Displaying items by tag: Landscape
Colorado's Best Landscape Photographers
We've updated this list as of 9/5/2014 to include new ratings and photographers. Updated 1/16/16 to remove non-Colorado photographers. Updated 9/20/17. Updated again 4/6/21. Updated and revised by new author on 12/30/22.
Colorado is an amazing place for photography.
The variety of scenes available to shoot are quite diverse and one could spend a lifetime shooting photos here and still not get a full collection of shots. The State has a huge variety of photographic subjects including color, culture, mountain vistas, desert scenery, forests, 14ers, lakes, cities and National Parks.
Last month, we set out to try to identify what we felt were the best photographers from Colorado that also shoot photos of Colorado scenes. We posed the question on Google Plus and received quite a few responses. We went through all of the responses and narrowed down the options to the top 14 photographers and have listed them here in the order that we feel they belong.
We made our choices based on three sets of criteria:
- How likely would we be to purchase a print from this artist?
- Based on their featured photos, what is the subjective technical difficulty in obtaining those shots?
- How likely would we attempt to emulate the shots that they obtained?
Here are the photographers and links to their website, in order:
1. Matt Payne
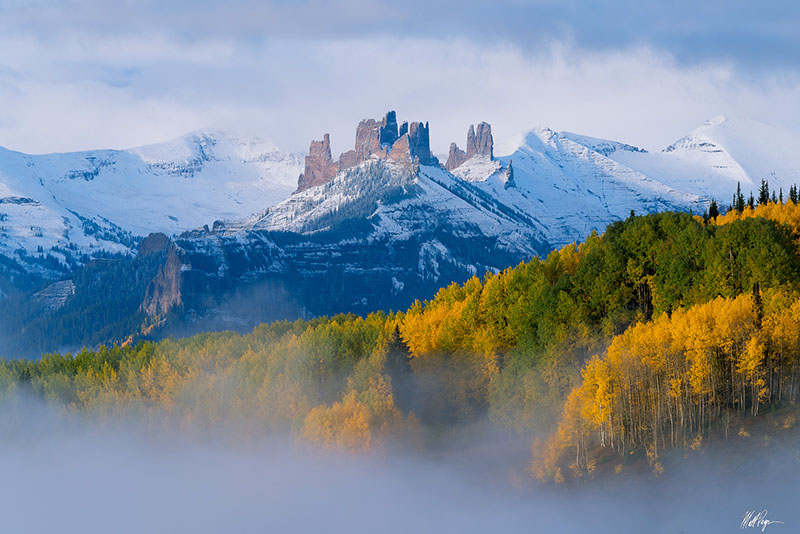
Foggy Fortress by Matt Payne.
Matt Payne has been an avid Colorado nature and landscape photographer since 2010. In 2012, he completed his goal of climbing all 53 mountains over 14,000 ft. in Colorado (known as the 14ers) and in 2018, he completed his goal of climbing the highest 100 mountains in Colorado (known as the Centennials). In 2022, he co-authored Climbing Colorado's San Juans, a climbing guidebook published by Colorado Mountain Press. Matt's work has improved significantly over the years and his dedication to photographing some of the most remote locations in Colorado is quite impressive.
2. Kane Englebert
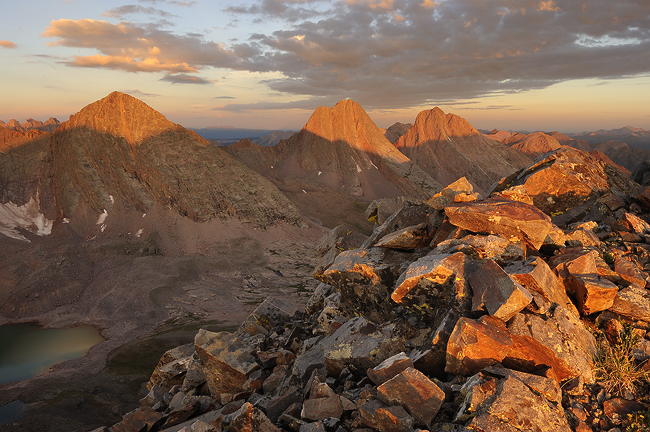
Vestal Peak Sunrise by Kane Englebert.
Since 2008, when we began seriously taking photos while climbing Colorado's mountains, we envied and admired the work of Kane Englebert. His style, vision, and subject matter were all things we found quite incredible. Ever since, we have always strived to try to vision our own work after his. Kane sets the bar quite high for quality, realism, scenes, subjects and composition. He also happens to be a really friendly guy, willing to take time to give new photographers tips and compliments, as evidenced by his comments on a 14ers.com trip report of ours from long ago. Kane is just an all-around great landscape photographer and thus earns the number 2 spot on our list of the best landscape photographers of Colorado.
3. Jack Brauer
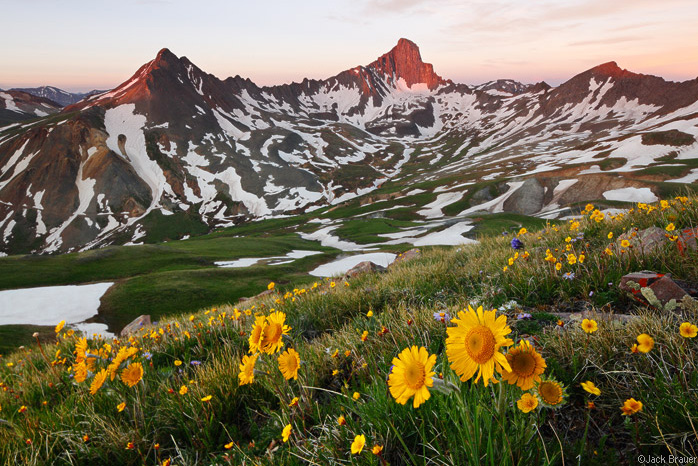
Wetterhorn Peak Wildflowers by Jack Brauer.
Jack Brauer's photos embody our own personal style of photography, which is - get up early, find an awesome mountain, climb it, and let the magic happen. The quality of photos that Jack takes are quite difficult to match in terms of composition, light and difficulty in achieving. For example, Jack has a photo on his site of Capitol Peak at sunrise. Just getting there by sunrise is a feat of its own. We think you'll agree that his photos are quite impressive. You can also check out Jack's blog, which is pretty incredible as well.
4. Jennifer Renwick
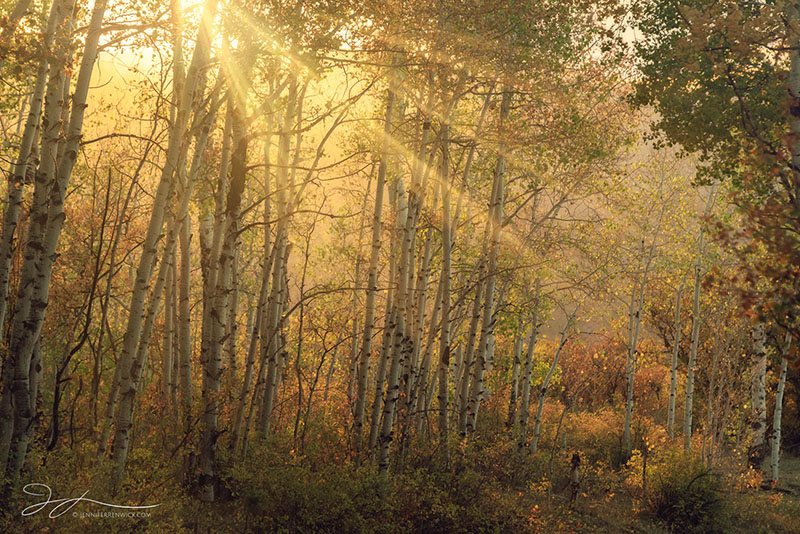
A Walk Through Autumn by Jennifer Renwick.
Jennifer Renwick is a Colorado landscape photographer who lives part-time in Denver, Colorado and travels the country in an RV with her partner David Kingham. Her landscape photography from Death Valley is especially incredible; however, she has some fantastic images from Colorado as well that will surely impress you.
5. Sarah Marino
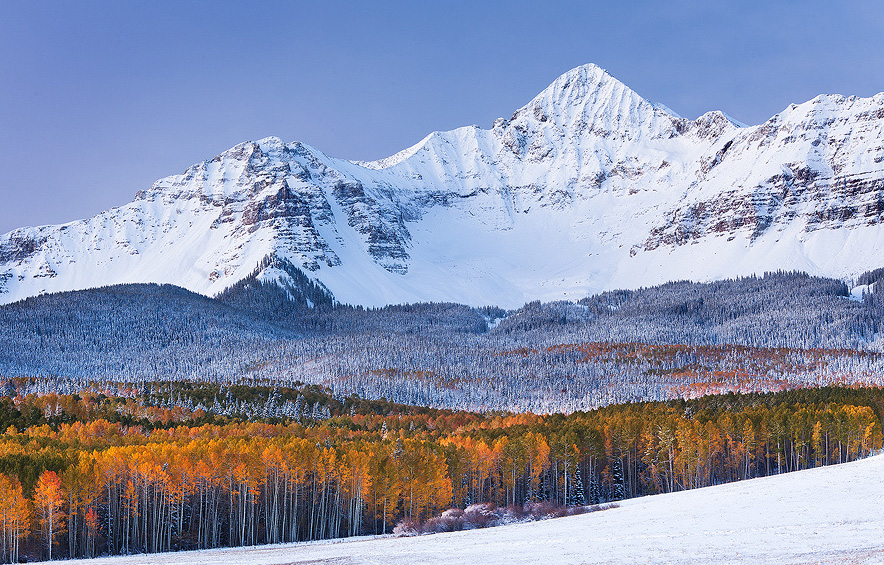
Wilson Peak - by Sarah Marino.
Sarah Marino is a very impressive artist specializing in the Colorado West. Her work is quite astounding. It is clear through the expression of her work that she has a real connection to the natural world and has an immense amount of creative vision and talent. Indeed, her work is marvelous and we envy her ability to capture some of Colorado's more incredible areas. Especially impressive though, is Sarah's work in the desert of the West. Check out her site and be ready to stay awhile!
6. Ron Coscorossa
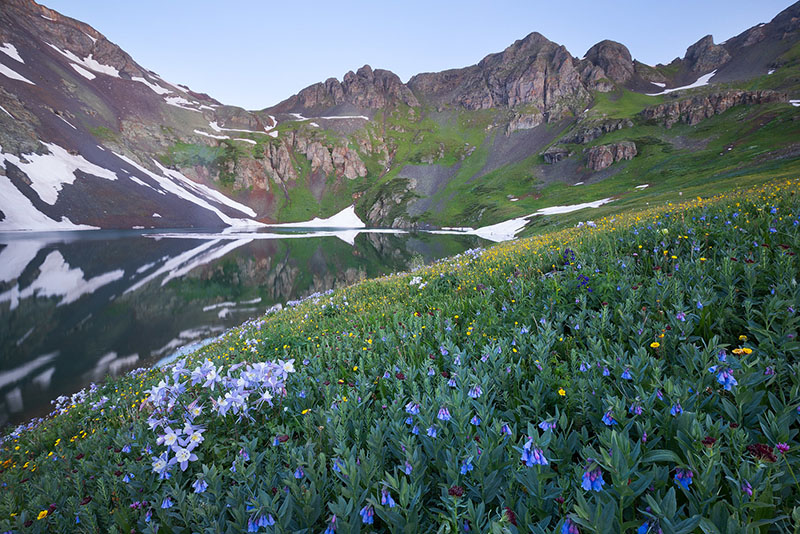
Purple Dawn - a classic Colorado mountain and wildflower scene from Ron Coscorossa.
Ron Coscorossa is the partner of Sarah Marino. They live in Ridgway, Colorado and specialize in small scenes in nature. We have always appreciated Ron's subtle processing style and his incredible use of patterns and shapes to create incredible landscape photographs.
7. Todd Caudle
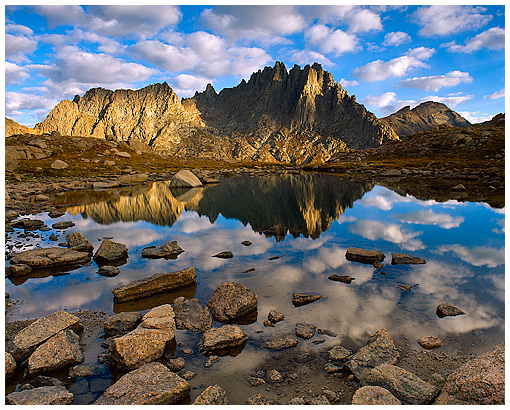
Jagged Mountain Reflection - by Todd Caudle.
Todd Caudle is best known for his work on the annual Colorado Mountain Club calendar. His work is quite excellent and worth checking out. He often takes very unique shots of Colorado's 14ers, and I greatly appreciate that. Getting to some of the spots he takes shots from requires quite a bit of effort, and the reward is obvious in his work.
8. Erik Stensland
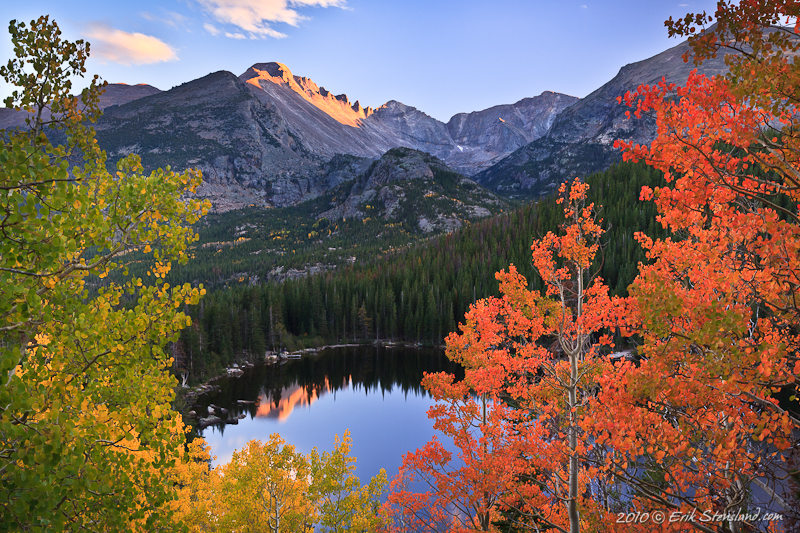
Bear Finally - by Erik Stensland.
Erik's gallery is focused on Rocky Mountain National Park, which I think is a superb idea. The park is full of amazing features and locations, so what a great place to get a full gallery of! Erik's shots should be greatly appreciated by photographers and collector's alike. The locations he is shooting from and the conditions he strives to photograph are rare in nature. Additionally, Erik blends the intelligent use of fancy equipment (filters) with the natural beauty of the Park, and that is a really refreshing thing to see.
9. Glenn Randall
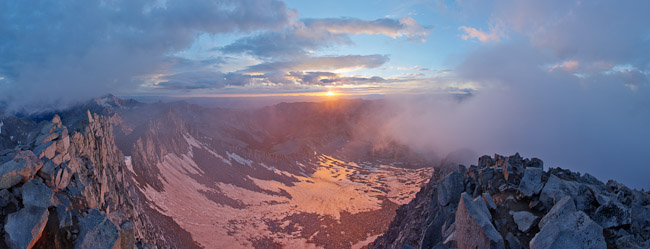
Sunrise from the Summit of Snowmass Mountain - by Glenn Randall.
Glenn Randall is a well-known landscape photographer based out of Boulder, Colorado. The first time we checked out his work on his website, we knew we found a real gem of a site. Glenn has a whole section dedicated to getting photos from the top of 14ers at sunrise. This is one of our personal passions as well, and we know from personal experience that it is no small feat to execute these shots the way in which Glenn has. You should really check out his work, it is quite splendid indeed!
10. Brent Doerzman
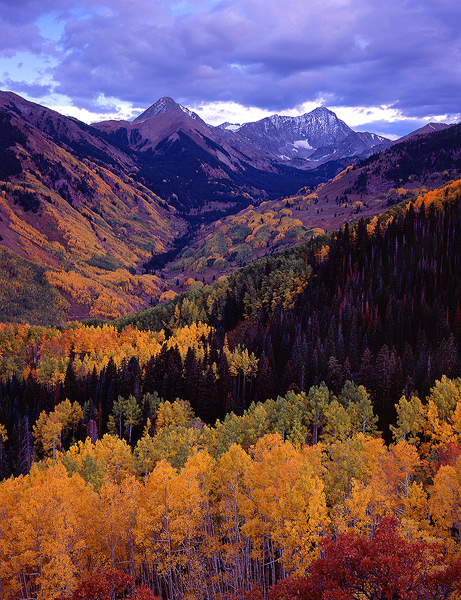
Capitol Peak - by Brent Doerzman.
At first we could not find much information on the web about Brent Doerzman; however, when it was recommended to us that we should check out his work, we were immediately impressed by the large collection of autumn photos taken from various locations across Colorado. Brent clearly has a gift for finding wonderfully scenic locations and capturing the best images possible from amazing viewpoints. Brent's website is laid out much like a collection of trips, and each trip we've gone to view seems like it has several great shots in it. Notably, most of his work was created on 4x5 film! Check out his work, you won't be disappointed.
11. Scott Bacon
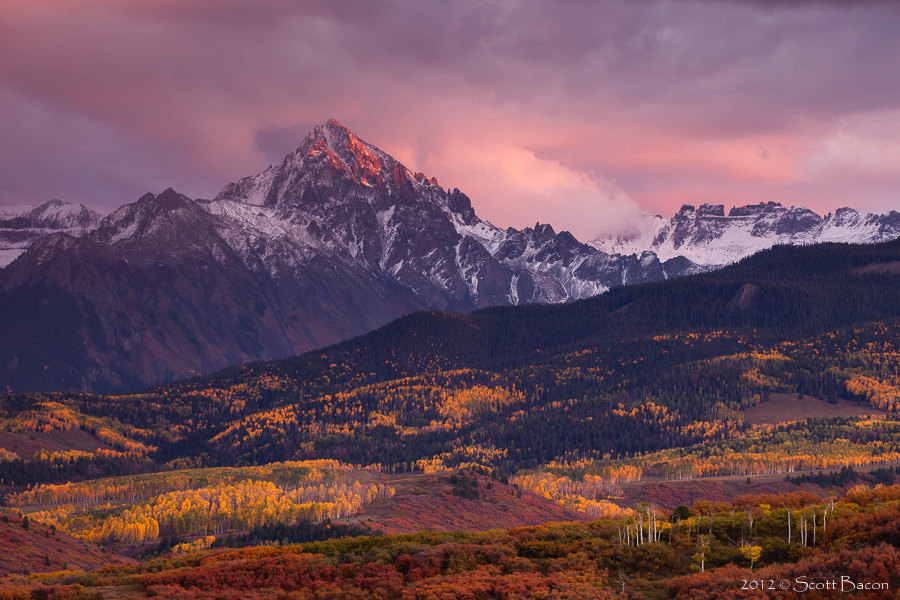
Mount Sneffels Wilderness - by Scott Bacon.
Scott Bacon is actually a full-time software engineer; however, his photographs of Colorado are quite stunning and worth checking out. Scott's techniques are very classic and his execution is nearly flawless. He visits and shoots locations that are vintage Colorado and is able to capture moments at those locations that are breathtaking. Take a look at his gallery and you will also be impressed by his work.
12. Mike Berenson
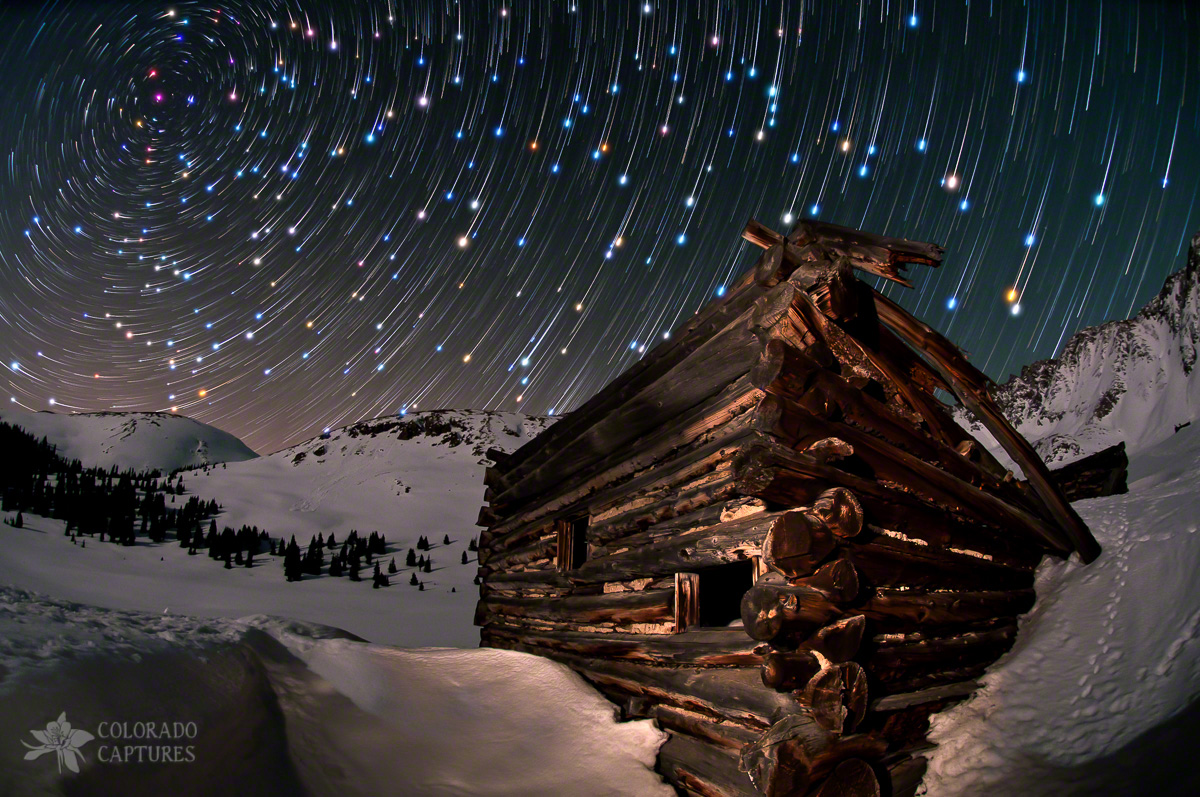
Wonders Of The Night by Mike Berenson.
It is no secret that one of our obsessions is night photography - and there are few better at Colorado night photography than Mike Berenson. We had the pleasure to meet Mike when both of us had work showing in the Denver Photo Art Gallery. Mike is not only a class act but also one of the most generous and forthcoming guys when it comes to photography knowledge. If you have the opportunity to take one of his night photography workshops, don't hesitate! His work and knowledge is nearly unparalleled. Mike's night photography shooting and post-processing techniques are constantly pushing the boundaries and the results are proof that he takes a great deal of pride in his work.
13. Grant Collier

Milky Way over Pawnee Buttes - by Grant Collier.
We are a huge fan of Grant's work, especially his night-time shots, including the above panoramic image of the Milky Way. Taking such photographs requires timely execution and a great deal of forethought to pull of the shot. Grant resides in Lakewood, Colorado and his work has been featured on CNN.com, NBC, CBS, WB2, UPN, The Special Reserve Collection, America's Scenic Drives, the Mammoth Book series, the Cube Book series, the Denver Post, and the cover of the Rocky Mountain News.
14. Nate Zeman
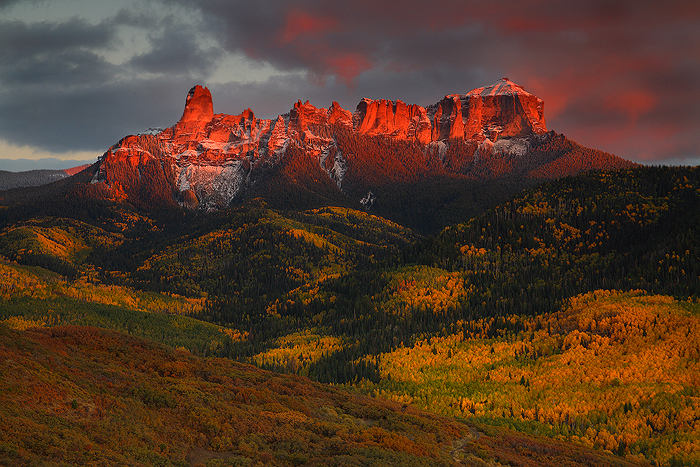
Glow - Chimney Rock by Nate Zeman.
We had personally never heard of Nate Zeman before inquiring on Google Plus about Colorado Photographers. When he was recommended, we went to his site and was quite impressed by the high quality of photography that we found there. Nate's work reminds me a lot of Kane Englebert's and I was most intrigued by his fall photo collection. Nate's work is quite outstanding. The scenes he captures are from vantages that most people will never see, which is why we picked him for this list.
That concludes our listing of the best landscape photographers of Colorado.
Panoramic Landscape Tutorial
A lot of people have been asking me how I do my panoramic landscapes, so I thought I would write up a guide on how to do them. Since I would love to see your results, feel free to share them with me and I will let you know what I think. Anyone can publish content on 100summits.com, so feel free to have at it! Without further ado, here's the tutorial:
The first thing you'll need to do is find a good subject to photograph. My personal favorite scenes are landscapes in the mountains; however, you could use this technique for all kinds of applications like in your house, architecture, real estate, city-scapes, etc. There are very few "rules of thumb" for shooting panoramics; however, the best thing to do is to develop a work-flow and be consistent with it. Ideally, you'll want a tripod and a good camera that allows you to change a ton of settings. My current camera is a Nikon D7000; however, most of my current (as of March 2011) panoramics were done using an older Sony DSC-828. Let's talk about the camera settings you'll want to change.
- Set focus to manual and infinity. You'll want as much depth of field as possible, with the lens focused on everything in the scene.
- Set mode to either aperture (A) or manual (M) mode. Aperture mode allows you to control the aperture of the lens (how much light is let in) and the camera automatically adjusts the shutter speed. Manual mode allows you to control both shutter speed and aperture. I prefer to shoot in manual mode. If you use aperture mode, it is generally best to use a lower f-stop (higher number) in order to make sure your depth of field correctly focuses on the whole scene. This will force you to have a longer shutter speed, and necessitate a tripod or a very steady hand. Note, almost all of my summit panoramic photos are taken without a tripod! Practice makes perfect.
- Set ISO to 100 if possible. The lower the ISO, the less noise will be present in your images. Lower light will force you to use a higher ISO unless you can shoot long-exposures on a tripod. Take a few practice shots and preview them to see how the image is exposed. This will indicate your need to adjust ISO and / or shutter speed / aperture. Play with the settings until you have a desireable photo.
- Set your exposure readings on the brightest subject in the scene so that you don't blow out highlights.
- Set metering to matrix / pattern.
- DO NOT set white balance to "auto." The same goes for ISO. If you use auto white balance or ISO, each frame you take of your scene will look different, making it impossible to align the images for stitching in post-processing. I like to use cloudy white balance for landscapes. It tends to bring out more color in the photo.
- Do not use a filter. Filters will also alter the way you will be able to stitch photos in post-processing.
OK so you have your camera dialed-in and ready to rock. You have your pristine scene and you are itching to get a panoramic. In order to get enough image data for the post-processing steps, you'll want to try to get at least 1/3 overlap on each photo. For example, if you shoot a photo and then move to the next photo slightly to the right, you'll want that second photo to overlap with the first by at least 33%. Also remember that there will be distortion from shooting this many photos, so you will want to compensate by taking extra photos of the top and bottom parts of the scene. You'll see what I mean later on.
Q: Should I shoot left-to-right or right-to-left?
A: It does not matter! Just be consistent. A good tip is to take all of your photos and then shoot one with your hand over the lens or with the lens cap on so that you know where the pano series ends on the memory card.
For some advanced shooting techniques, you can zoom into a scene and do panoramics that way. Just know that you'll need to be extra careful to get sufficient overlap and that the work in post-processing will take much longer. The reward is that you get a lot more detail in the photo. An even more advanced technique that involves this is called "gigapan."
OK so you have your photos and they are on your computer ready for processing, now what!?
Step 1: load the photos into your favorite panoramic software. Fortunately for you, there are some free versions out there. This tutorial will show you how use both Autopano Pro by Kolor, and Windows Photo Gallery Live by Microsoft.
I will start with Autopano Pro:
Open Autopano Pro and you'll see this screen:
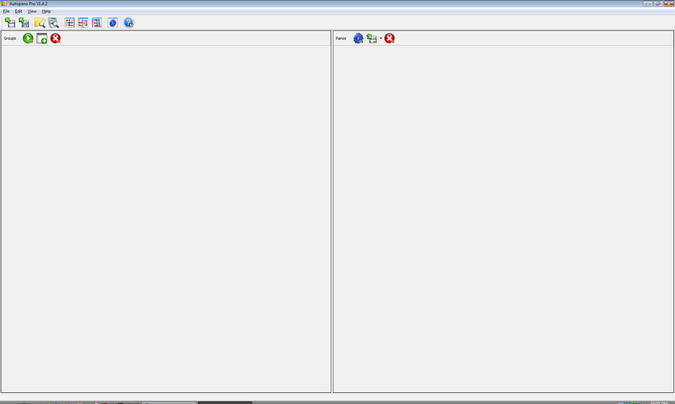
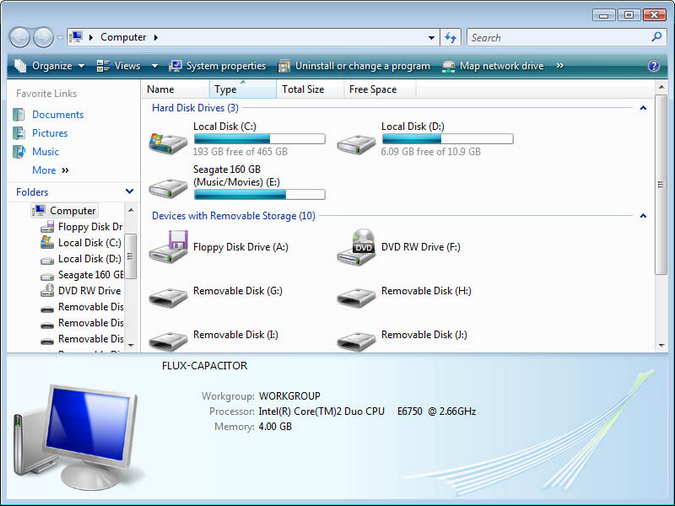
For this tutorial, I am going to use a pano I made last year from Vestal Peak, taken from Vestal Lake. It is one of my favorite photos from last year. Using My Computer, find the folder where your photos are located. Holding down the control key, select each photo from the pano and drag-and-drop them all into Autopano Pro. Alternatively, you can drop a whole folder into Autopano Pro and it will try to figure out which panos can be made from those files, which is a pretty cool feature; however, sometimes it does not do this correctly, so your mileage may vary.
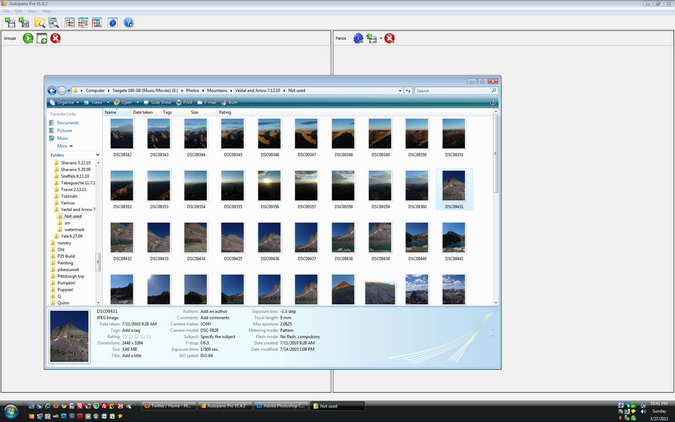
Once you drop your photos into Autopano Pro, you will see them in the left hand side. The next step is to hit the green play button which forces the program to detect possible panos from the photos you selected.
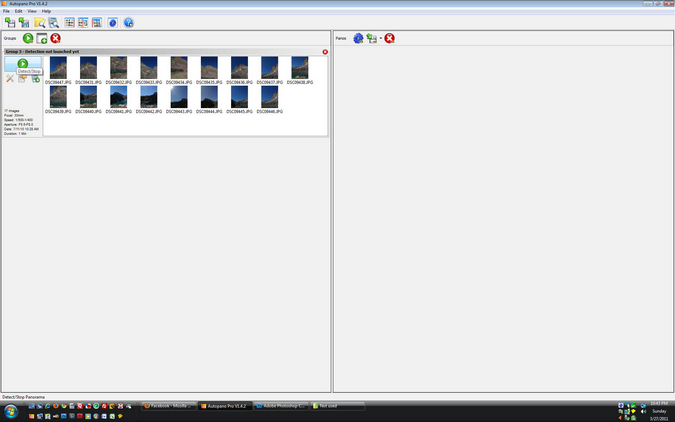
Once you click the button, it will begin the recognition process, seen below:
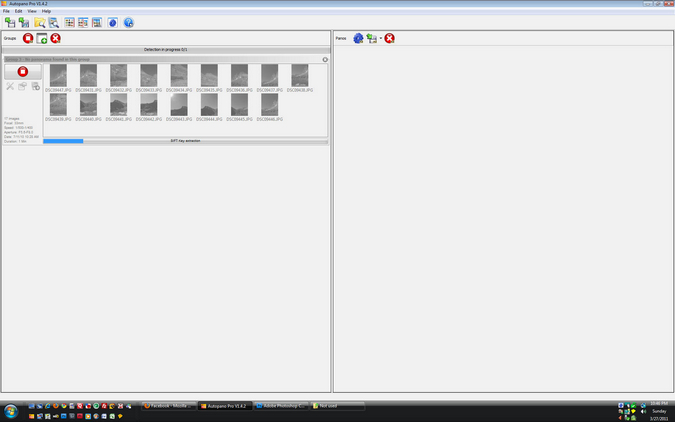
It will then paint a preview of the pano that will result in the stitching of the photos you selected, seen on the right hand side of the screen.
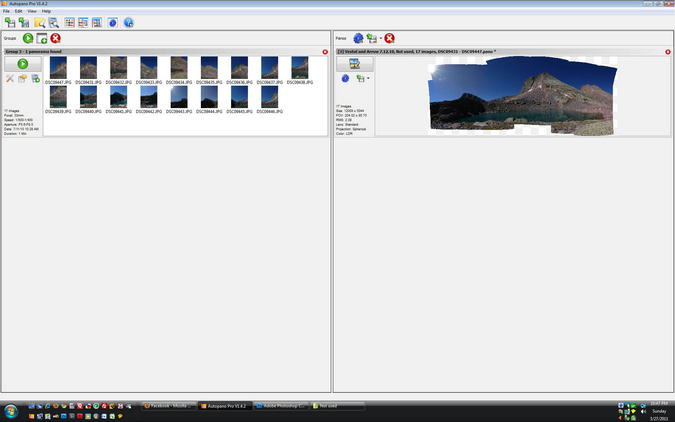
If everything looks good, hit the render button, which is the blue gear button. Hitting that button brings up a dialog box asking you how you want the file processed, where to save it, what to name it, etc. I prefer to stitch my panos into .TIFF files with no compression, especially if I am going to be post-processing HDR's etc. However, .jpgs are usually just fine. The settings I like to use are seen below:
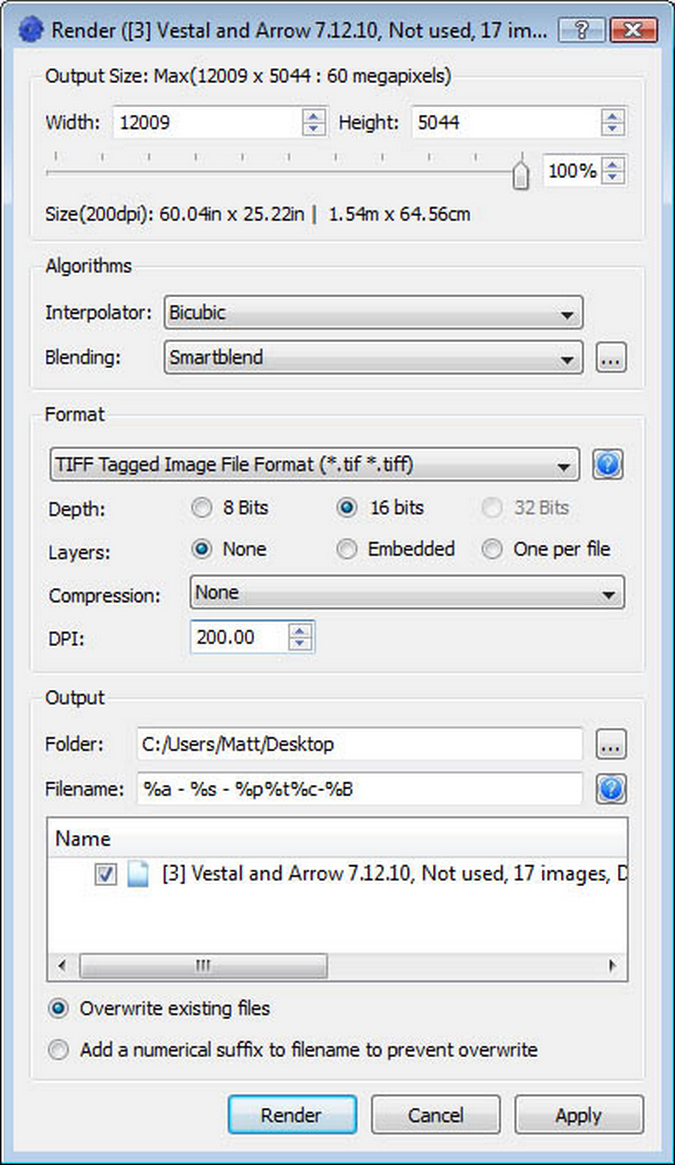
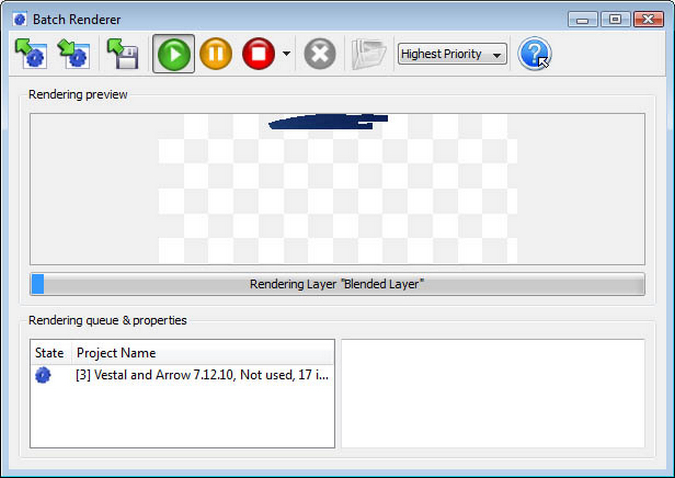
The next step is to hit render and the software does its thing. It begins by blending all of the images together into one giant photo. This process takes longer if you have a ton of photos to combine.
The process completes and you can open the file up in your favorite image editing program or the default program (Windows Photo Gallery Live seen below). You can see how there is some blank areas as well as a little bit of distortion, both of which can be fixed in post-processing. You can see the gaps in the middle bottom, where I could have benefited from taking one more photo to cover that area. Oh well! My mistake is now for your benefit!
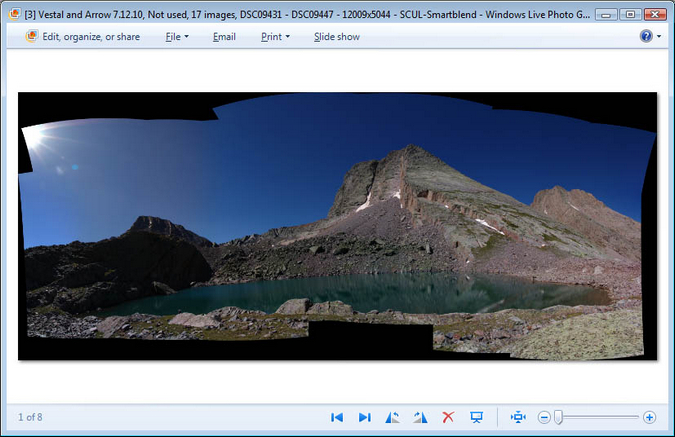
Go ahead and crop the image to your liking. I like to use Capture NX2 or Windows Photo Gallery Live to crop because they have the ability to show you an overlay of a rule of thirds grid. If you don't know what the rule of thirds is, read this article.
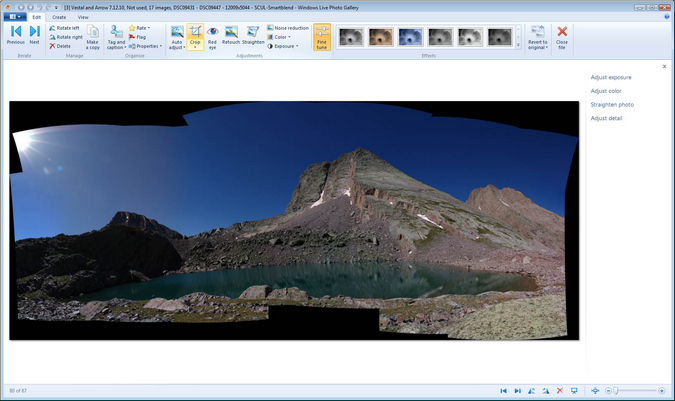
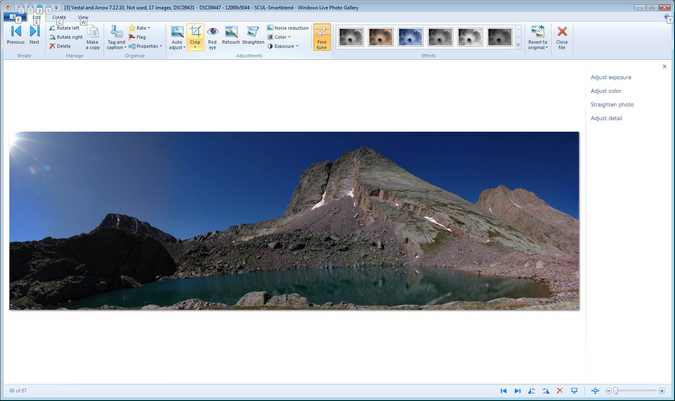
Most of the time, I like to crop as little as possible to retail all of the images. You can see the final result below. After cropping, feel free to do other post-processing work on the image before publishing it for others to view.
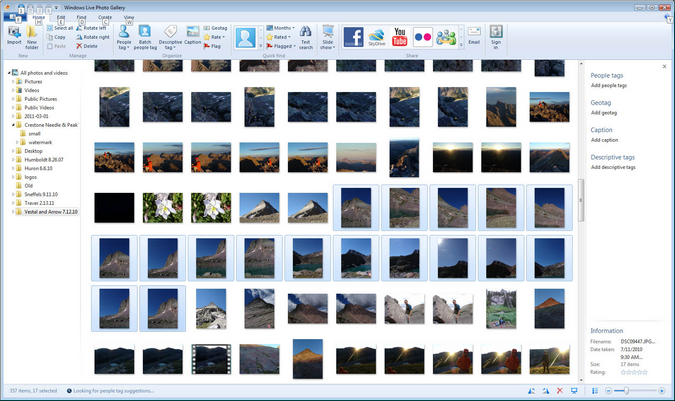
Now, let's see how to repeat this process in the free software, Windows Photo Gallery Live. Below you will see the images from the Vestal folder in Windows Photo Gallery Live. Holding down the Control key, select all of the photos needed for the pano. They will be highlighted.
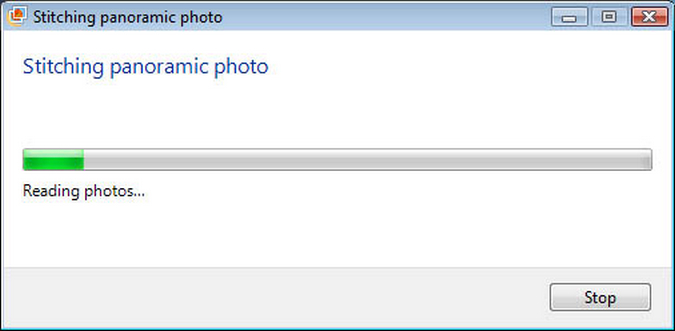
Next, go to the menu and click on create. You will see the panorama option. Select it. You will see a "stitching panoramic photo" dialog box pop-up. Once it is finished, your stitched photo will be ready for further editing such as cropping.
After it completes the stitching, it asks you to rename the file.

The rest of the steps are identical to the final steps in Autopano Pro. Simply crop and edit as needed.
That concludes this tutorial on how to create panoramic photos. I'd love for you to share your results. Feel free to quickly register on the site and begin uploading your own photos today! If you'd like to be featured as an artist on 100summits.com, feel free to contact me!
I would love you to stay up-to-date on the latest trip reports, photography tutorials and other new material. Follow me on Facebook and Twitter!
