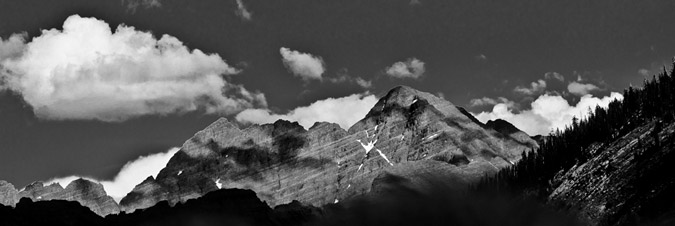
Displaying items by tag: Panoramic
Maroon Peak and Pyramid Peak - finishing a goal 27 years in the making
Two amazing summits; 11,060 ft. elevation gain, 21.5 miles... and a whole lotta' fun.
Introduction
Last year, I had plans to complete my long quest to climb all of Colorado’s 14ers. I had the calendar all lined up, trips planned, gear ready and my legs were in great shape. If all went to plan, I was to finish on Windom Peak after a long summer of knocking out some of Colorado’s toughest peaks. Unfortunately, as is so common in this sport of mountaineering and peak-bagging, those plans were interrupted. An unsuccessful attempt on Snowmass Mountain in June left me with one less weekend available. A complete re-arrangement of the calendar ensued and for the third straight year, my plans of climbing Maroon Peak and Pyramid Peak were delayed. However, this worked out to my advantage – as I had always dreamed of completing the 14ers on Maroon Peak and then on Pyramid Peak, which purportedly is one of the most difficult mountains as well as one of the most rewarding summits. Finally, my time had come to complete this incredible journey that started when I was six-years-old – the completion of the 14ers. Lots of hard work over the past 3 years have culminated in this moment.
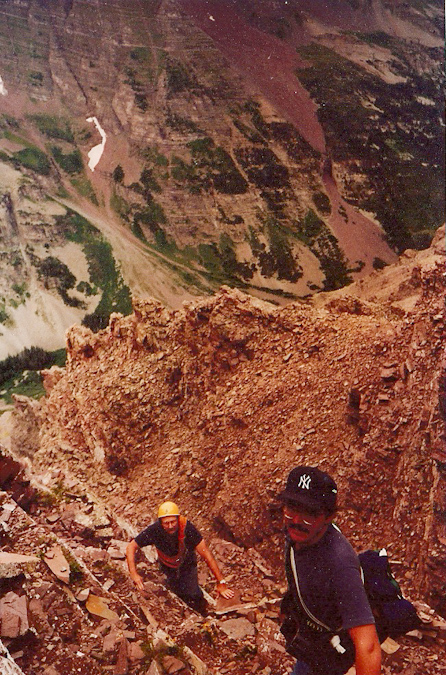
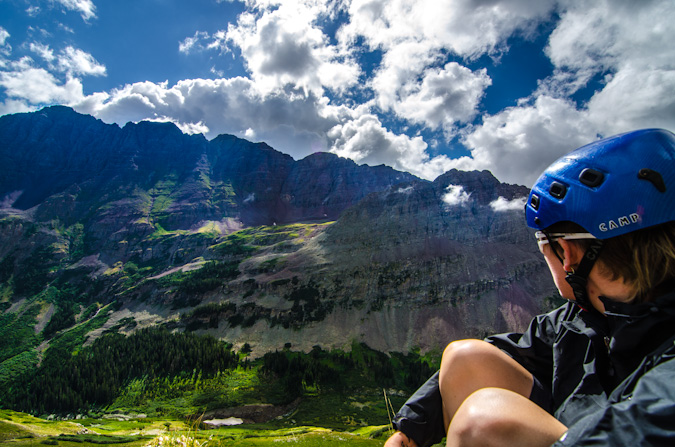
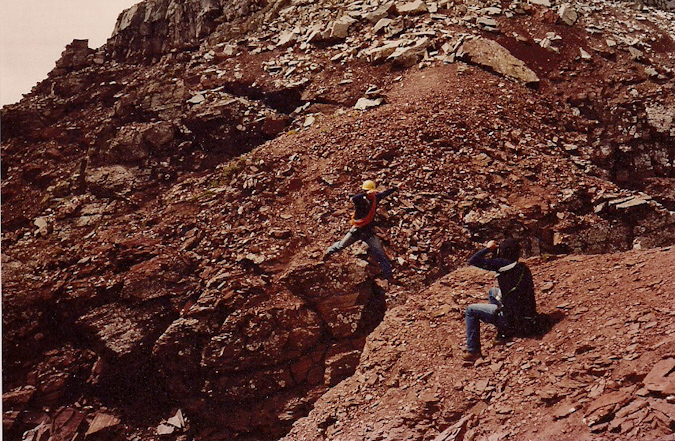
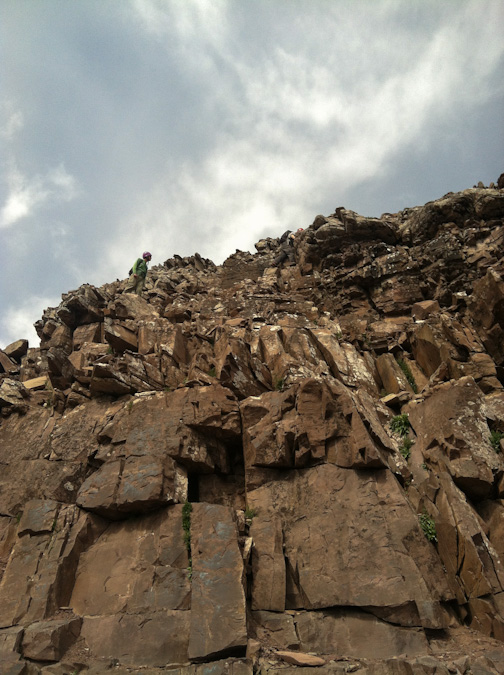
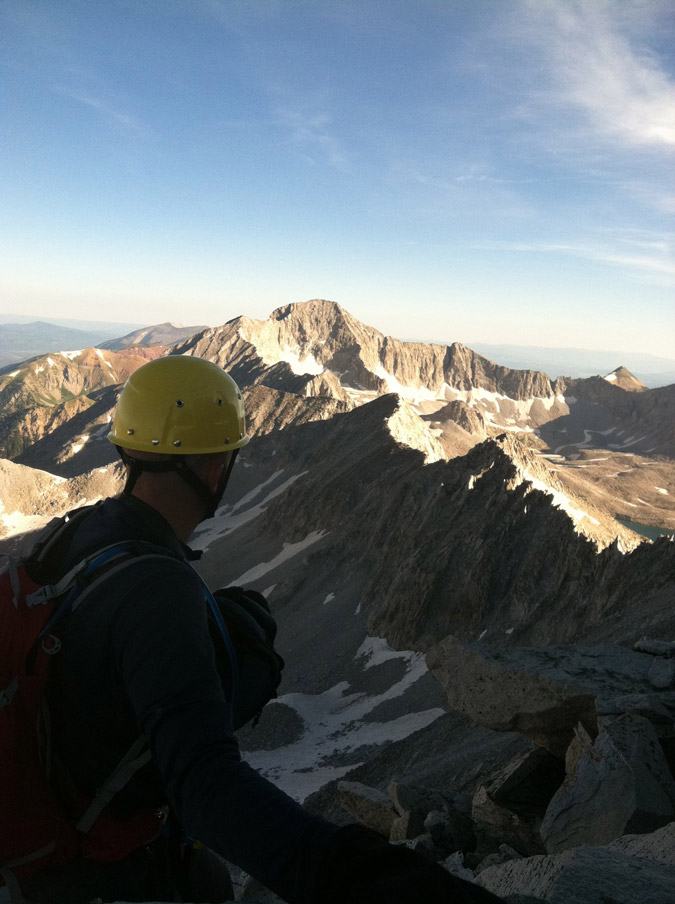
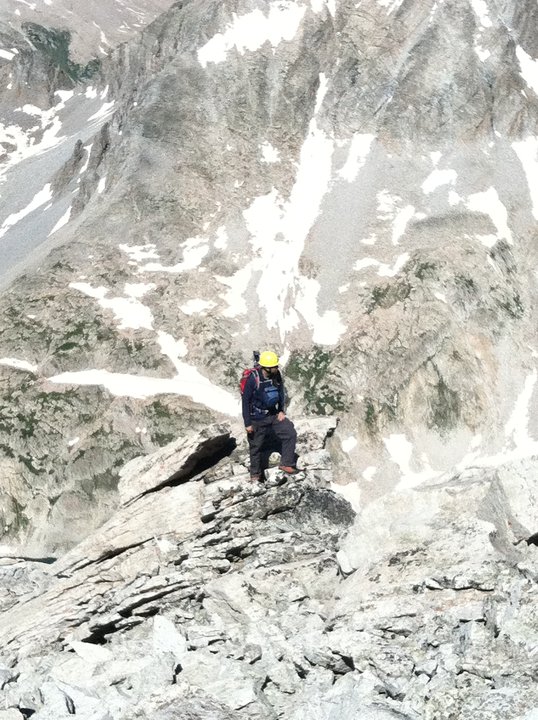
Ever since I was a child, I recall being mesmerized by the Maroon Bells, for both their scenic wonder and beauty and their dangerous mystique. My dad, Ray Payne, climbed the Bells back in August 1987 and returned home regaling his conquest with stories of incredible mountaineering feats (it must have sounded insane to my then 9-year-old ears) and near-death encounters with “The Deadly Bells.” Here's an old-school shot of my dad (yellow helmet) asending Pyramid Peak, rope in tow.
Per Wikipedia (and per my own witness of the sign), the term “Deadly Bells” refers to a U.S. Forest Service sign on the Maroon Lake access trail which calls the mountains "The Deadly Bells" and warns would-be climbers of "downsloping, loose, rotten and unstable" rock that "kills without warning". Sounds like my kind of mountain! Unlike other mountains in Colorado, the Maroon Bells are composed of metamorphic sedimentary mudstone that has hardened into rock over millions of years. This mudstone is weak and fractures readily, giving rise to dangerously loose rock along almost any route. This same mudstone is responsible for the Bells' famous and distinctive maroon color. The Bells got their "deadly" name in 1965 when eight people died in five separate accidents. Since then, many climbers have perished while attempting these dangerous peaks, including Spencer James Nelson in 2010.
In fact, just before leaving for this trip, I had learned that there was a missing hiker on the Maroon Bells. This news had cast a shadow on the trip and I had hoped he was found safely. The hiker was a New York City Paramedic named Lenny and had not reported to work. It later turned out that he took a fall and perished on North Maroon and was found the very same day we arrived.
Given the danger factor and overall awesome factor surrounding the fact that I was planning to complete the 14ers on these deadly mountains, I was quite nervous the week leading up to this trip. I think I had started packing four or five days before the trip, which is uncommon for even me and my neurotic trip planning. To make matters even worse, the trip had quite a few loose ends on the logistics side of things – originally I had planned to head-out Tuesday night with my climbing partner, Sarah, we’d climb some mountains, and then our other climbing partner, Ethan, would join us at Crater Lake on either Saturday or Sunday. Then a few wrenches got thrown into the mix – Sarah found out she had to work a cycling event on Sunday, and Ethan would be unable to join us on Friday. To make matters even more interesting, my Jeep Wrangler came up with some mechanical issues the day before we were supposed to leave. It was not looking good for team Payne. I called Sarah and we finally worked out all the details. Ethan would not be joining us after-all, and Sarah could drive. Crisis averted.
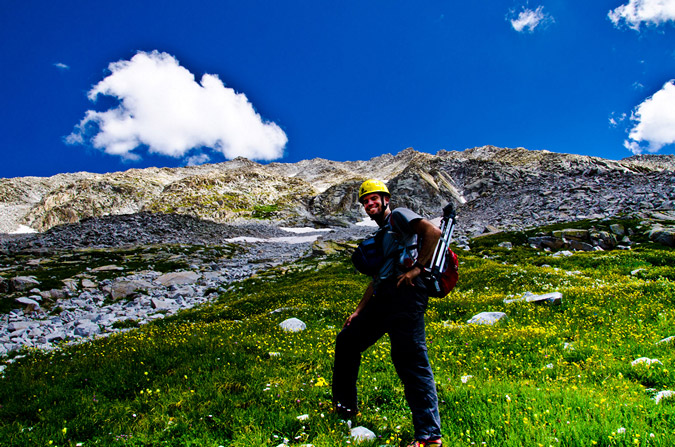
I decided to backpack using my Osprey Talon 44 instead of my regular backpacking pack – the huge and insane discontinued Dana Design Terraplane - a monstrous 95 Liter pack. Instead, I opted for the smaller 44 Liter pack so that I would force myself to take less gear and food and hopefully save some damage to my knees, which were still recovering from the massive 45 mile trip Sarah and I took last year to the Chicago Basin. To round things out, I opted to also purchase a knee brace, in hopes of preventing pain and further damage on this trip.
Choosing camera equipment for a trip such as this was a challenge, especially given the fact that I wanted to keep my over-all weight low without sacrificing my ability to take great photos. So, I opted to bring my Gitzo carbon-fiber tripod (which is quite solid and somewhat heavy despite being crafted out of carbon-fiber), Nikon D7000, a few filters, a shutter release cable (for long exposures), and two lenses – the Tokina 11-16 f/2.8 and the Nikkor 18-105 VR f/3.5-5.6. This would give me the ability to shoot very wide shots and some versatility with a zoom in the 18-105.
Day 1: The drive in
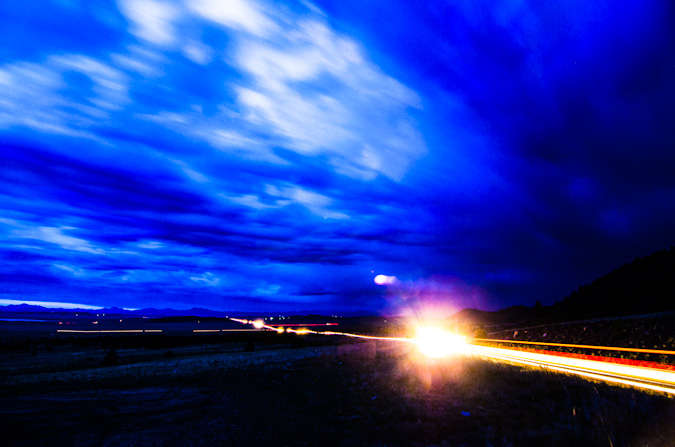
Loaded-up and ready to rock – Sarah picked me up from my house in Colorado Springs at 7 PM. We departed for our speedy adventure up Highway 24, which afforded us some pretty gruesome views of the damage caused by the Waldo Canyon Fire just the month prior. We stopped at the top of Wilkerson Pass to check-out the remnants of a thunderstorm there, hoping to capture some of that footage on film; however, all I was able to get was a long exposure of the cars driving through South Park below.
Thanks to some recon data provided by 14ers.com member Bill Wood, I knew our goal was to find the over-night parking lot just below the Maroon Lake trailhead. We found that lot at around midnight and prepared for what would become a very short 4-hour nap in the back of Sarah’s skinny pick-up truck.
Day 2: The backpack in to Crater Lake and an attempt on Maroon Peak
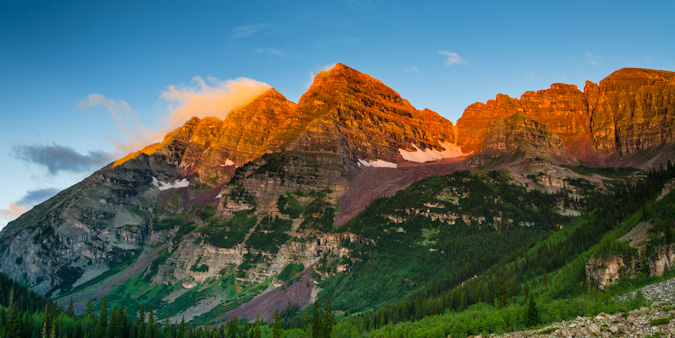
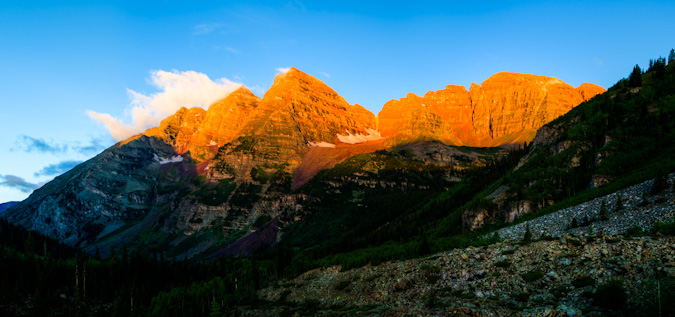
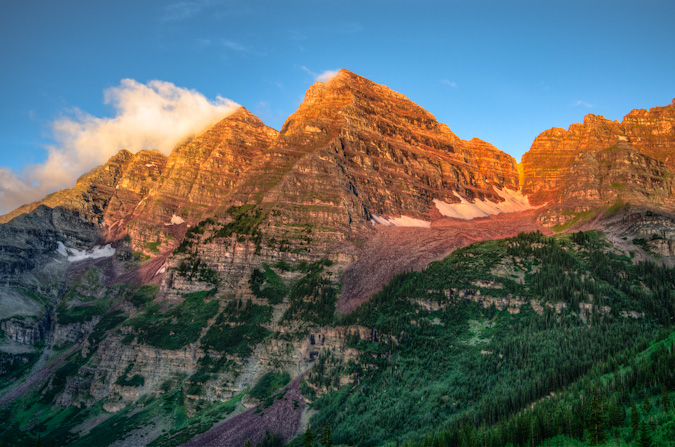
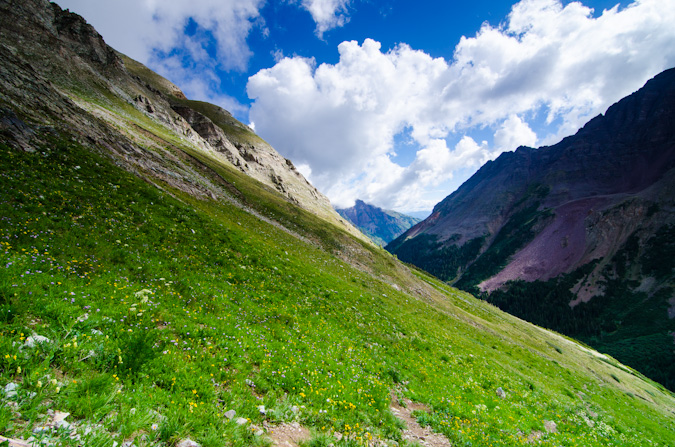
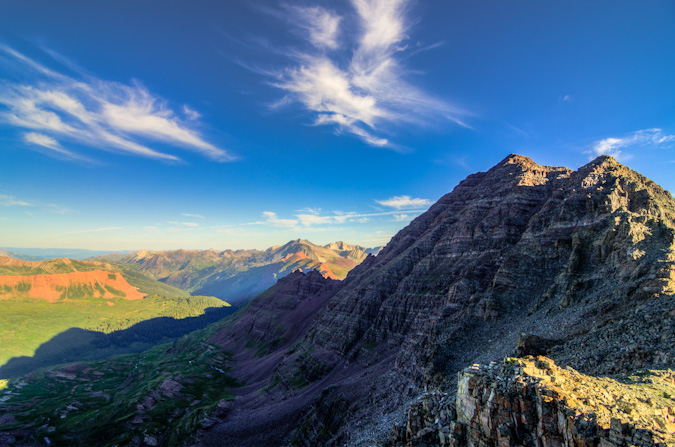
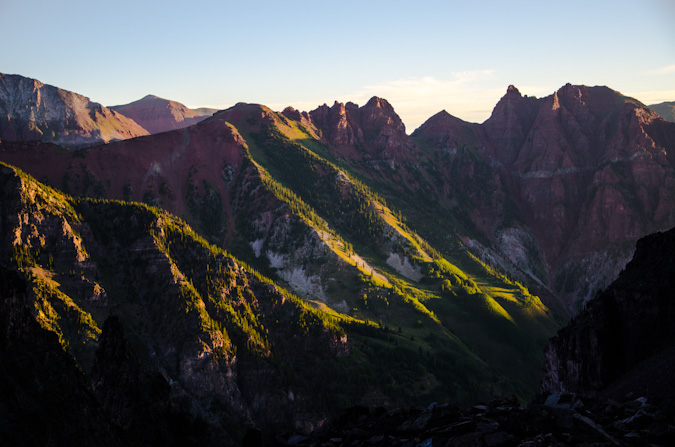
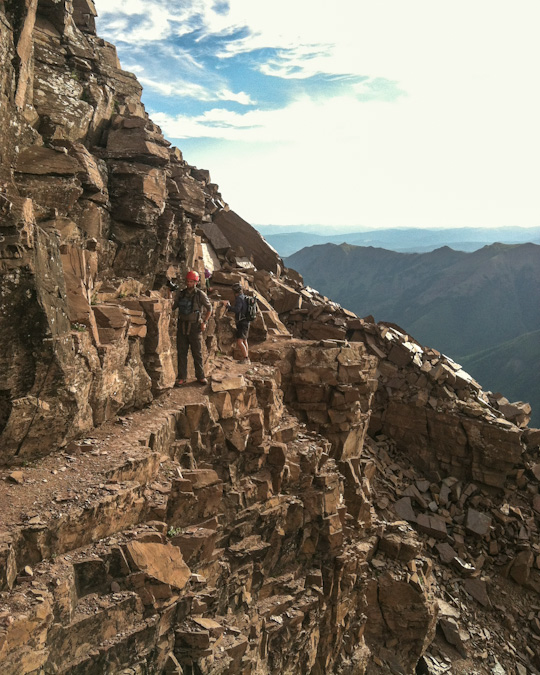
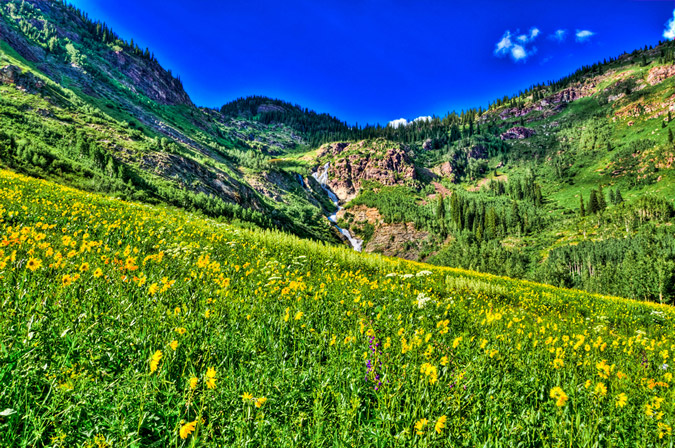
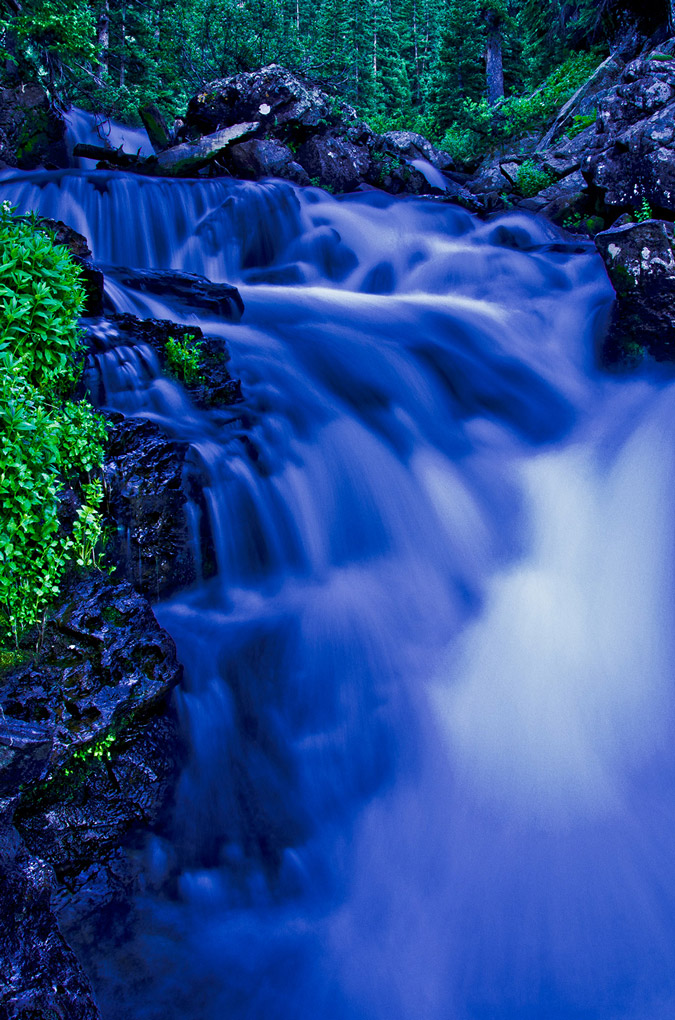
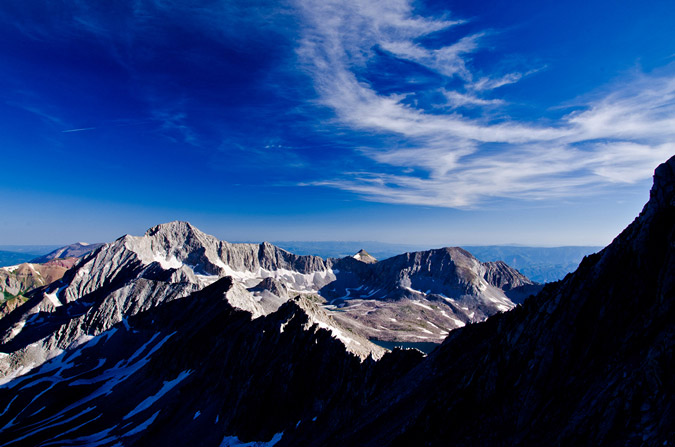
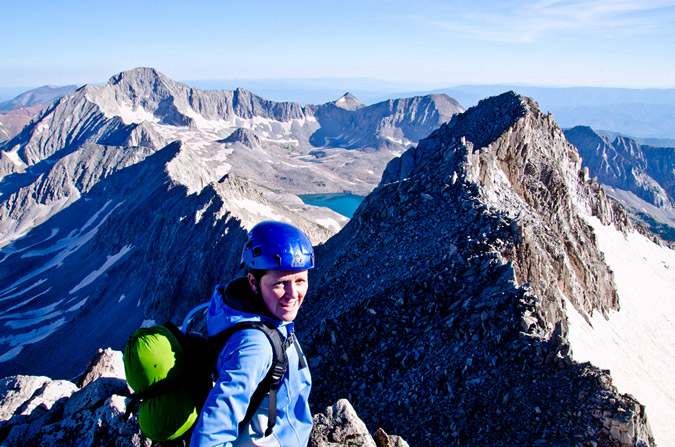
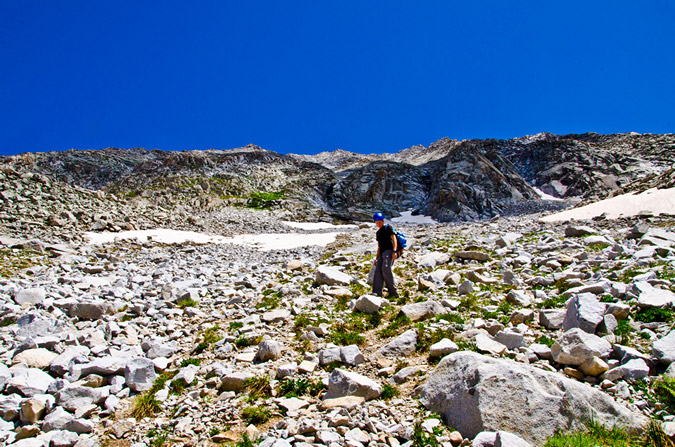
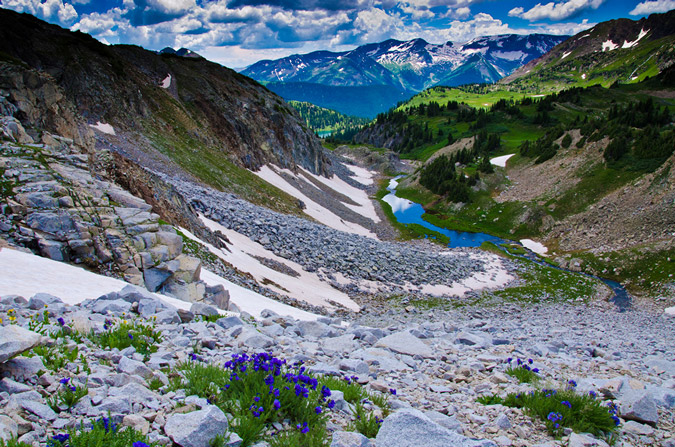
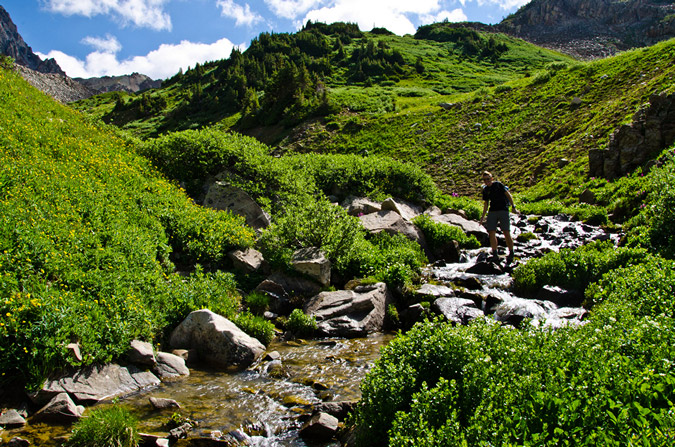
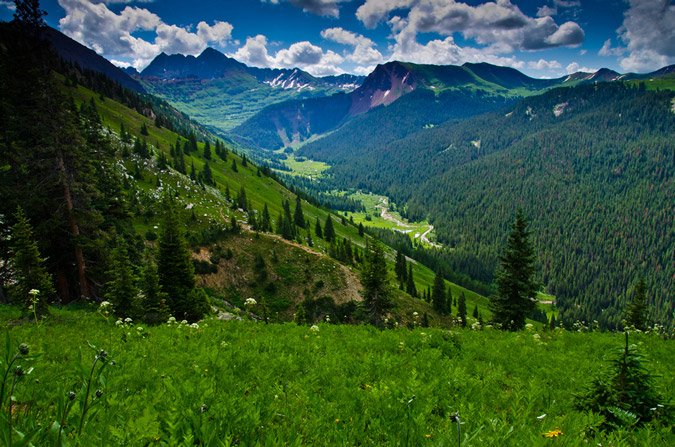
We were rudely awoken at around 3:45 AM by some guys next to us prepping for their hike, who were loud and even making jokes about how we were probably not too happy about how loud they were. Such is life at popular 14er trailheads, even on a Wednesday morning. We debated the night before about our intents and goals for this first day in the area, and decided to wake-up at a reasonable time (4:30 AM) to begin backpacking up into the basin to find a campsite, with the option to attempt Maroon Peak (weather dependent). We rose groggily from the truck and prepared our backpacks, which for me is always an interesting challenge with a large tripod attached. We began the hike in the dark and were passed quickly by a solo hiker looking to tackle Pyramid Peak by himself. Best of luck to that guy. The hike up towards Crater Lake was quite uneventful, and after a quick 1.5 miles, we stopped shortly before sunrise so I could quickly bushwhack up a hillside to photograph the Maroon Bells while the light was good. I did several versions at various focal lengths and lighting.
During this photo shoot, I made a nearly dire mistake when I switched lenses. I put my Tokina in my camera bag, which was attached to my chest. I forgot to zip it up, so when I leaned over, the lens rolled out onto the rocks. Fortunately, absolutely no damage was done. Close call!
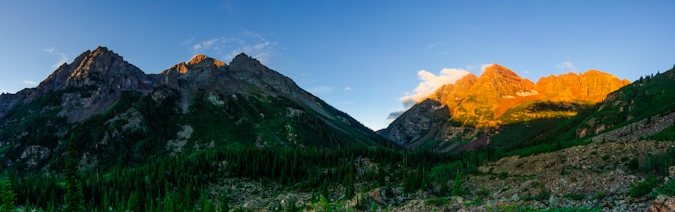
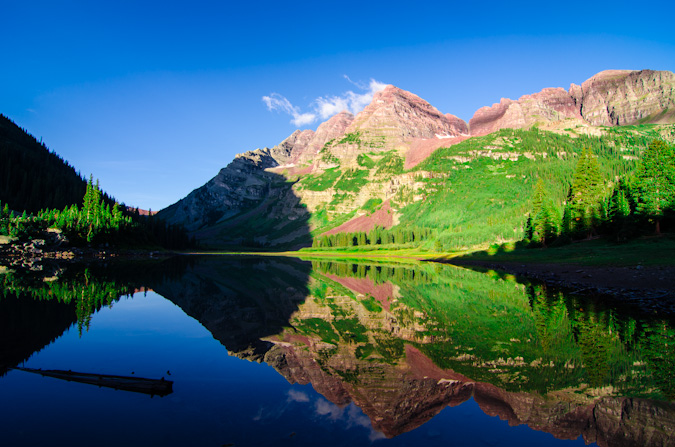
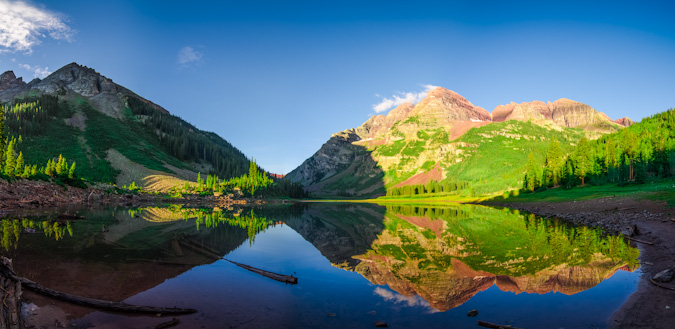
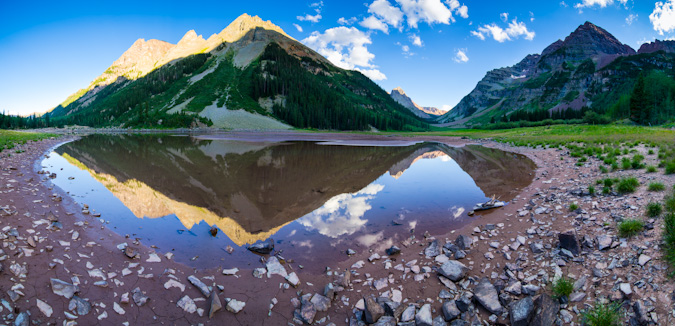
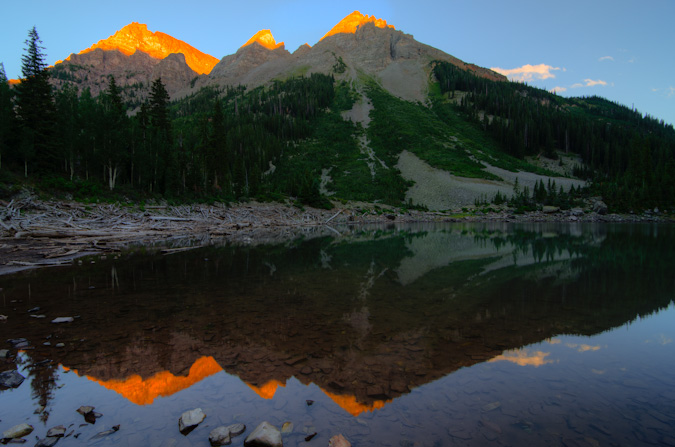
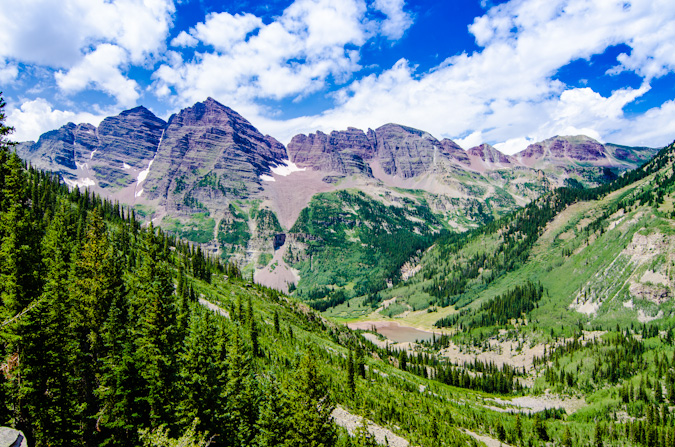
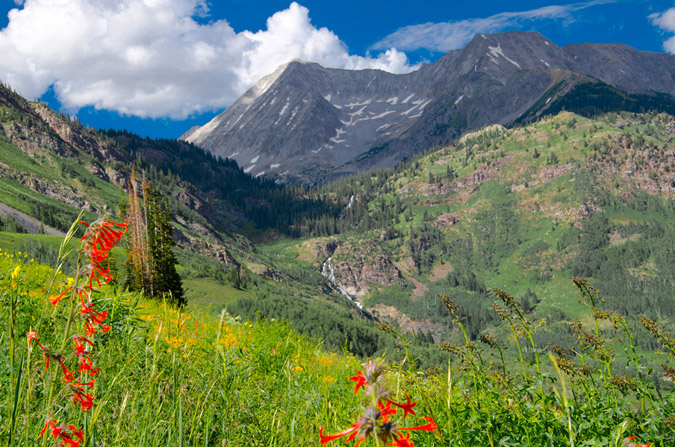
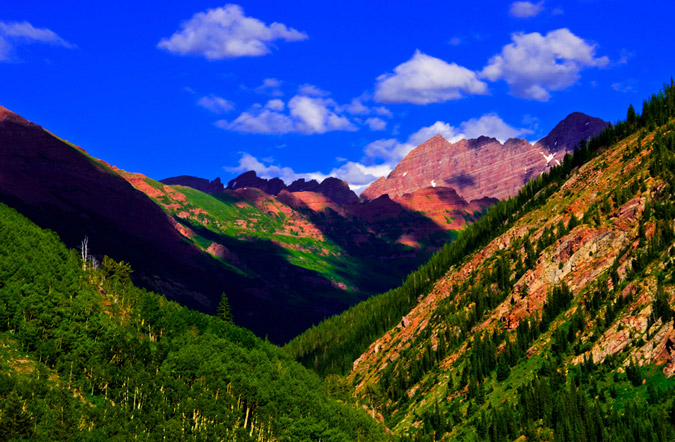
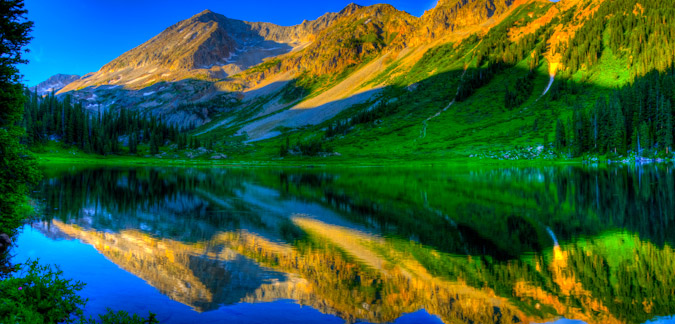
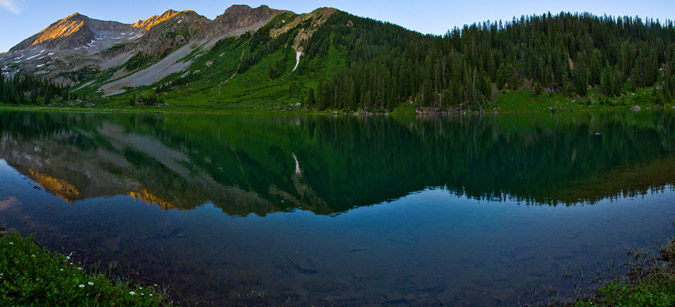
After shooting sunrise at the Maroon Bells, we made our way up the rest of the way to Crater Lake, where we would try to locate a campsite. Upon first arrival at the lake, the reflections of the Maroon Bells in the very still water and post-sunrise light were absolutely fantastic.
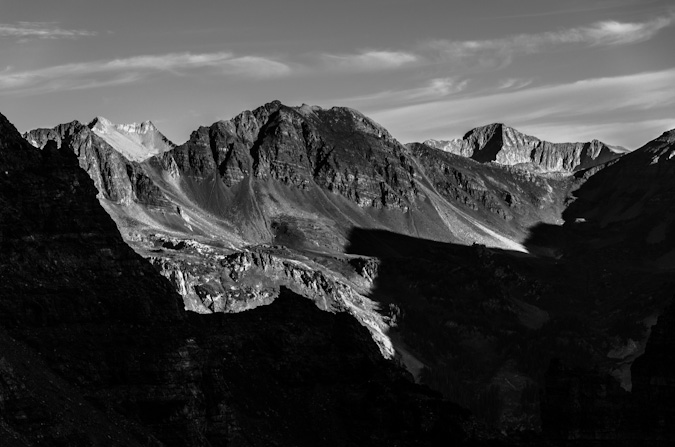
A wider view, including the Pyramid Peak massif:
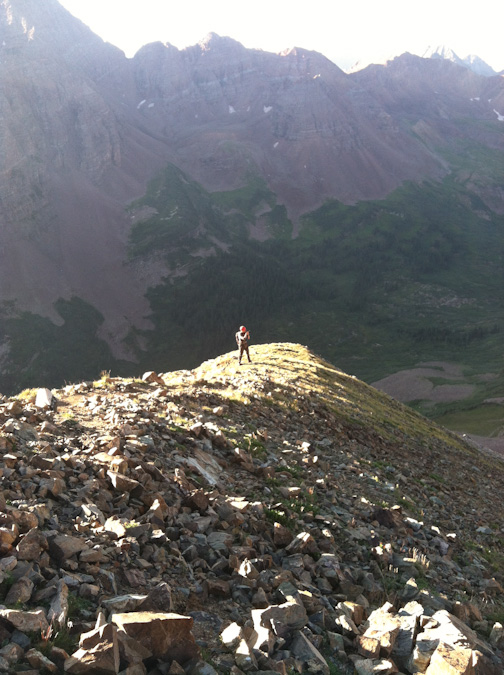
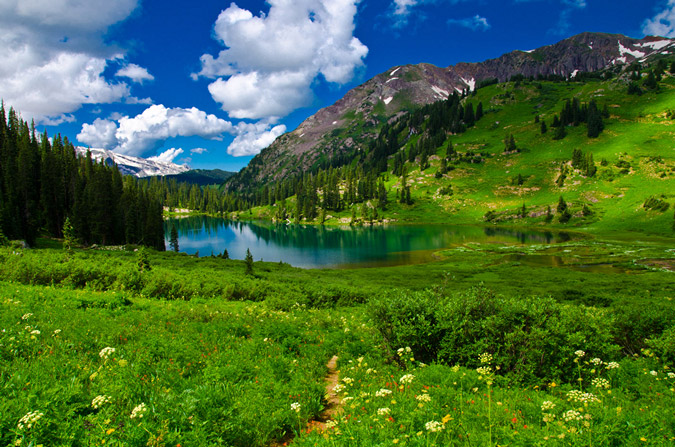
The search for a campsite was on, and I had been given some good tips from Bill Wood that we should shoot for campsites 6-11. We finally landed on campsite 9, slightly south and west of Crater Lake on a large hillside. Sarah later joked it was no wonder the campsite was open, because you have to hike up a hill away from the water to reach it.
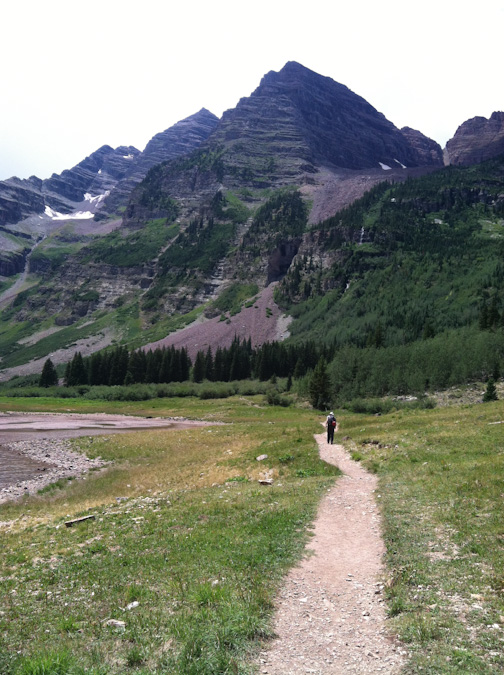
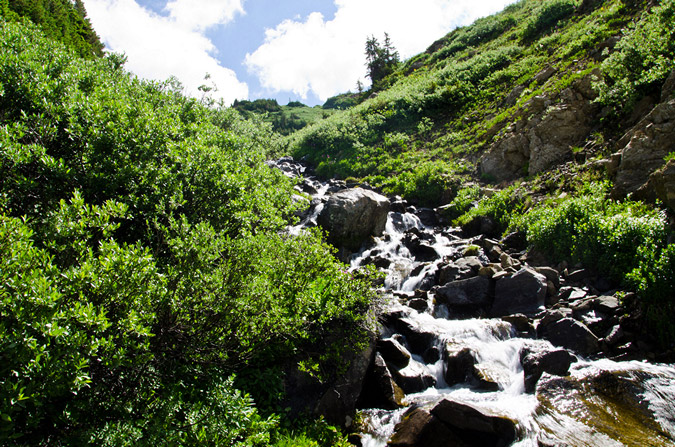
We quickly made camp, setting-up the tent and all of our stuff, and finally had summit packs ready by 8 AM. Not exactly the best start time for a 14er of Maroon’s caliber, but we thought we’d give it a shot either way, so off we went. We followed the trail quite a long ways up the valley to the south and reached the oh-so recognizable warped tree described by the 14ers.com guide.
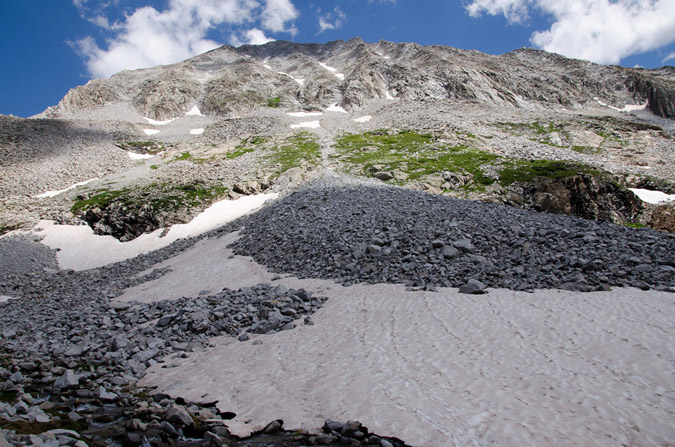
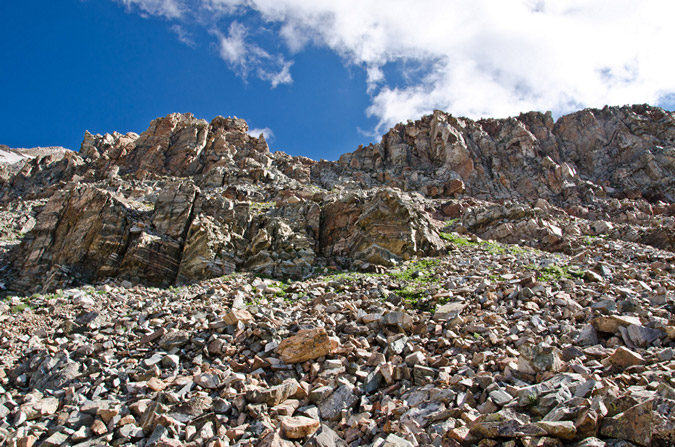
After the tree, the real work was before us, and the Maroon Peak southeast slopes trail lay before us in all of its steep glory. The trail started quite steeply, much like the Manitou Incline.
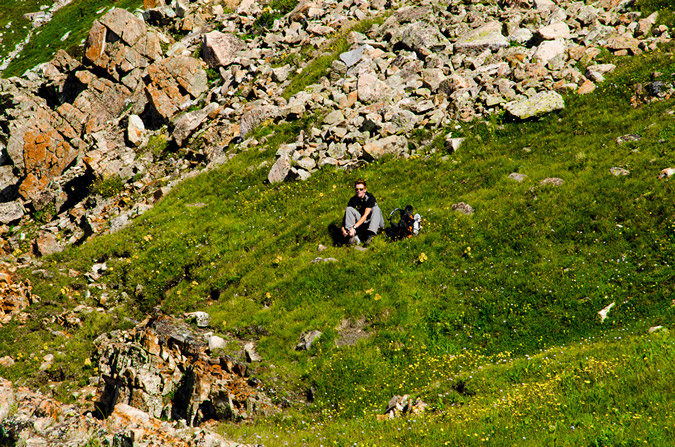
We reached well above tree-line before my stomach started to really give me issues. I could not figure out why I was not feeling well, so we stopped at around 12,400 ft. This turned out to work out just fine, because weather was starting to build above, the clouds that were hanging low all morning had never really left. I later figured out that the culprit to my stomach issue was the Cliff Bar Builder’s Bar I had ate.
Sarah and I sat around for a bit, contemplating our options.
We had picked a pretty great place to stop. The views in all directions were great. We did not feel rushed at all.
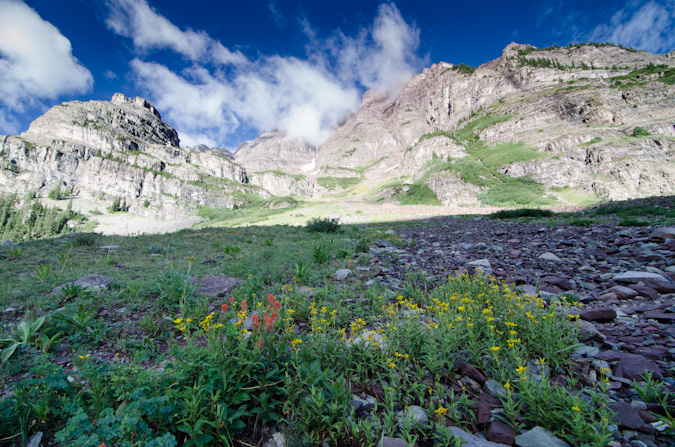
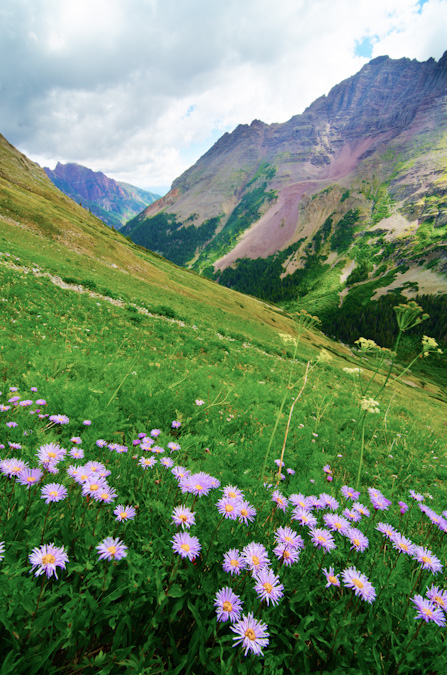
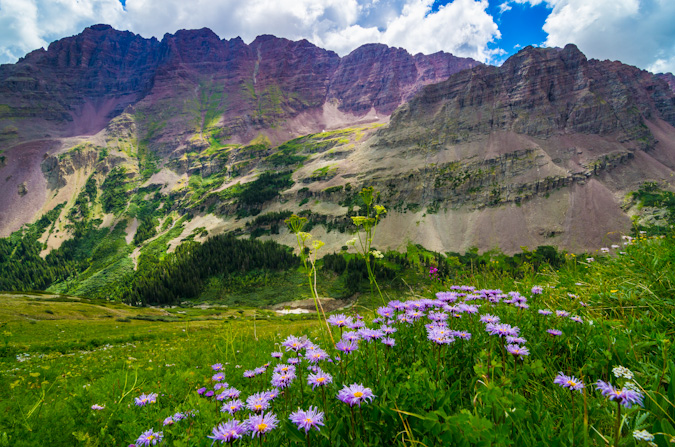
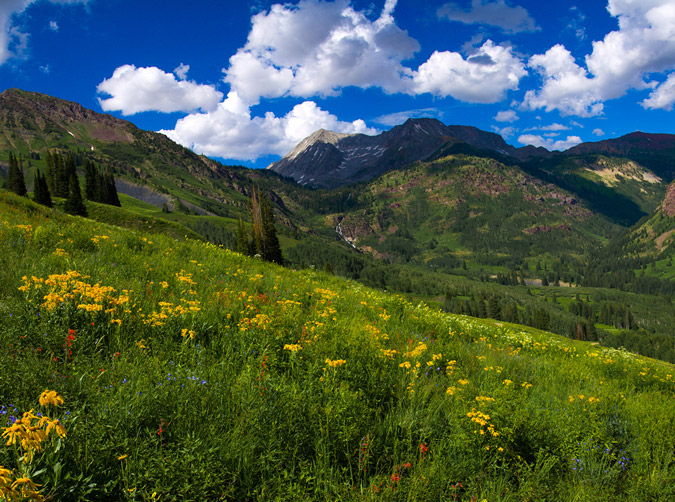
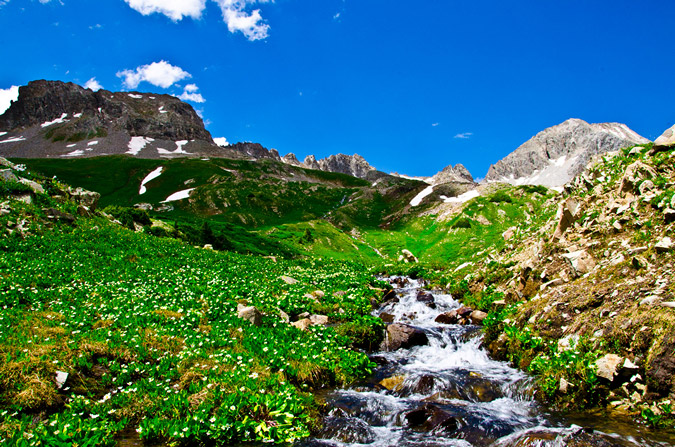
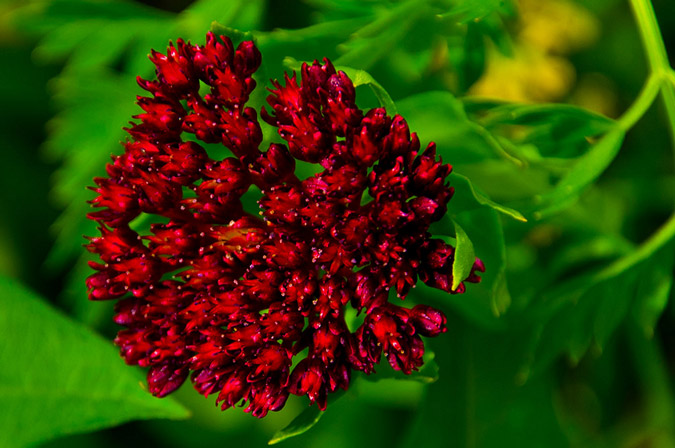
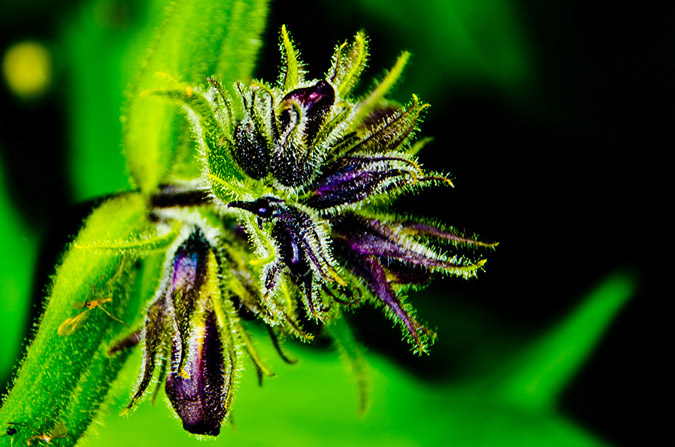
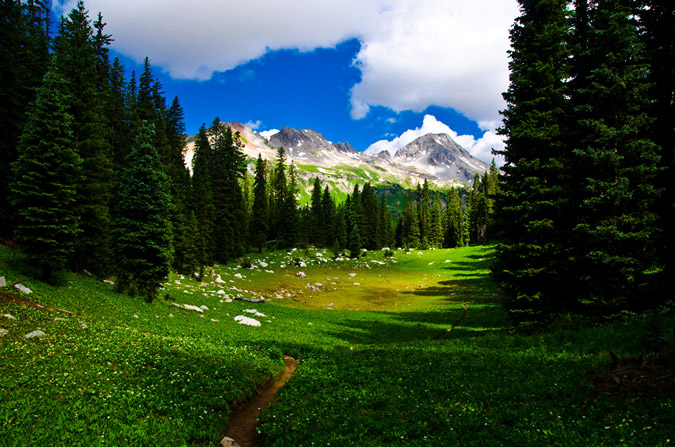
Even though my stomach was in pain, we found ourselves near a large meadow of wildflowers, which made for some fun photography.
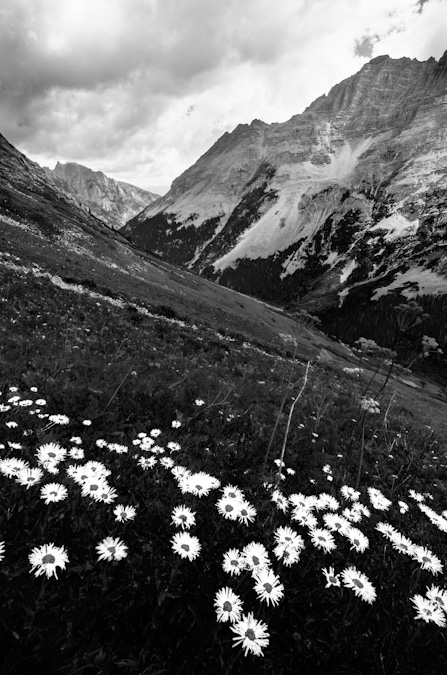
It was a really cool spot, and since it seemed were not going to do any more climbing, I took the liberty of taking a ton of shots.
We headed on down and later ran into a group of three guys coming down as well. They were attempting Maroon as well and were turned back due to the weather just short of the ridge. These three guys were very cool, and we had a nice conversation about the area and climbing the Centennials. We all headed on down to the main trail, where we intersected two more hikers coming up to investigate the location of the Maroon Peak trail turn-off. This would not be our last encounter with these two guys, as we would later run into them twice more the following day.
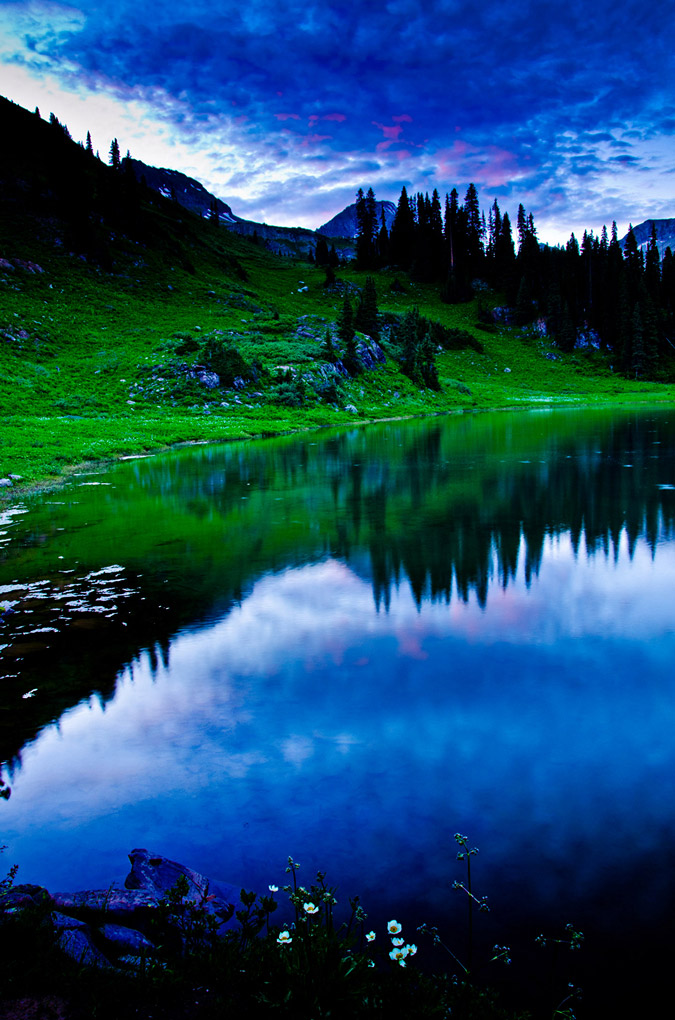
Sarah and I hiked back to camp and took naps. After our short naps, we cooked up some food and I prepared my camera equipment for a walk down to Crater Lake for sunset shots and later night photography.
Upon arriving at the lake, I was immediately in my happy place, having many quite interesting landscape shots to attempt. I waited for the sun to set and the magic started to happen, lighting up the tips of the surrounding mountains to our East, which were part of the Pyramid Peak massif. I also tried out my ND filter and did some longer exposures of the clouds and Maroon Peak.
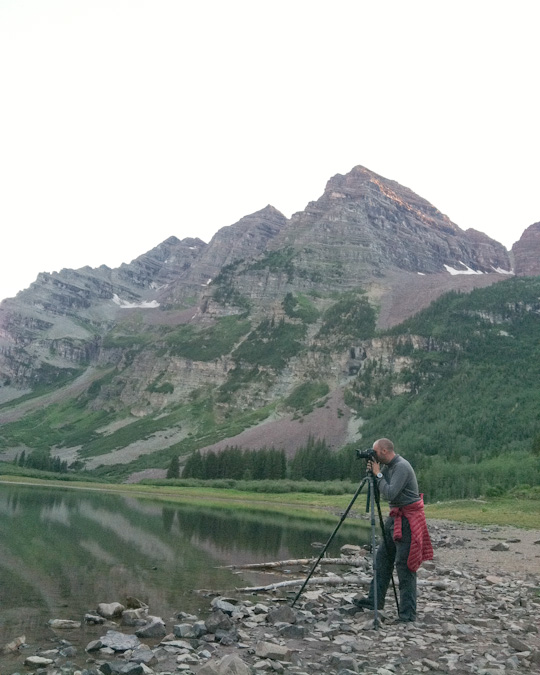
Sarah was able to sneak a shot of me geeking out on my camera.
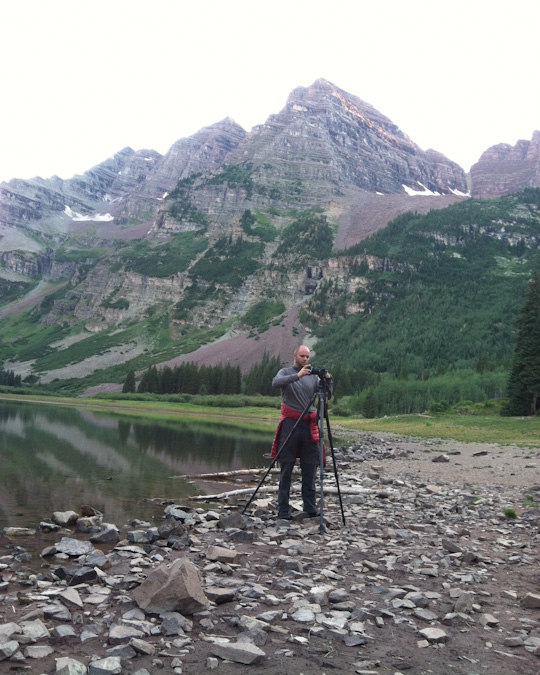
Composing the shot...
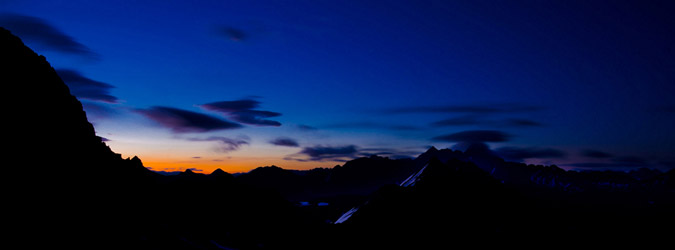
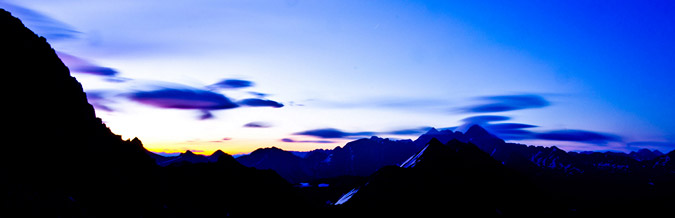
The sun was setting and the light started doing its thing.
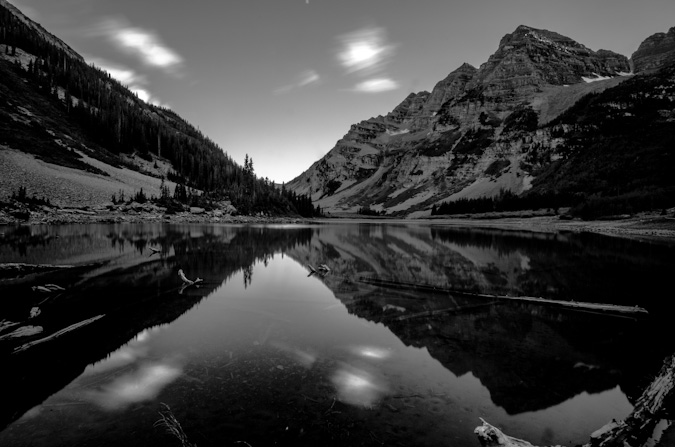
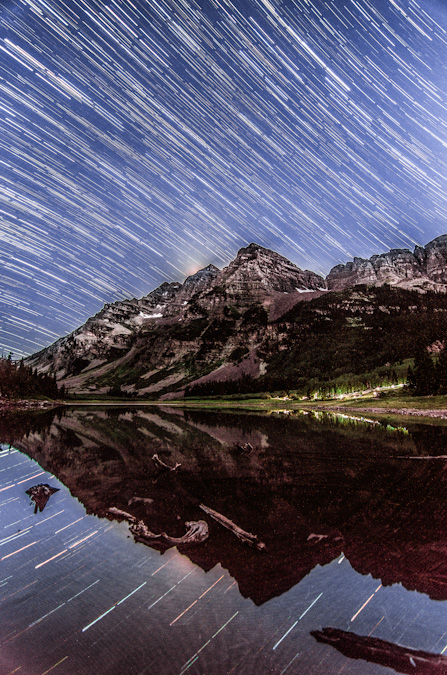
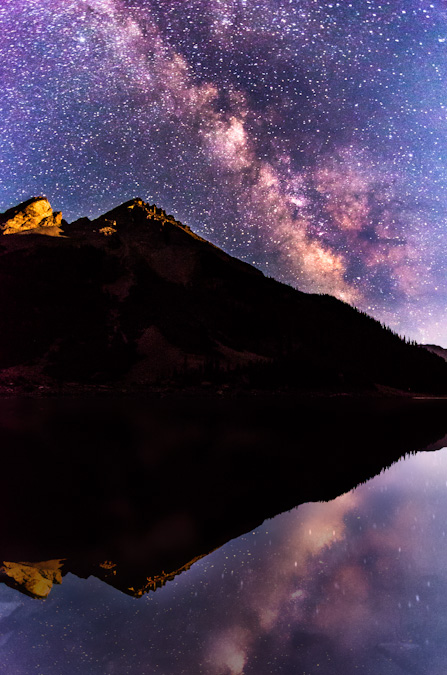
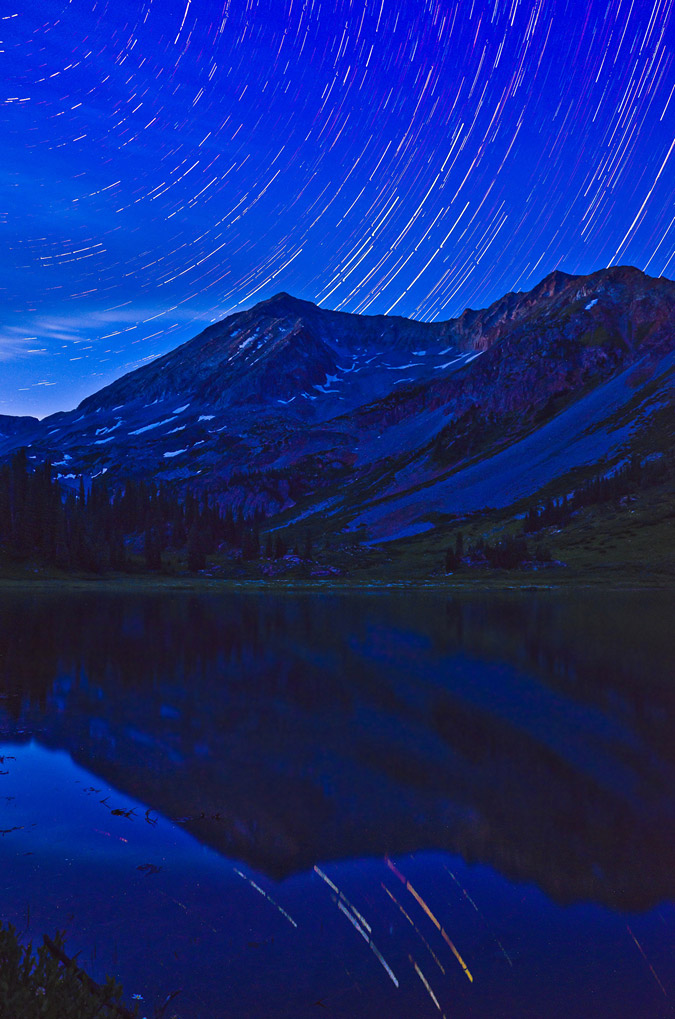
After the sun went down, Sarah went back to the tent to get some sleep. I stayed out and set-up for something I had been planning for a long time - star trails over the Maroon Bells, reflected in Crater Lake. This worked out pretty nicely, there was a group hiking in the dark up the trail and so my long exposures got their head lamps in the shot too, which I opted to keep in. The "break" in the trails is from my intervalometer stopping unexpectedly on me and me having to restart the sequence. Bummer! Still turned out great though, I think. You can see where the moon had just set over Maroon Peak's upper left cliff bands.
While photographing the star trails using the intervalometer on my camera, two sets of eyes appeared near me at the lake. I rose and walked closer to find two deer, one a quite large buck. I was both relieved and amazed. I’m not really sure how well I could defend myself against a mountain lion.
After shooting star trails above the Maroon Bells, I took advantage of the scene and clear night and took some fantastic shots of the Milky Way. My two favorite was this single shot of the Milky Way reflected in the lake, and the next one, which is a 9-shot panoramic of the Milky Way above the Pyramid Peak massif. Click on the single shot if you'd like to learn more or purchase it.
I just could not get over how clear the sky was!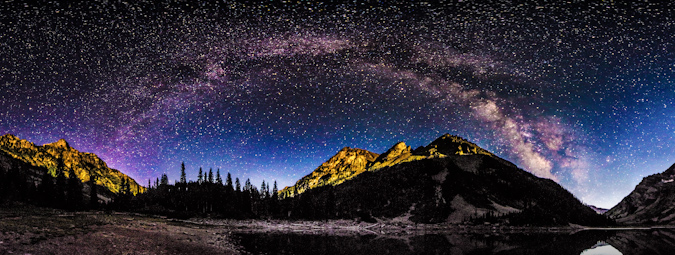
After capturing what I felt at the time were some great photos, I decided it was time to hit the sack, since our departure time for Maroon Peak was looming just a few hours away. I came back to the tent, where I found Sarah wide awake still. Apparently a field mouse had managed to find our tent and was crawling over the top of it, which kept freaking Sarah out. In fact, about 30 minutes later, the mouse bumped past the side of the tent next to Sarah’s face, which caused her to freak out and elbow me like she was trying to win a Karate match. It was awesome.
Day 3: Early start and successful summit of Maroon Peak - 14,156 ft.
Sarah’s iPhone alarm sounded off and sounded just like a self-destruct sequence, in fact, it was just like this YouTube video.
Mixed with my dream that President Obama had confiscated the valley we were in for national security reasons, and my head was all kinds of whacked out – too much, too early.
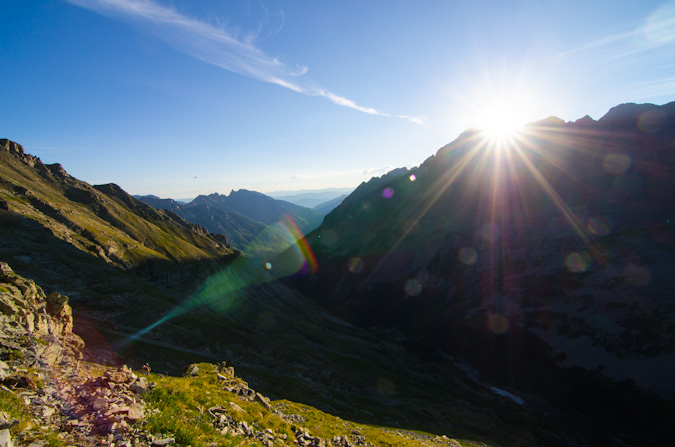
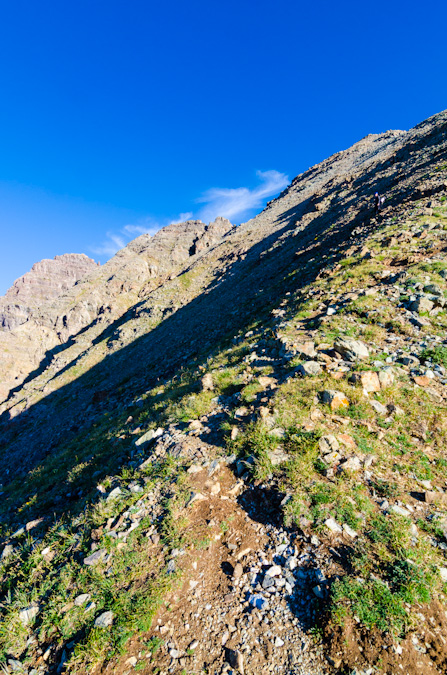
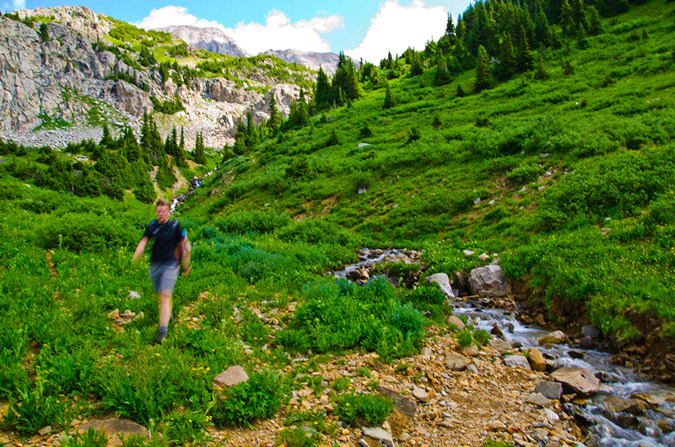
Nonetheless, we rose like zombies and hit the trail at a brisk pace at a quarter past 4 AM and head back up the valley to the Maroon Peak turn-off, in the dark. By the time we were working our way up the steep trail, the sun had begun to illuminate the mountainside and we were moving at a very steady pace.
Two of the three climbers from the prior day passed us quickly, having a deadline to meet – they were extremely fast – good on them! We kept our pace going at a good rate and eventually caught up with the two gentleman from the day before that were looking for the trail.
They were moving very slowly and had mentioned that there was only two others ahead of them other than the two we knew about – a photographer and their friend.
A photographer you say? This piqued my interest instantly. Who was ahead of me? Did I know them or of them?
The trail was one of the steepest I could remember. Exhausting, but a wonderful workout all the same.
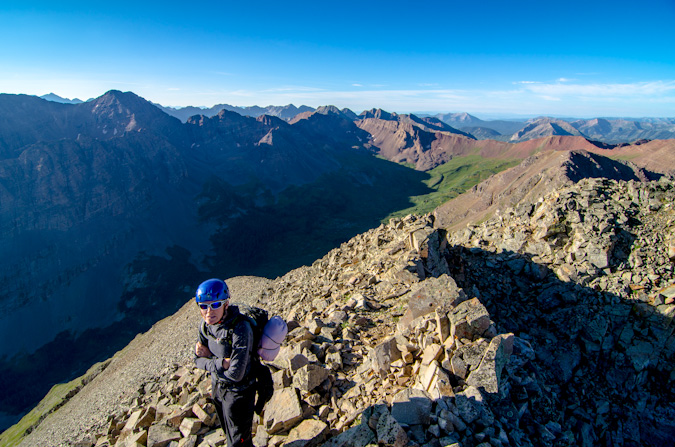
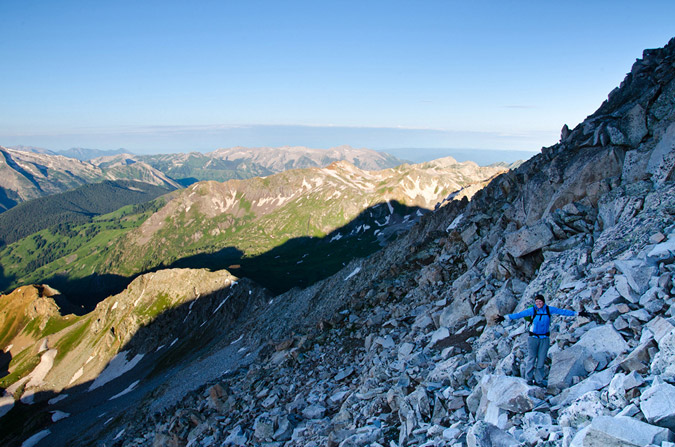
Before long at all, Sarah and I crested the ridge after 2,800 feet of grueling non-stop high angle grinding. As Bill Middlebrook describes on the 14ers.com route description, “Conquering the East Slope is a major achievement, but now the more technical terrain remains.” Indeed. Time to refuel.
Sarah had maintained an excellent pace up Maroon Peak so far and was kicking my butt. Did I mention that while I'm at home editing photos, she's out racing single speed mountain bikes? Yeah. Wonder who's in better shape?
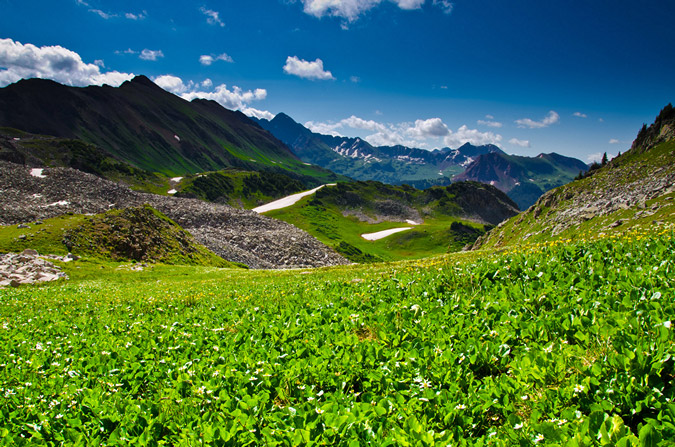
The remaining section of the ridge was more of the same; however, we had much better views of the surrounding area.
Once we reached the ridge, it was only a short section of maybe 400 feet to tackle before reaching the hard part.
The ridge section was still fairly steep, but the excitement of seeing the rest of Maroon Peak's impressive face kept us moving quickly.
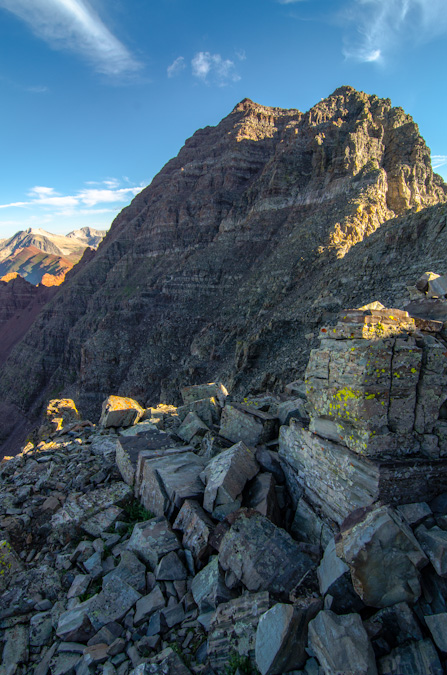
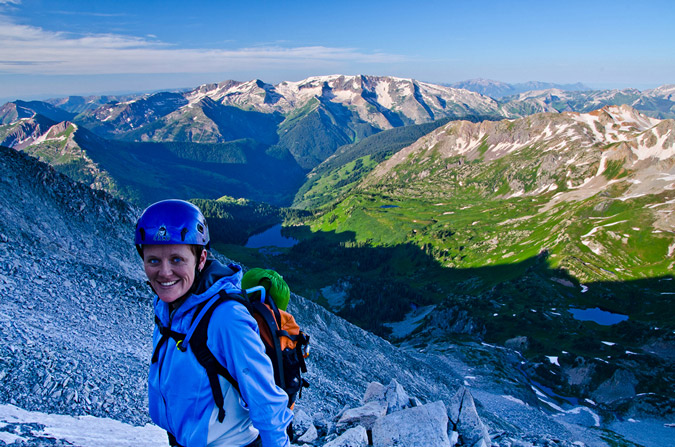
Reaching the crest of the final ridge was exhilarating as always, made especially sweet by the awesome visage of Maroon Peak, which loomed in front of us like a giant sentinel.
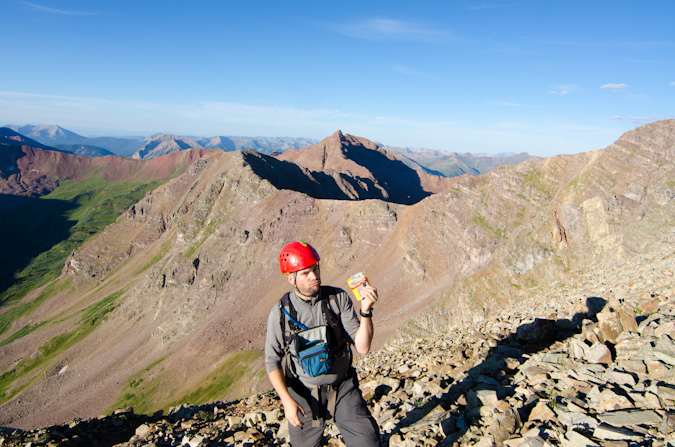
Sarah and I followed the rest of the route religiously, having had a bad experience off-route last year on Snowmass. We took a break for food, and I ate another Honey Stinger Waffle which was delicious – these things are the real deal. The fun begins.

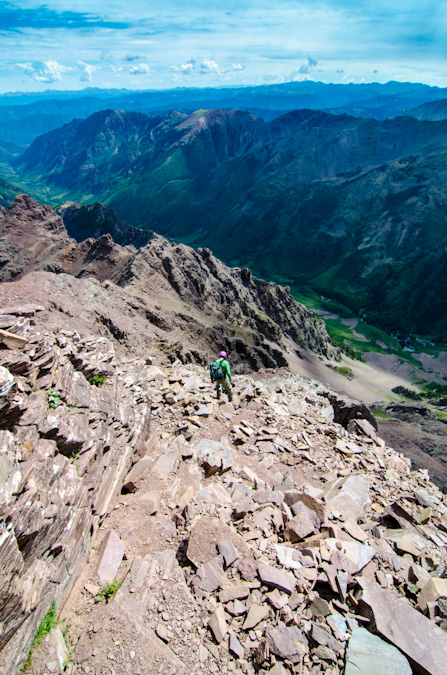
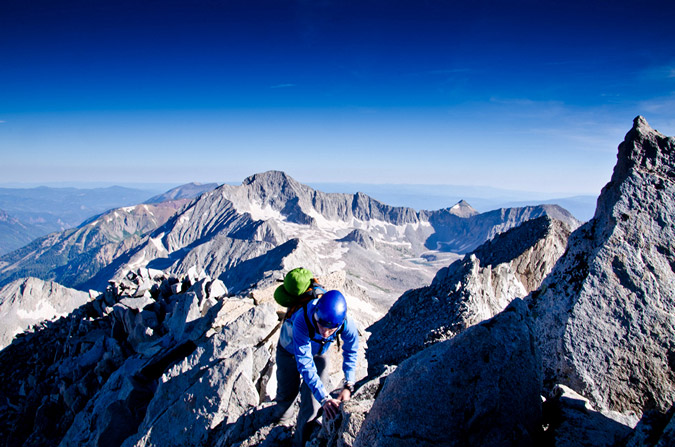
From the ridge crest, the route went very easily, much to my surprise and partial disappointment. I was expecting an epic class 3 adventure; however, Maroon Peak is more like class 2 with a sprinkle of class 3 in some lame locations. It looked intimidating as hell though.
The trail is very obvious most of the route and there are actually only a few spots you need to actually make a decision and “climb.” That being said, the terrain was still quite dangerous and we were vigilant. The views... oh man. So amazing. Intense.
Shortly after entering the more dangerous terrain, we ran into the other companion of the two guys we had passed earlier. He wanted to know how far behind they were. He was not very thrilled to learn about their slow pace, but the weather seemed to be holding so I felt like they still had a shot.
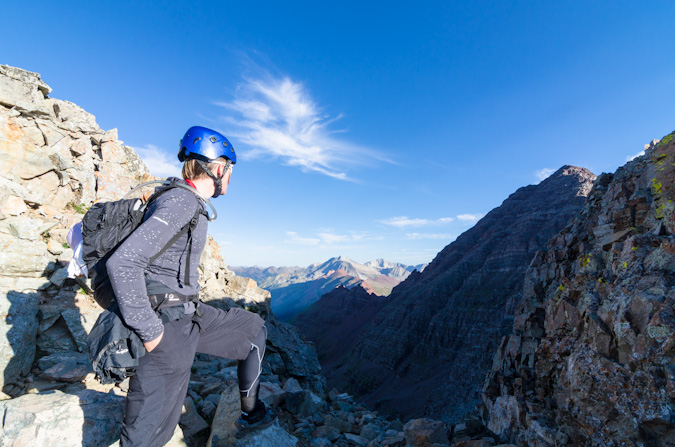
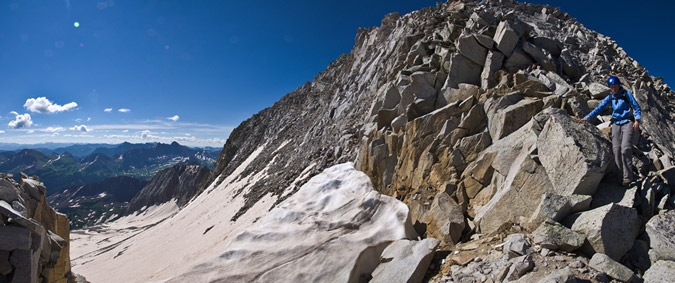
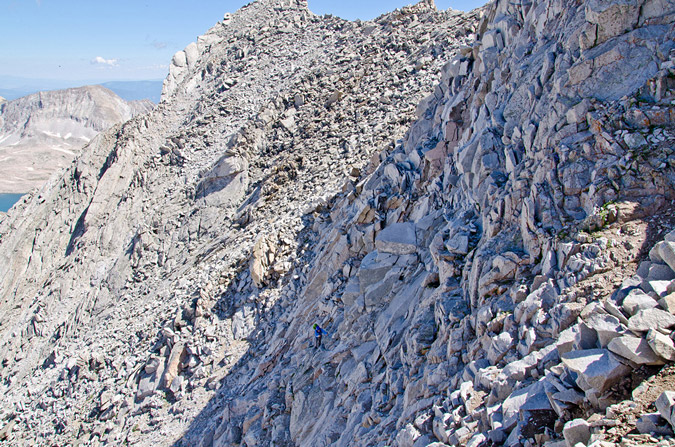
For the most part, the first section after the ridge involves following the trail up and over a bunch of small gendarmes near the ridgetop. As predicted, we found ourselves having to climb a small gully into a small and secluded alcove, which offered great views to the west.
Just at the top of this gully rested our next problem - a small gully with great hand and foot holds heading up.
On the other side of this gully, parts of Maroon Peak were back in view. The route certainly did not look obvious from here, but it worked out.
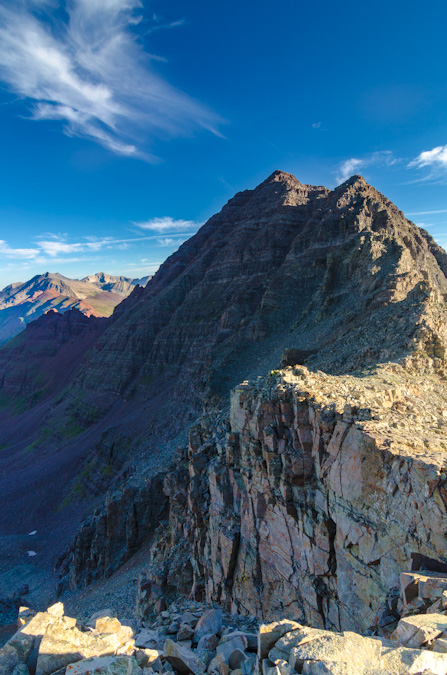
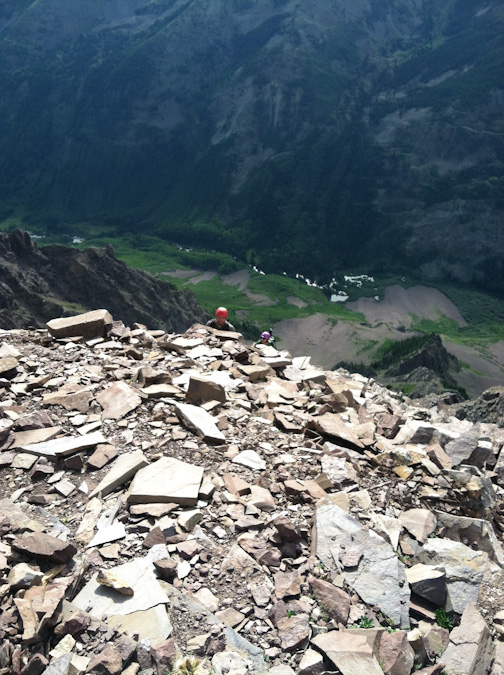
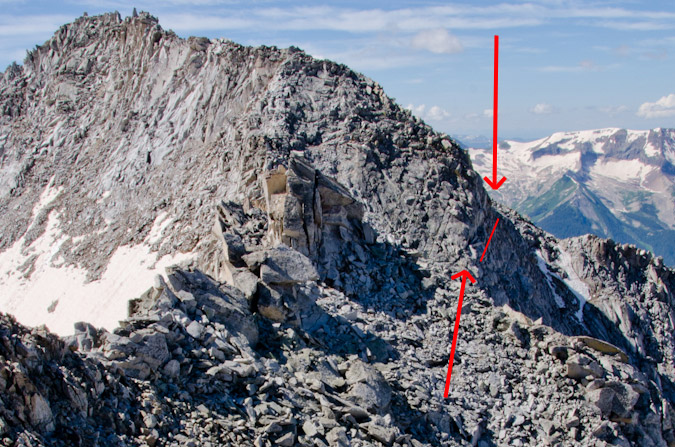
The most dangerous section was probably the set of gullies you can choose to ascend about 2/3 of the way through the route as pictured here.
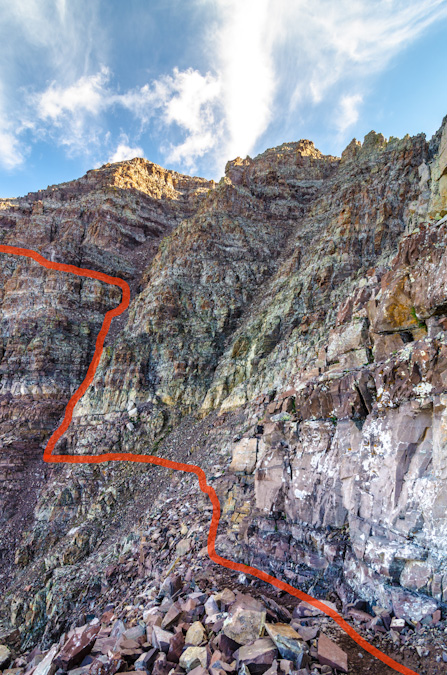
We chose to climb the second gully and then follow a ledge system to the left. I feel that under the right circumstances and a lot of climbers, this section could be quite dangerous due to rockfall. Most of the rest of the route seemed quite safe with the occasional ledge area that was exposed. It looks worse than it is, trust me. Here's a view from the top of the gully, looking back across where we had come from.
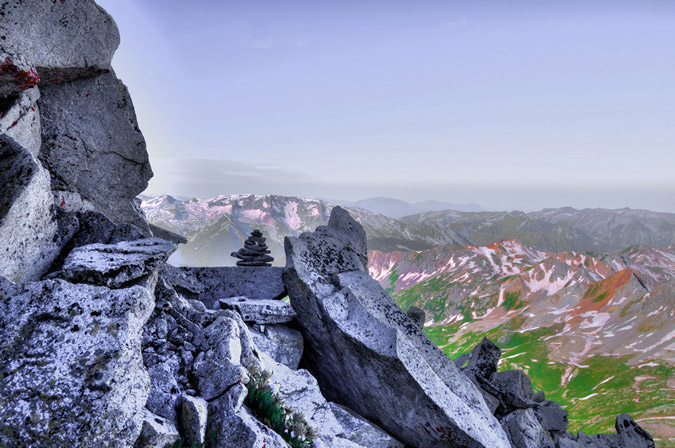
At this point it felt like a great time to stop and soak in the views. It does not get much better than this.
The rock features on Maroon Peak were quite remarkable and made for a wonderful hiking experience. There were many times where I kept saying to myself, "I'm really here, this is one awesome place!"
Looking up or down made you feel so small. The sheer ruggedness and steepness of these peaks is easy to appreciate.
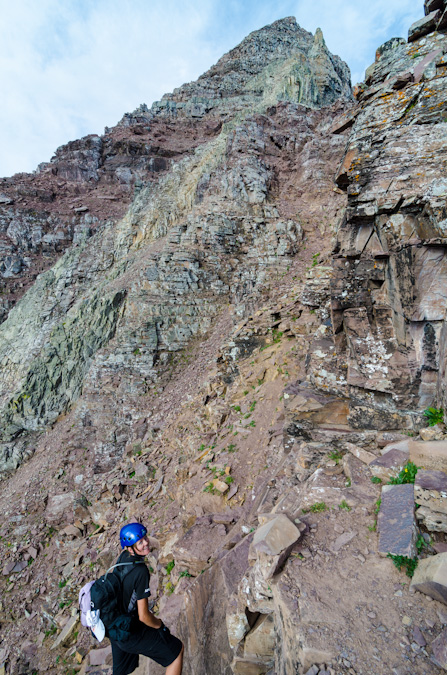
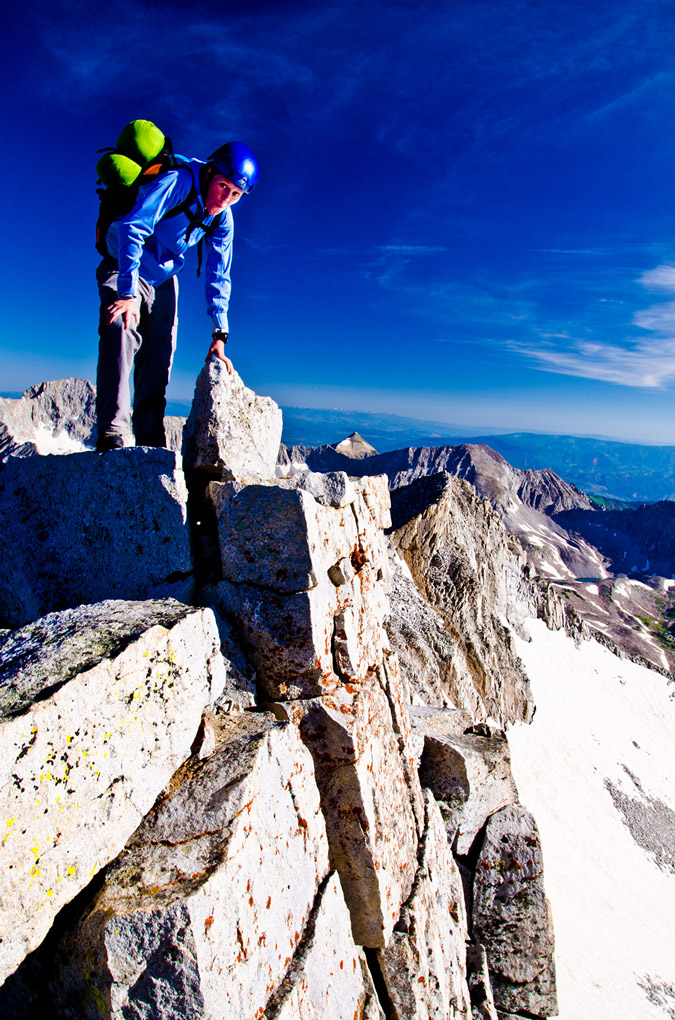
The final stretch of the climb includes a large boring dirt and rock section that reminded me of Columbia Peak, meaning, it was fairly awful – the kind of stuff that goes two steps up and you slide one step down.
Once at the top of this area, you climb a really short but interesting ledge system onto the flank of the peak and follow a long series of quite solid and fun-to-explore ledges before reaching the final summit ridge.
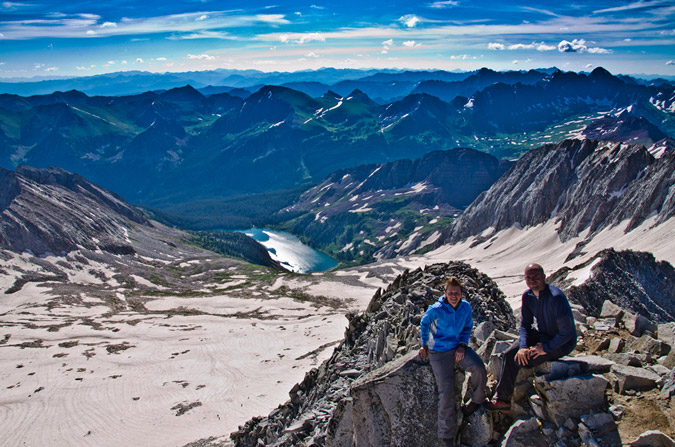
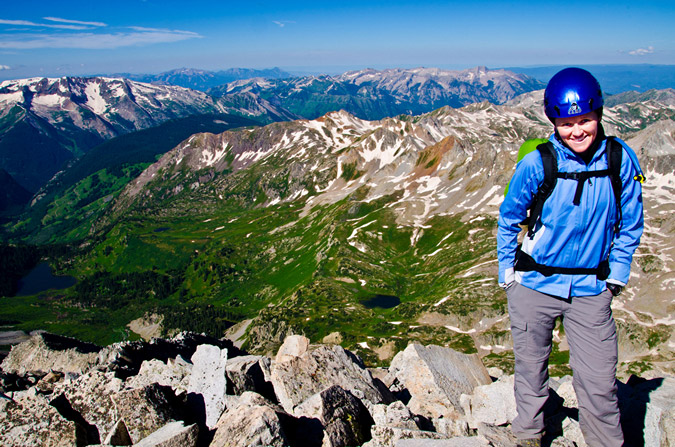
Pyramid Peak dwarfed Sarah.
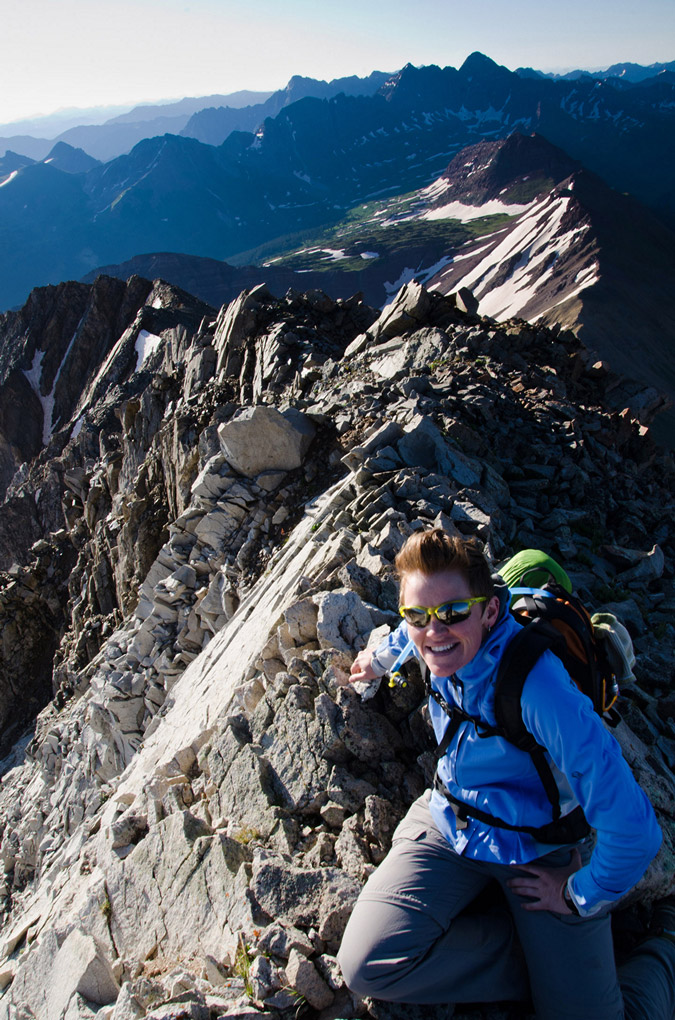
Sarah, while only equipped with an iPhone, took some awesome shots on this trip as well. One of my favorites was this one she took of my near the summit.
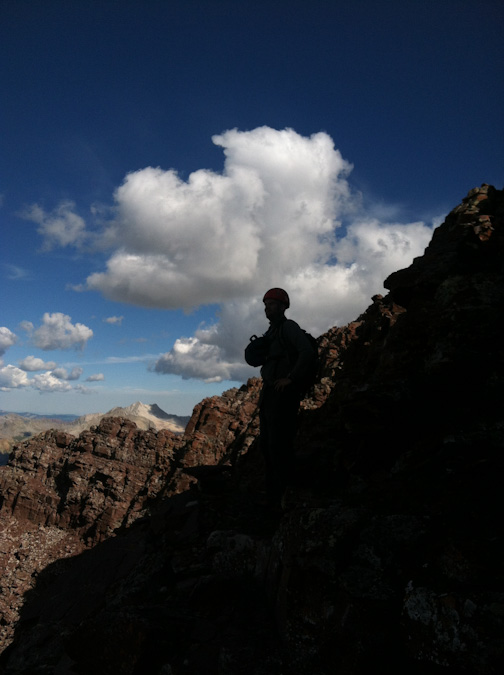
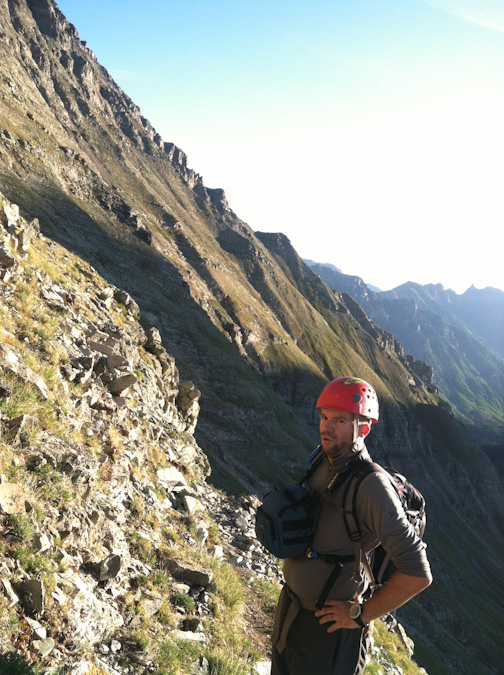
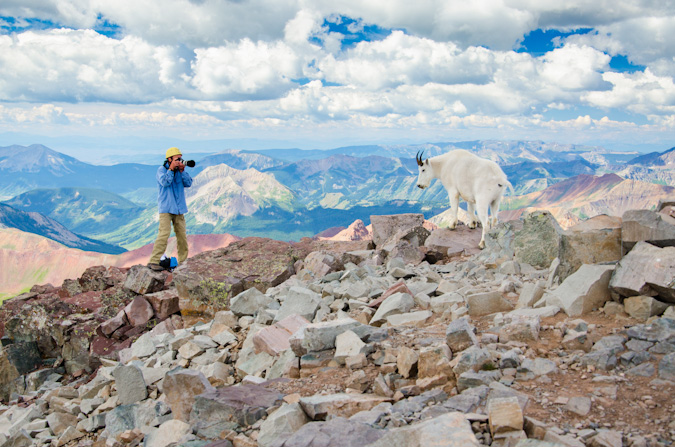
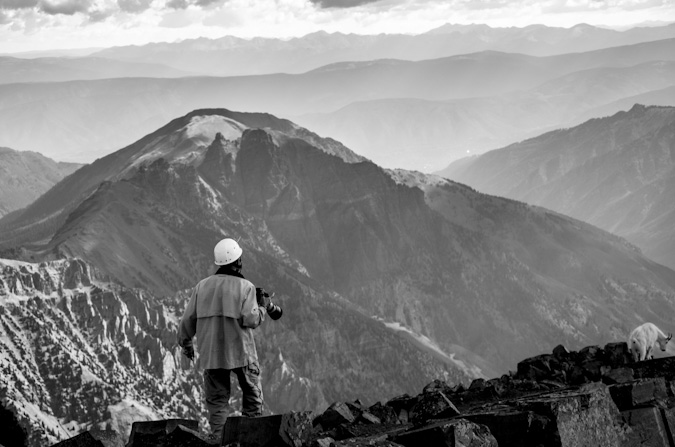
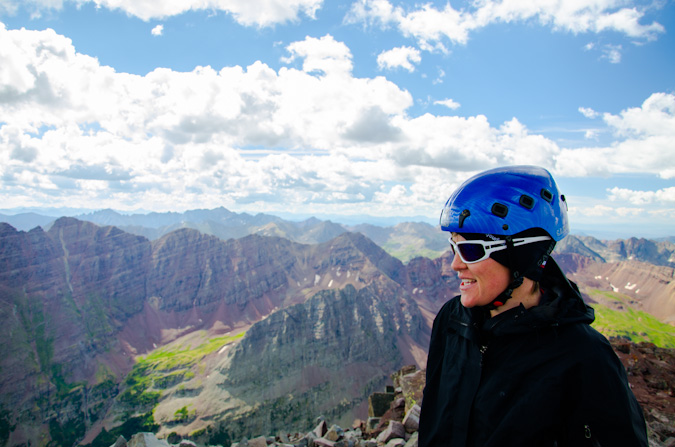
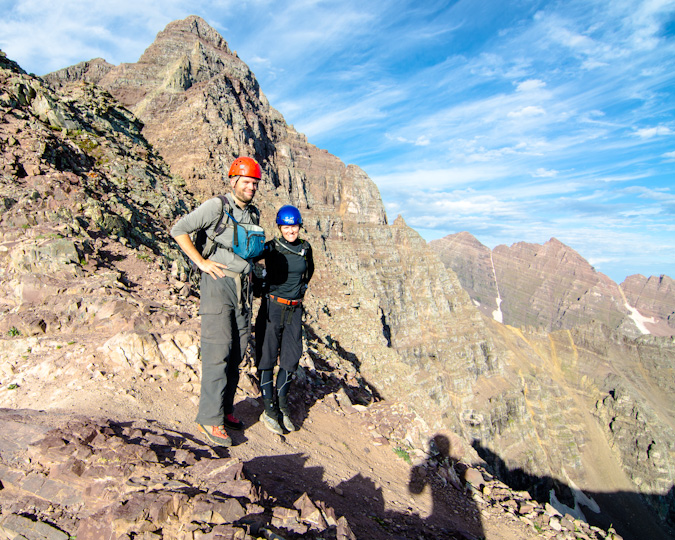
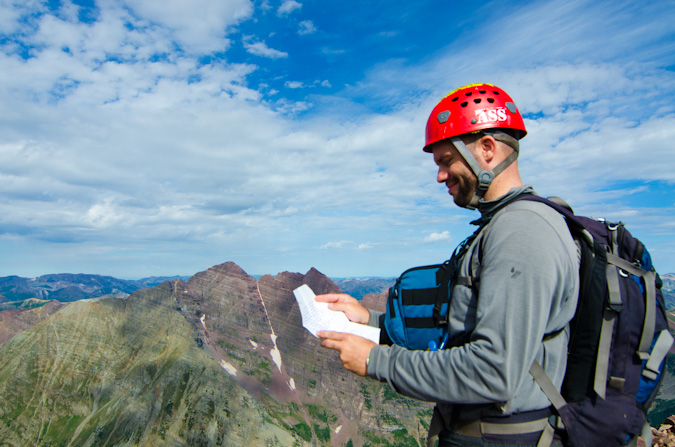
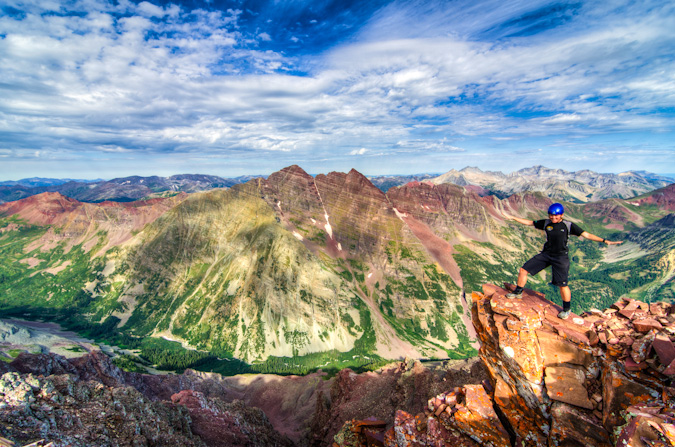
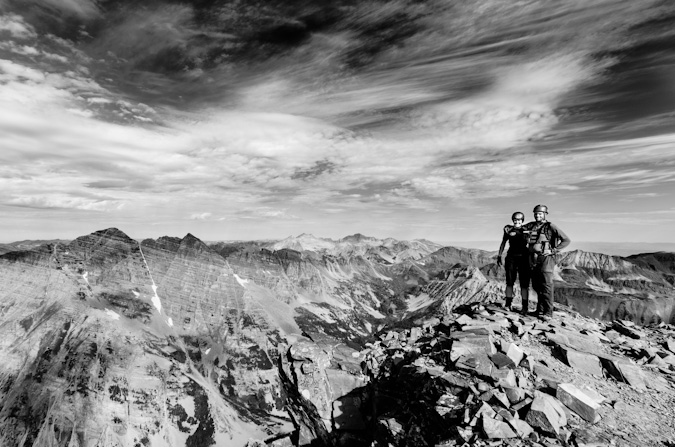
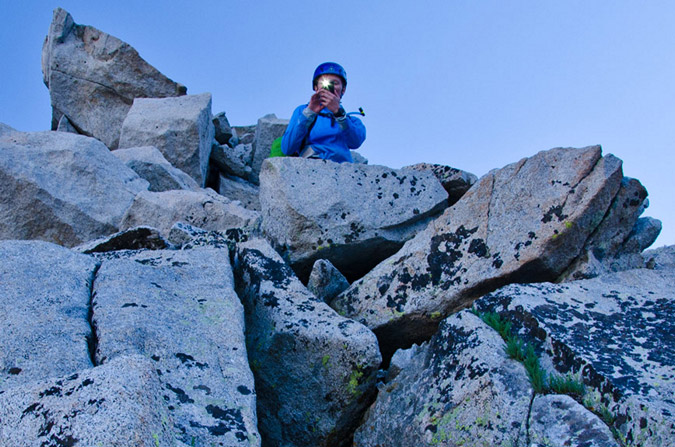
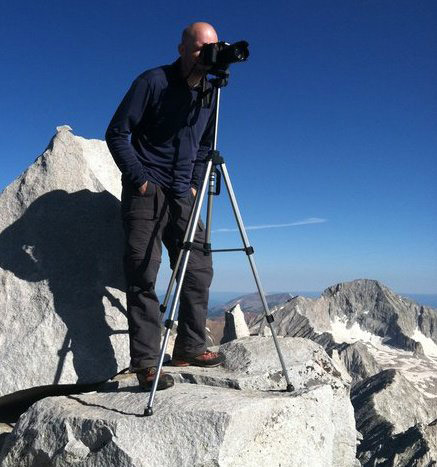
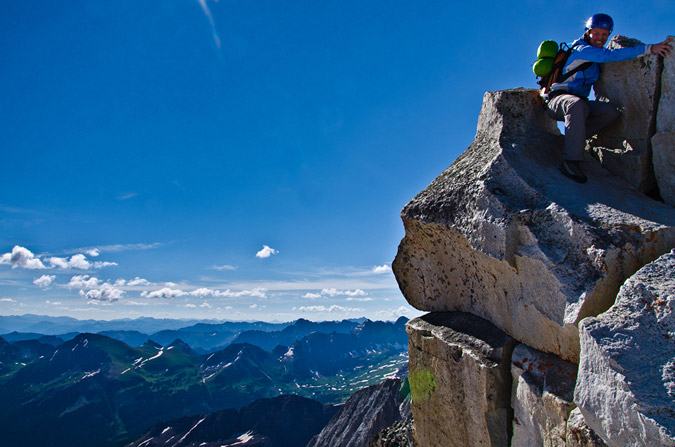
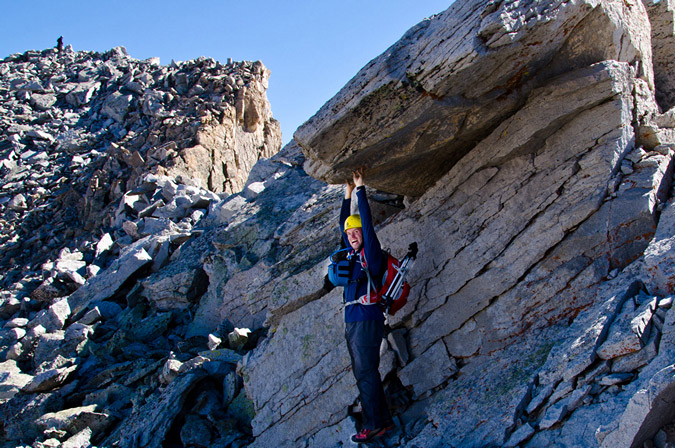
Upon reaching the final summit ridge, I saw a man with a yellow helmet on the summit, in fact, the same yellow Edelrid helmet my dad handed down to me and seen in the photos of him in this report. He yelled down at me that it “was a great photo” and to “stay put if I didn’t mind.” This must be the photographer we learned about. While I waited for the light to get right for him to take my shot, I took a high contrast shot of him and Sarah on the summit.
He then snapped off this cool shot of me climbing the final section to the summit.
We got up to join him and he pulled out his business card. It was none other than the legendary Glenn Randall. Readers may recall Glenn’s name from an article I wrote earlier this year where I shared my thoughts on the twenty best Colorado landscape photographers. In fact, Glenn’s revered in the mountaineering-photography community as a pioneer, for, as he later explained to me, he has photographed sunrise from thirty-eight 14ers. This is a most impressive feat. Glenn explained that he was just on a recon mission today, because he was going to be doing Maroon Peak tomorrow as well to photograph sunrise from there. He was setting waypoints and familiarizing himself with the route. He had just done sunrise at Pyramid Peak the day before. Glenn’s dedication to this sub-set of photography is most impressive – in order to achieve sunrise on a peak like Maroon Peak – he would need to begin hiking at midnight and carry over 20 pounds of photography equipment with him to the summit. I was humbled to have met such a great photographer that I had modeled a great deal of my own personal work after.
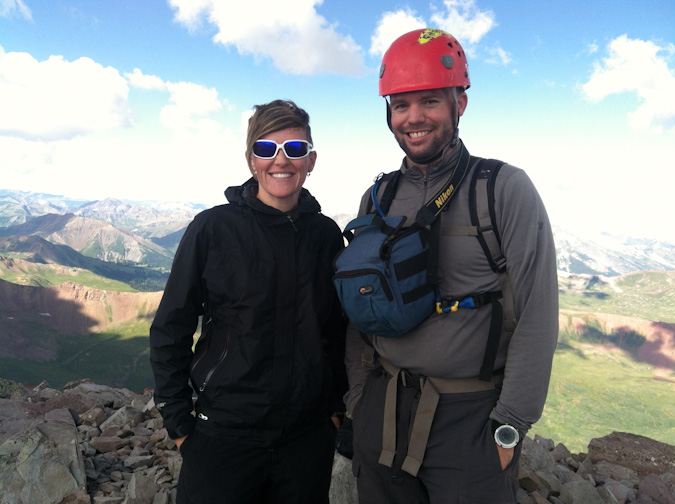
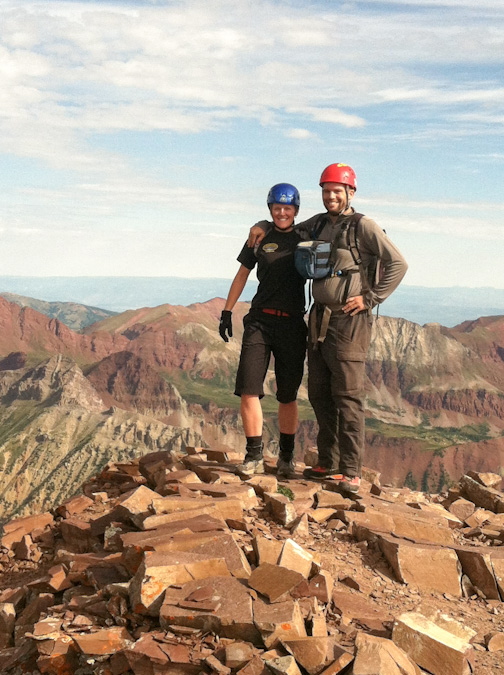
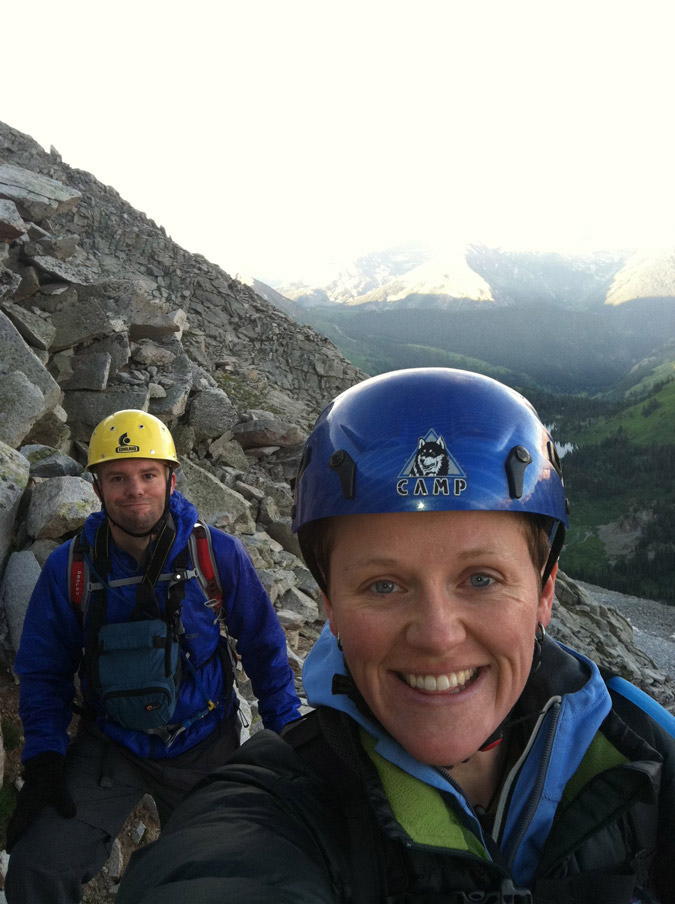
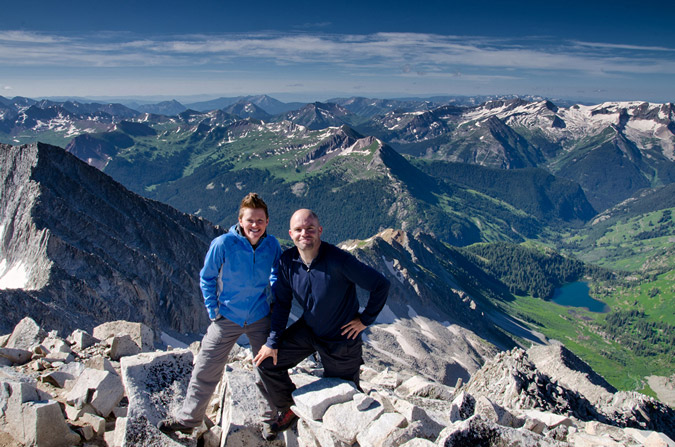
Glenn gladly took our photo with Sarah's phone.
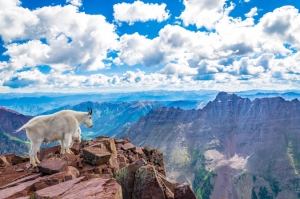
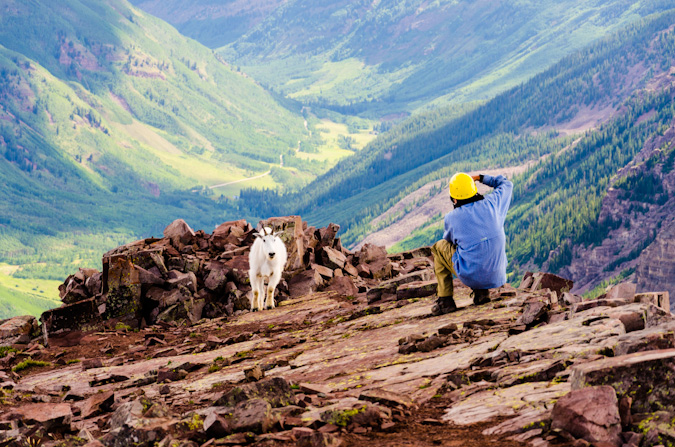
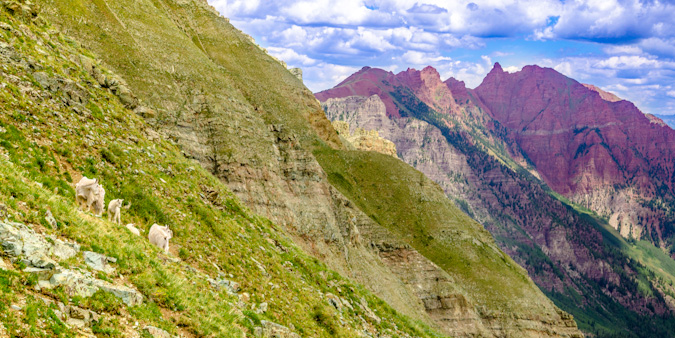
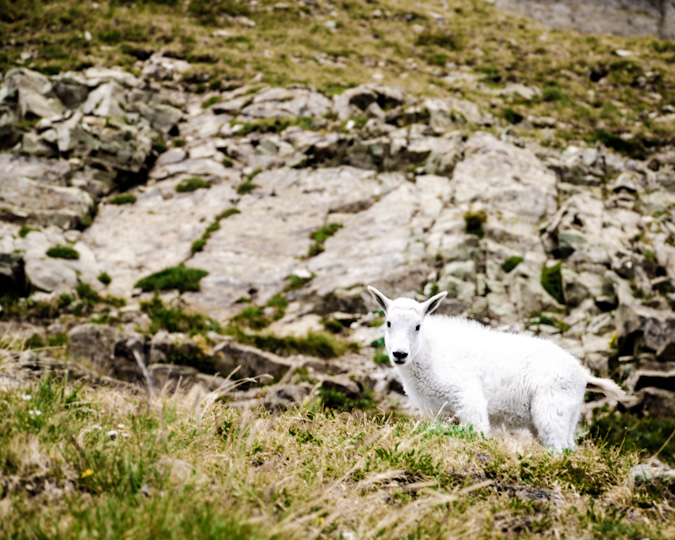
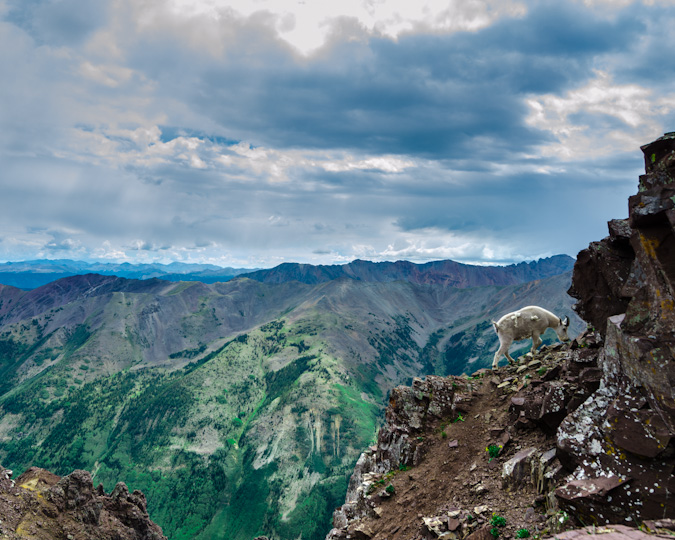
Glenn and I talked shop for quite awhile and he decided to head down. Shortly after though, two mountain goats came strolling up the side of the mountain from the descending route area with none other than Glenn behind them.
It was such a fun day on the summit, sharing the photographic experience with a true pro. I had fun composing images of the goats and of Glenn. I might be geeking-out a little, but it really was an incredible experience.
Sarah was able to get some incredible shots of all of the action too. Some of my favorites.
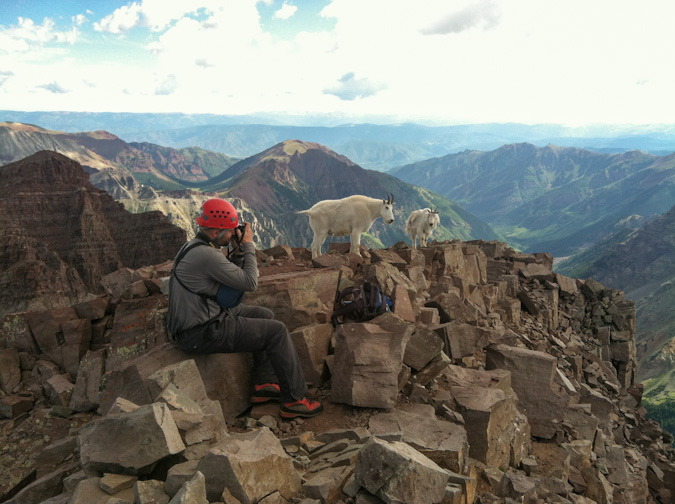
These were quite friendly goats, often coming within feet of me.
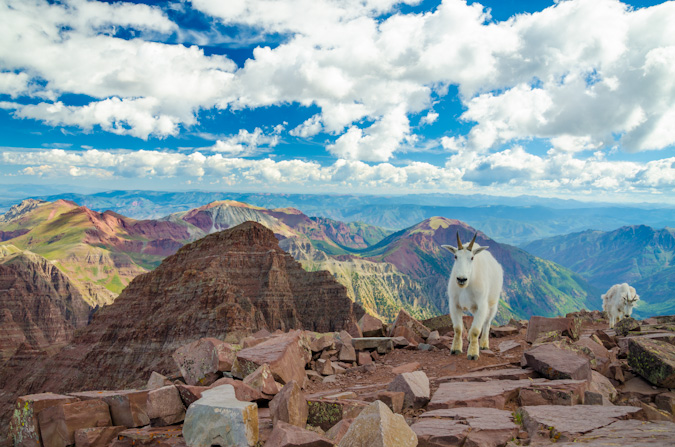
Pyramid Peak made for a killer backdrop for the goat.

I bet Glenn got some really great shots of the goats... he was sporting a quite nice Canon Fx camera and a 70-200 lens.
I took so many fun shots of the goats, and I hesitated to post so many here, but they turned out so great, I had to share.
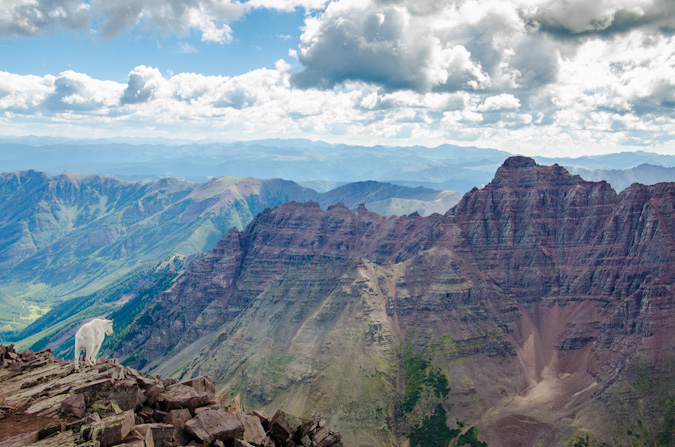
My favorite shot of the mix was this shot of this goat peering out towards Pyramid Peak, foreshadowing the day to come, where I would complete the 14ers.
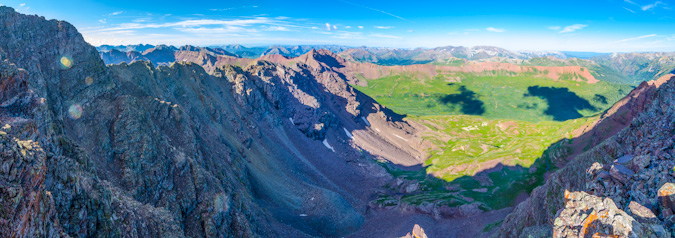
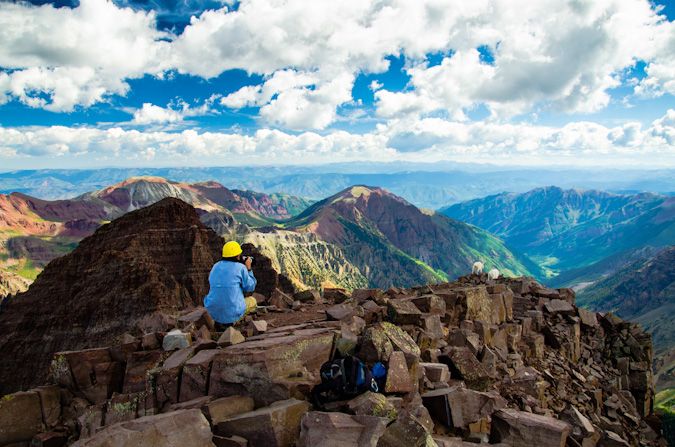
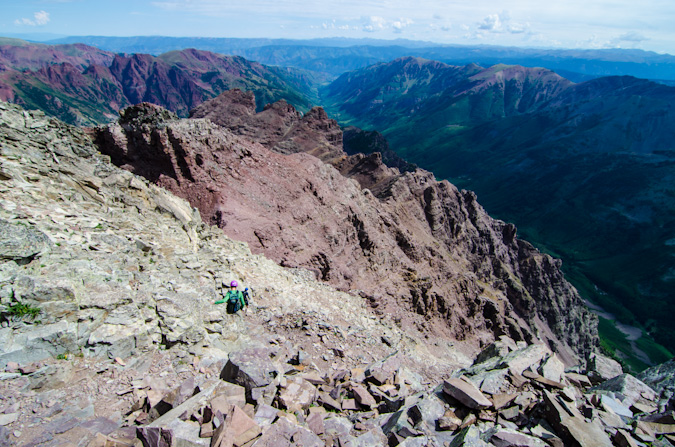
Through all the excitement, I had to stop and take some shots of Sarah and a couple panoramics.
The traverse over to N. Maroon looked like a lot of fun, but it was not on the agenda.

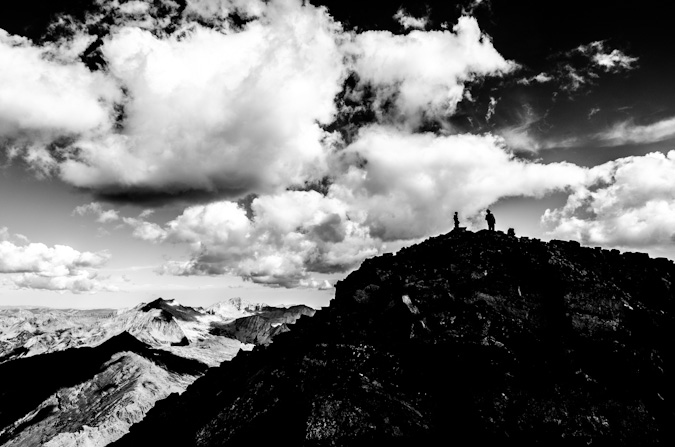
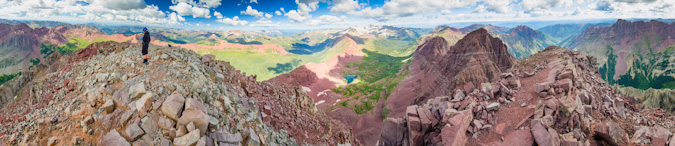
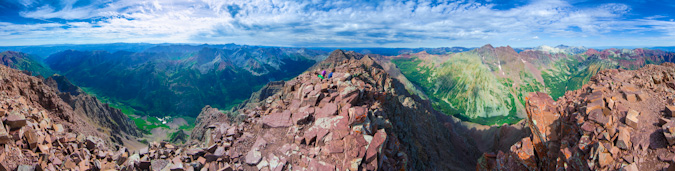
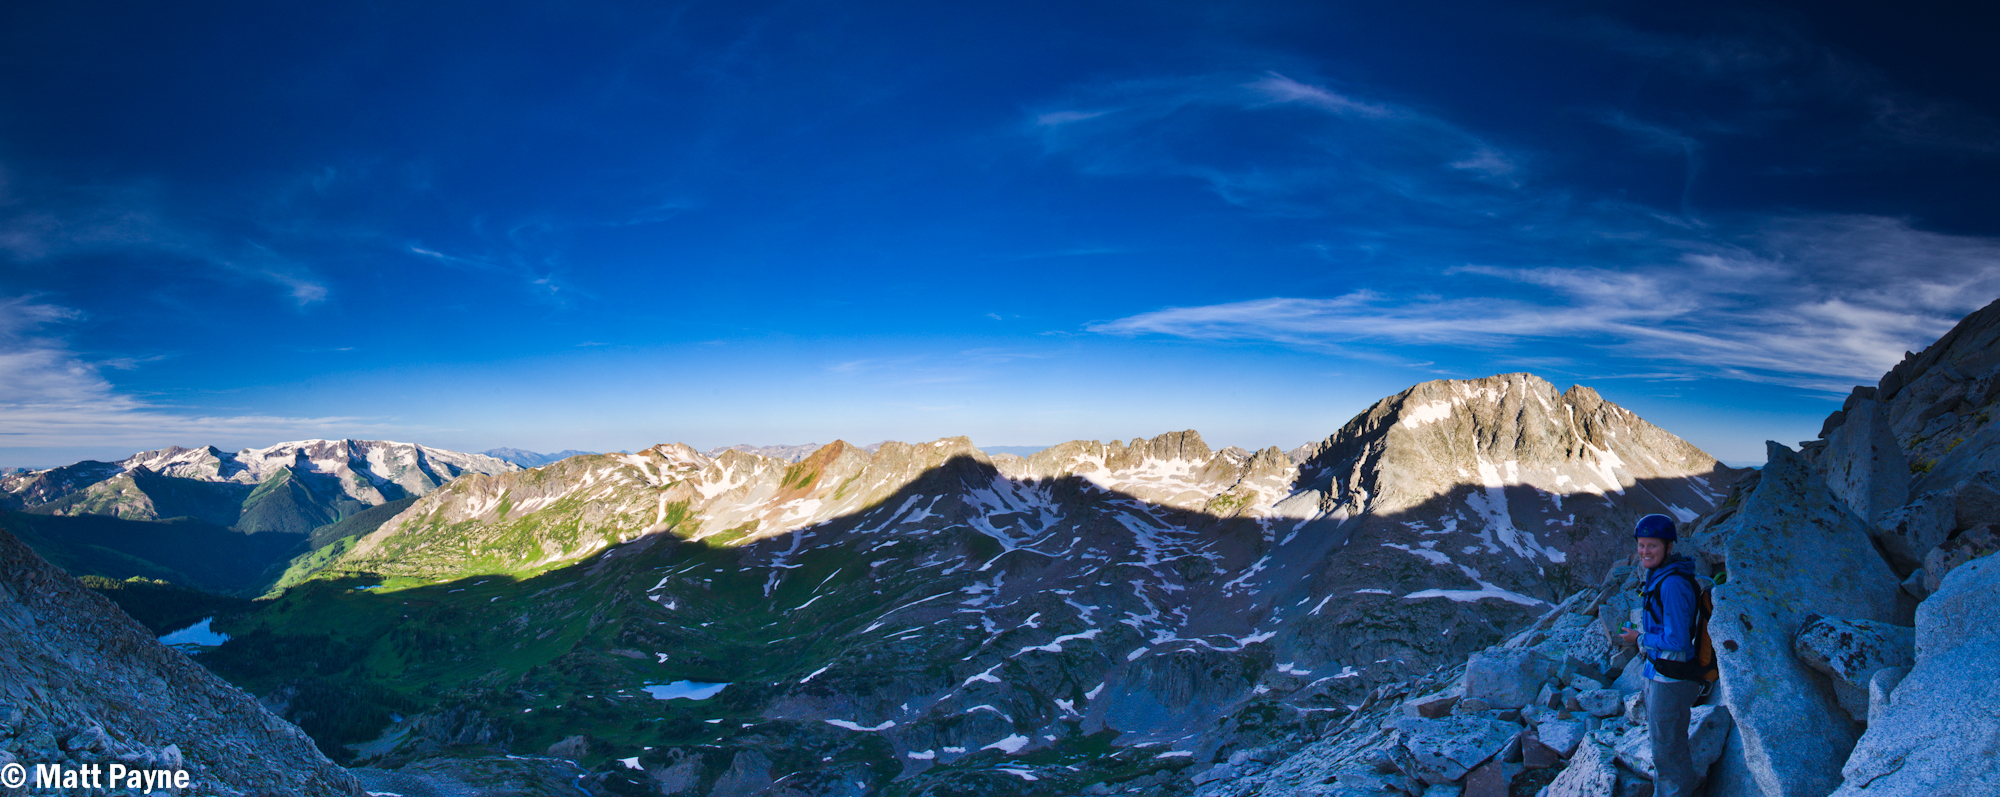
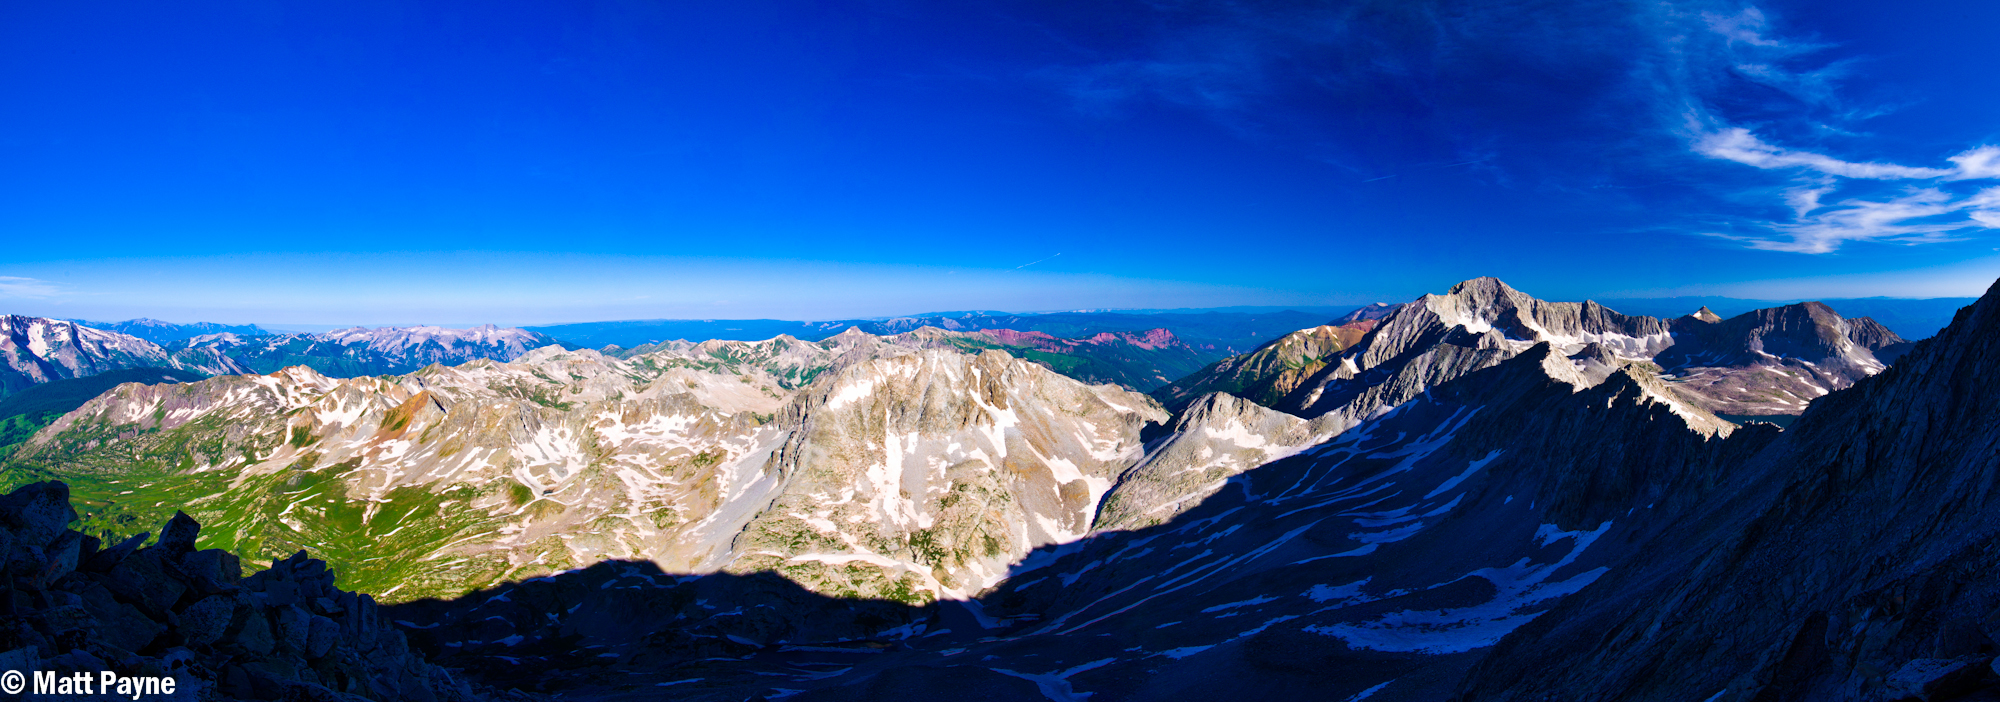
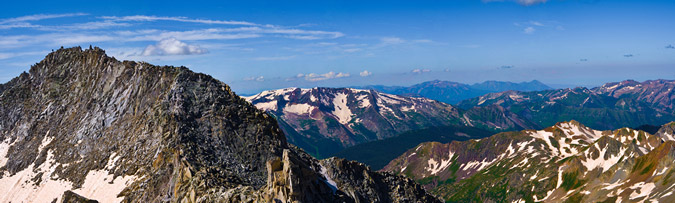
The obligatory 360 panoramic... which demonstrated how large of a summit Maroon Peak really had... and how amazing the views around us were.
The white coilour for Thunder Pyramid stuck out like a sore thumb above Len Shoemaker ridge.
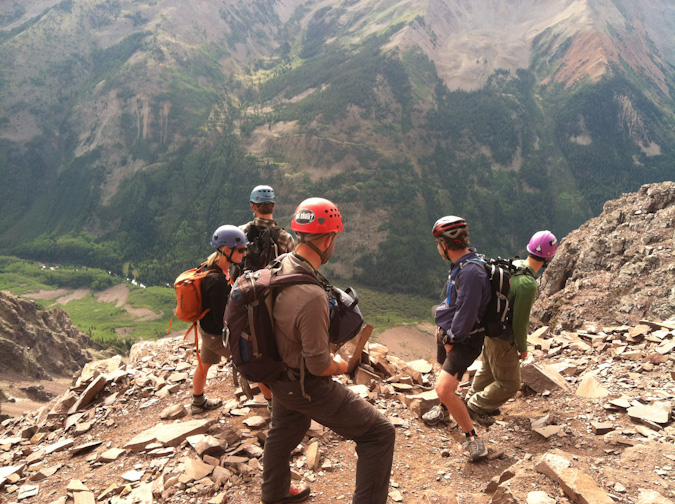
The weather began to look a little shaky after a long time spent at the summit, so we all decided to head down together. On the way down, Glenn was a really great mountaineer, concerned with safety and route selection in many of the same ways Sarah and I were. It was such an honor to spend the afternoon chatting about photography methods, gear and stories while down-climbing. I felt kind of bad for Sarah but she rolled with it and contributed a great deal to the conversation, having many stories of our mountaineering adventures to convey.
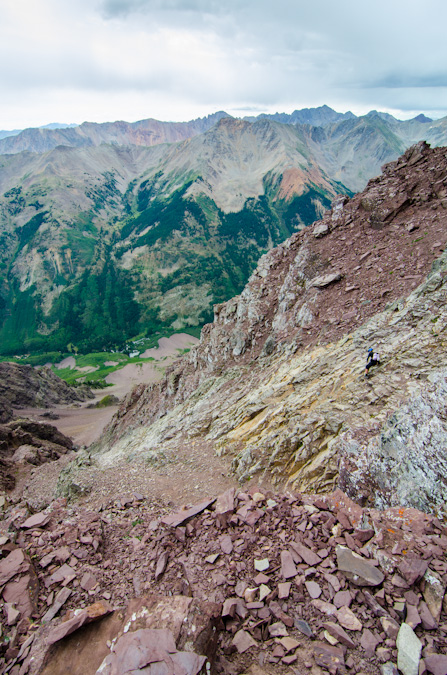
On the way down, at the earlier described gullies, we opted to go with Glenn down a different gully. I think the original gully we took on the up-climb was sturdier (the second of the two when coming up, the first of the two when coming down). Other than this small section, we sailed down the mountain’s route, eventually running into the lone guy we had encountered earlier that was waiting for his friends. Indeed, he was again waiting for his friends and explained that they were very slow and he was concerned because he said they were very set on doing the traverse between Maroon Peak and North Maroon Peak, which is very dangerous and requires a great deal of time. He asked that we try to convince his partners not to attempt the traverse based on the weather and their slow speed.
Shortly after this, we ran into the ambiguously odd duo again as Glenn tried to convey the seriousness of the traverse given their speed and the weather. They did not seem convinced this was problem for them and so I hoped that I would not be reading about them on 14ers.com in the Memoriam section (if you guys are reading, I hope you got down safely). We continued on and eventually reached the ridge safely without any issues.
The hike down was relaxing. No threat of weather to worry about.
From here, we casually followed the steep trail back down from the summit, stopping occasionally to take photos of flowers and a small group of mountain goats, which consisted of two adults and two tiny baby goats (so adorable). This prompted me to wonder about the breeding habits of mountain goats and the herd consistency, so I made a mental note to read about that when I got home. I did learn that it was likely that we saw two females (nannies) with their two kids (babies) – as I learned from this almighty Wikipedia article.
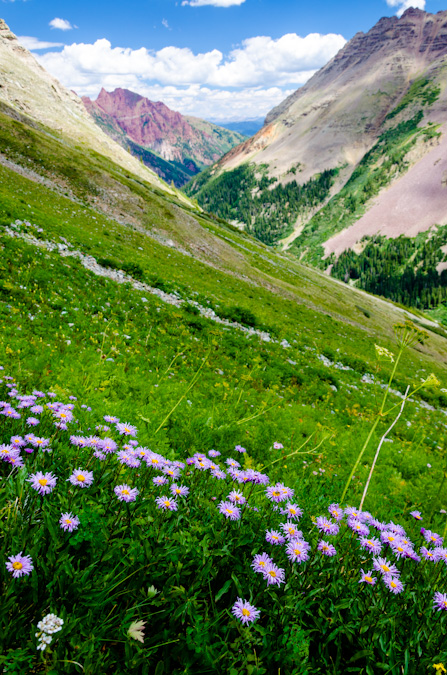
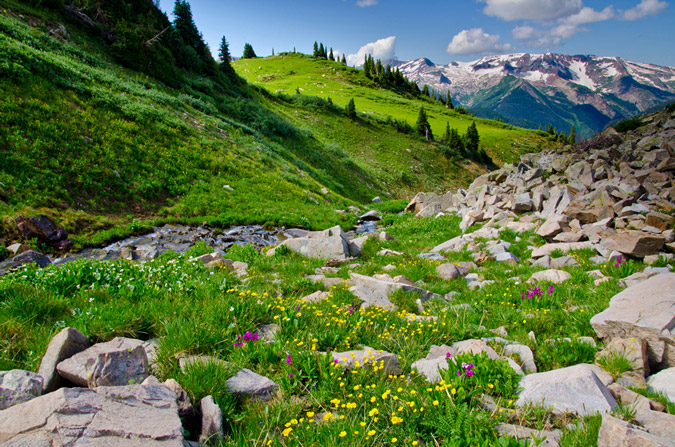
The wildflowers were so fantastic on this hike, it reminded me a little bit of the wildflowers we saw the prior year on our hike up into Lead King Basin.
Glenn left us about halfway down to move a little faster so that he could get some rest before his epic sunrise hike. Sarah and I continued down at a decent pace and found ourselves back at camp at approximately 1:45 PM. The weather was holding quite well for the Elk Mountains, and we were starving. We cooked some food and took naps that lasted well into the late evening and eventually the night. We were certainly well rested for the next climb.
Day 4: Early start and successful summit of Pyramid Peak - 14,018 ft.
The alarm went off and we climbed out of the tent and started hiking at 4:15 for Pyramid Peak. The hike down to the lake and to the trail split off in the darkness was a fun experience as always. Once we found the turn off for Pyramid Peak, we were greeted by a couple that was heading up to do Pyramid as well. They were moving quite quickly and left us in their dust in no time at all. We were both thankful to have a really well-constructed trail to start the day on - the Colorado Fourteeners Initiative built an absolutely bomber trail up the first section of Pyramid in 2006 and it does not disappoint. The trail climbs steeply out of the valley over large boulders and is very well-maintained. Before we knew it, we were starting to get the first sunlight of the day at pre-dawn.
After switching back and forth up the steep slopes, the trail deposited us at the base of a giant boulder field, nick-named the "Ampitheater" due to the fact that it has three of its four sides surrounded by steep sections of Pyramid Peak.
As we rose up the Ampitheater, the views to the north became better and better, with the soft light of sunrise illuminating the surrounding peaks.
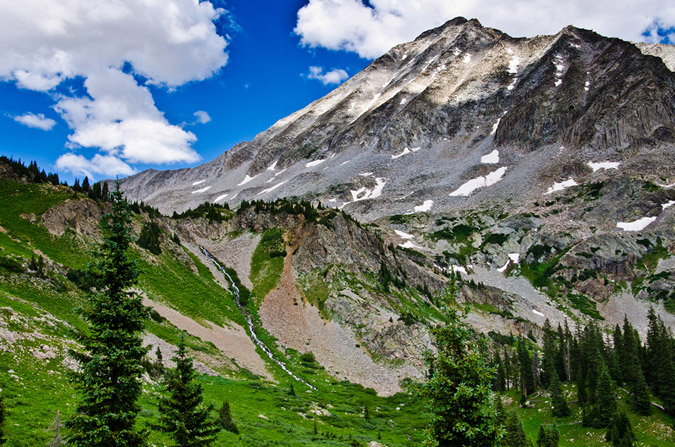
Eventually, we reached the top of the Ampitheater and were greeted with our next task, climbing up a very steep scree and dirt gully to the ridge. We were both overcome with glee over the prospect of such fun hiking (just kidding). Fortunately, the views behind us were starting to get good, with Snowmass Mountain and Capitol Peak poking above the ridgeline in the Ampitheater.
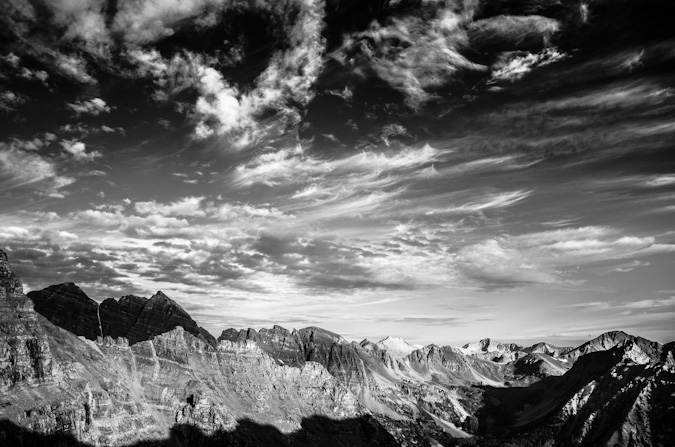
In addition to this, the clouds above were looking phenomenal, and the Maroon Bells were beginning to poke up above the ridge too.
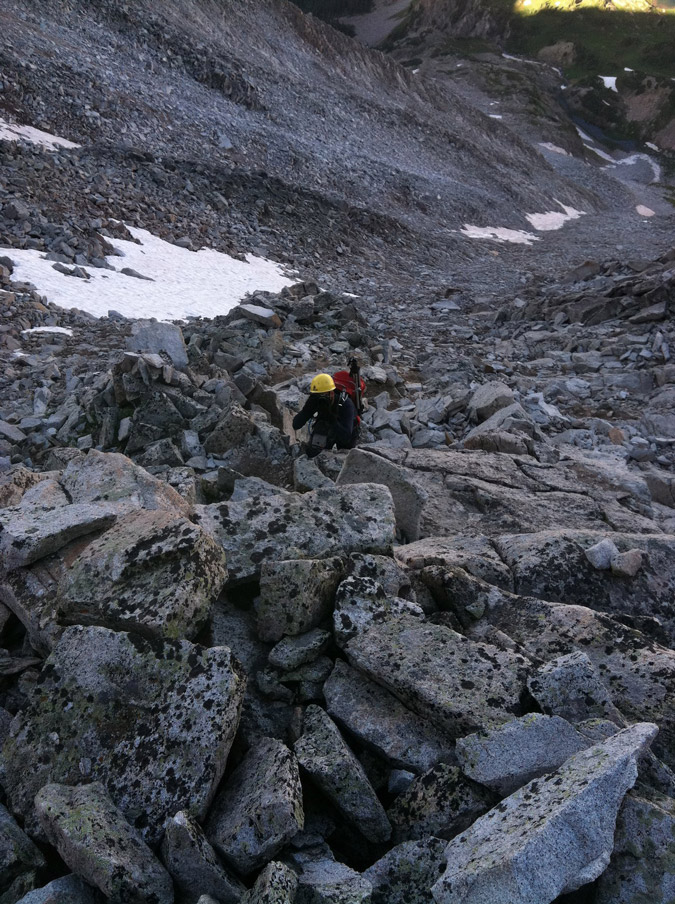
The hike up this section was gruelling to say the least. It was steep, loose and unrelenting. The occasional break to look back was worth the climb though.
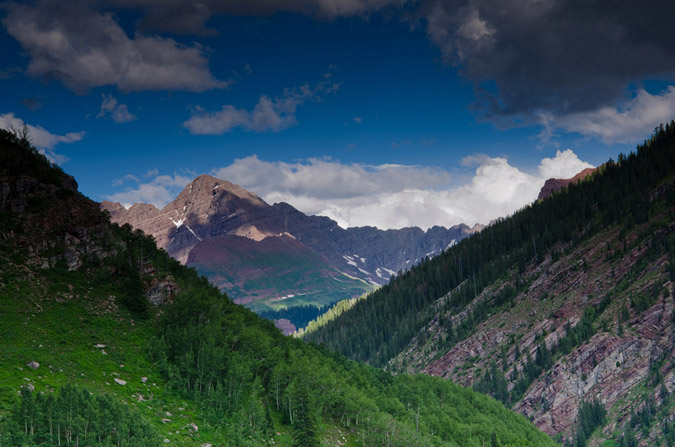
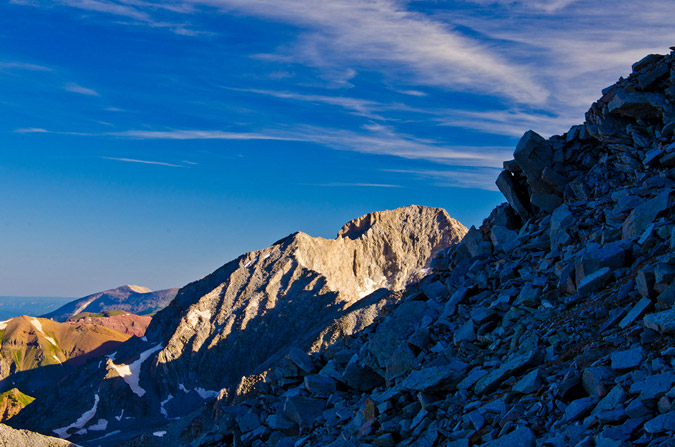
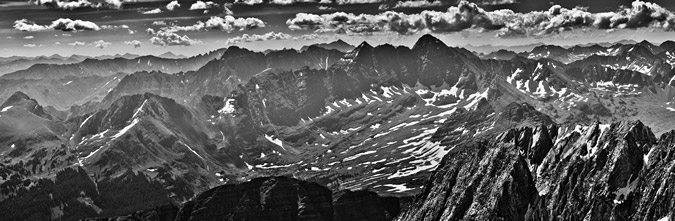
At last, we reached the top of this devilish section of climbing and our day's objective finally came into view for the first time. Pyramid Peak erupted above us like some freakish volcano. Here's a groovy photo with all of the mighty Elk 14ers in view - Pyramid, Maroon, North Maroon, Snowmass and Capitol. 
Sarah and I stopped for a bit at the top of this section to rest, eat and study up on the route. Sarah enjoyed what had become her signature staple food of the trip - PB&J on a hot dog bun. Yep. 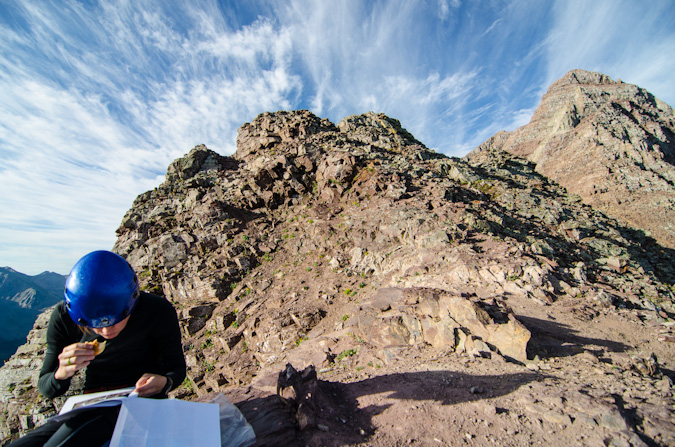
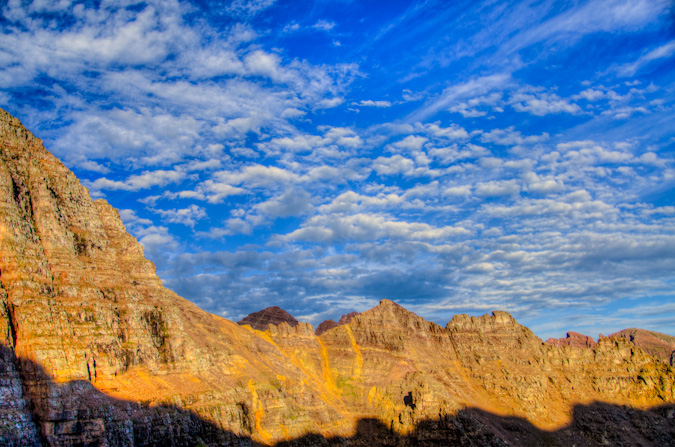
The clouds continued to provide a very dramatic feel for the whole morning.
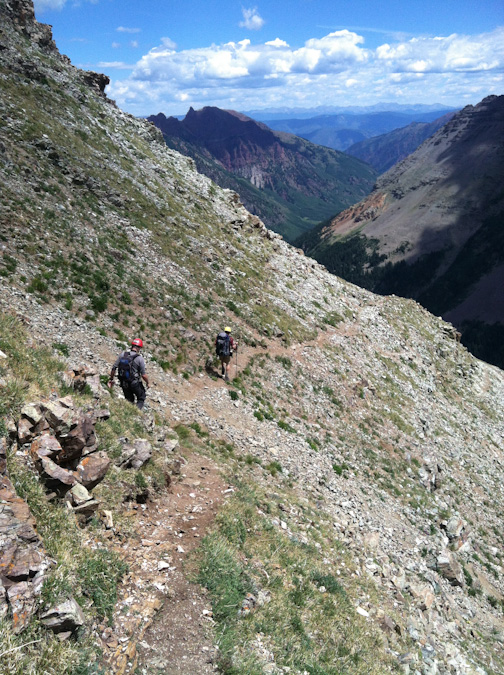
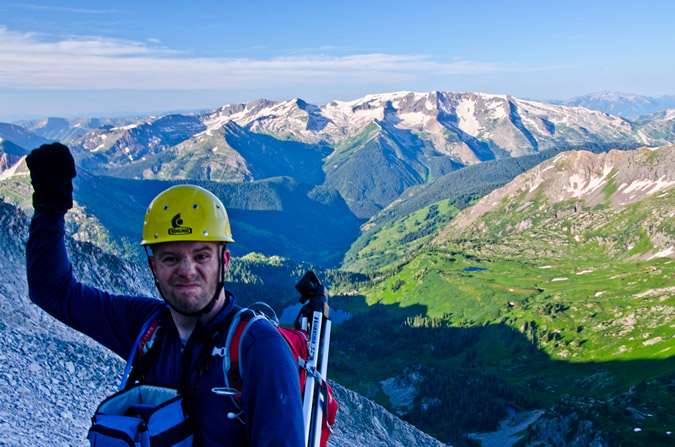
After a short rest, two climbers joined us on the saddle - they were named Doug and Martin and asked to join us for the rest of the climb so that we would not kick rocks down on each other. This seemed like a great plan to us; although at first glance, Sarah and I were both a little taken back by Doug's bicycle helmet. Fortunately, it turned out he would be one of the safest climbers I've been with.
Doug snapped off a group photo for Sarah and I and we departed for the difficult section of the climb.
The route was quite obvious for most of the remaining part of the climb, with several cairns and a clear trail in many sections. At one point, we found ourselves at a section that was a huge crevasse in the trail, which totally reminded me a photo I remembered seeing of my dad when he climbed Pyramid Peak. Indeed, the crevasse was jumped by me both up and down. Here's a photo from the 1980s of my dad jumping a similar crevasse.
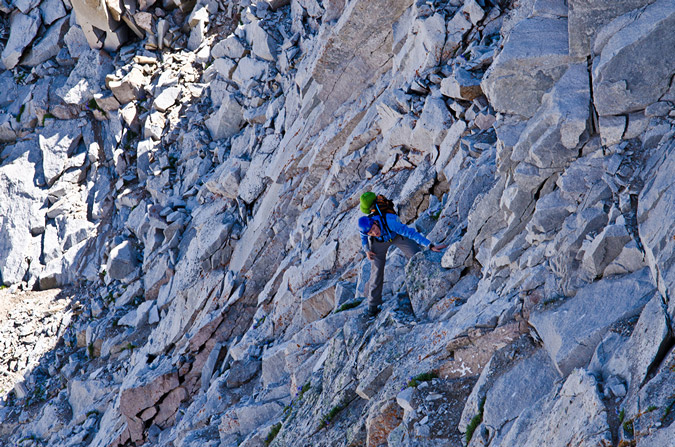
We reached the infamous "ledge" which proved to be a challenge with my camera bag affixed to my chest. Sarah captured this photo of me being quite relaxed while crossing, with camera in hand.
I had the camera out for a reason though, as I wanted to get a closer shot of Doug and Martin crossing this awesome section.
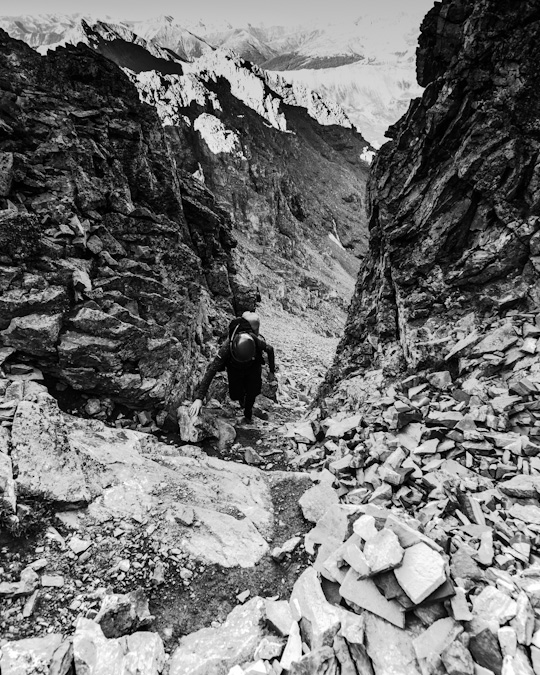
At last, we reached the infamous green gully, which turned to be the most enjoyable section to upclimb. It was quite solid and easy going, with little to no loose rocks to contend with. It was very steep though, and a miscalculation would prove fatal. Climbing to the top of this section was quite a lot of fun.
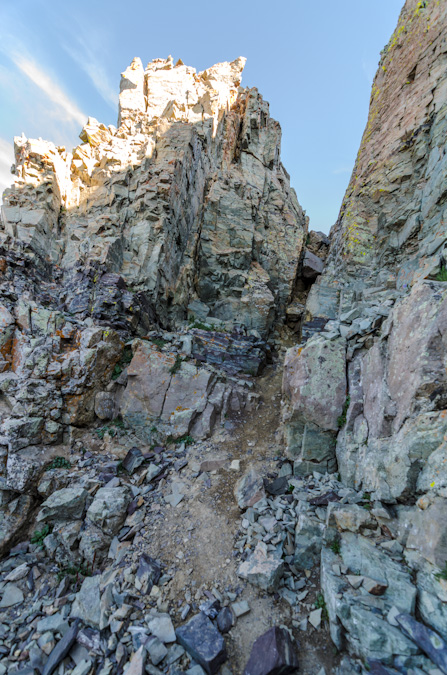
We then reached what many consider to be the crux of this route up Pyramid Peak, a section where you can choose between a very exposed class 3 section or an unexposed but more dangerous class 5 section. Coming down from this area were the two climbers we met earlier in the morning near the lake - they had already summited and were coming down, so we waited for them before continuing. As a group, we had a nice discussion about the route and the other two climbers departed.
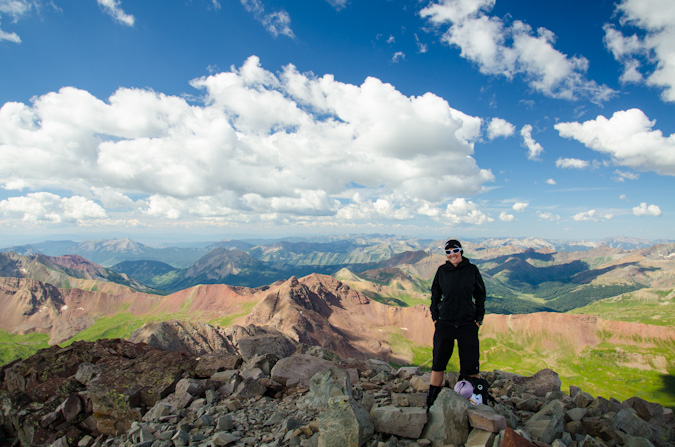
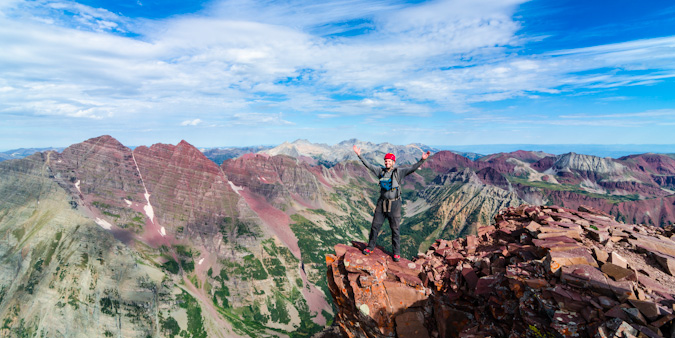
The crux move was spicy but nothing too hard. I thought the summit block on Mt. Wilson was harder and more exposed for sure. The rest of the climb was as simple as weaving our way up cairned sections of ledges. Before we knew it, we were on the summit. Sarah was up first and captured a photo of me summiting my last 14er.
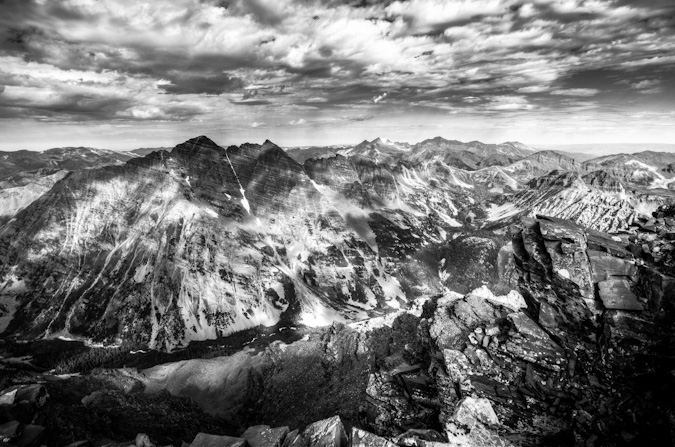
As I reached the top, I took one last look back behind me at the east Elks - they looked so good.
The feeling was surreal, exciting, sad, happy and relieving, all at the same time. It was a flood of feelings for sure, but they were all welcome feelings. I felt like I had accomplished something quite remarkable (even though thousands have done it before me). Perhaps it had something to do with the length of the time it took to finish, or the length of the time I had had the goal. Either way - it was pretty darn awesome! Sarah gave me a big hug and then dropped a huge surprise on me. She prefaced the surprise with the something like the following words, "Angela wanted me to give this to you when you got to the top... I ensured it was not a divorce letter or anything like that, but don't shoot the messenger!"
She then handed me a white folded envelope with my name on it. Inside was the most thoughtful, humorous and loving message I could ever ask for from my wife. Sarah said, "she said you might cry." Which of course, I did a little.
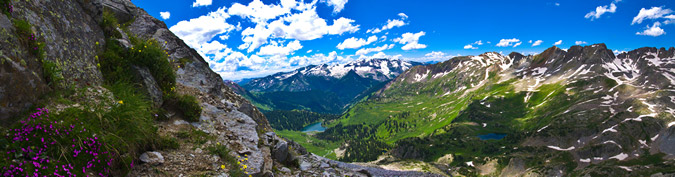
Sarah and I celebrated the amazing day and basked in all of the glory that I knew would come from the views from Pyramid Peak. It was the perfect mountain to finish on. The views of the Maroon Bells, Len Shoemaker ridge, Snowmass Mountain, Capitol, Castle, Conundrum, Cathedral and the rest of the killer Elk Mountains were absolutely surreal and wonderful.
The famous Pyramid Peak diving board was a very inviting spot for photos, and Sarah decided to go surfing. I did an HDR and a non-HDR of this, for fun. You can mouse-over or click to see the non-HDR version.
...and my celebratory pose!
It felt like a small little party up there, spirits were high, weather was looking good, and the views were to die for.
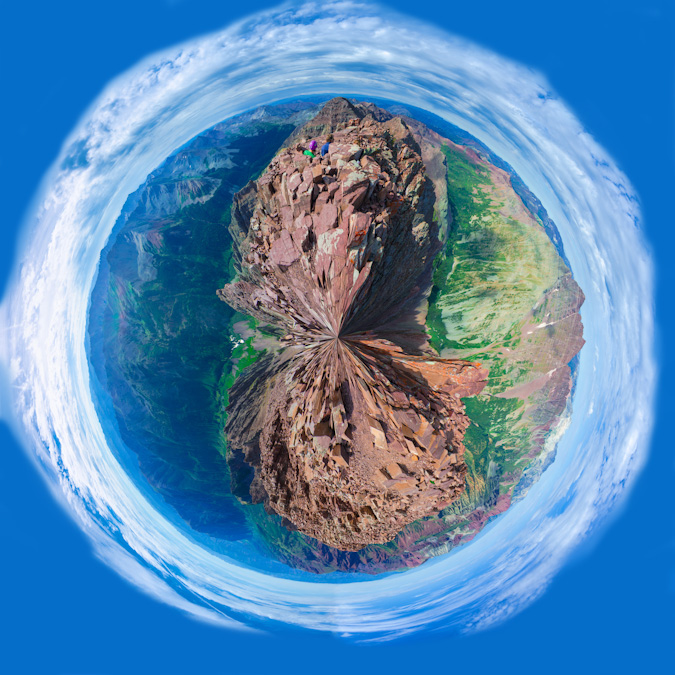
After some food, I fired off a 360 degree panoramic from the summit. One of my favorites to date.
The same 360 degree pano made for a wonderful planet too... for more on those see this article...
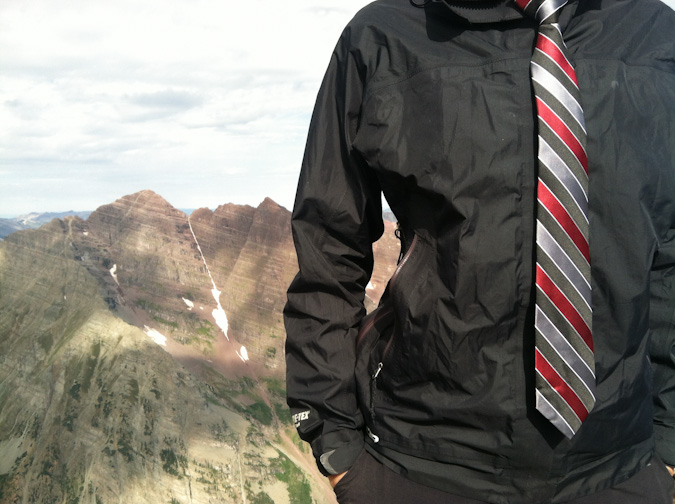
One of Sarah's more awesome traditions is that every Friday she wears a tie and takes a photo of it. This Friday would be no exception!
Weather was starting to build to the west, so we decided to start to pack up our stuff. I still was in awe of the sheer nature of the valley below - how steep the walls were, how amazing the features of the rock were. I'm not religious at all, but this is as close as you can get to a religious experience.
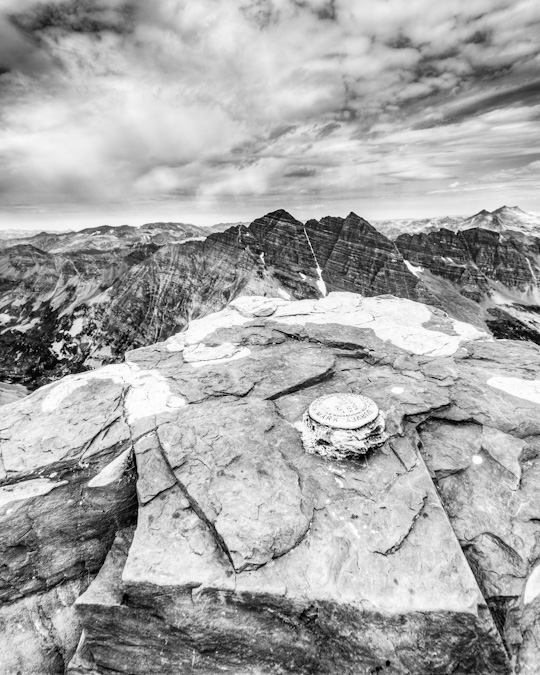
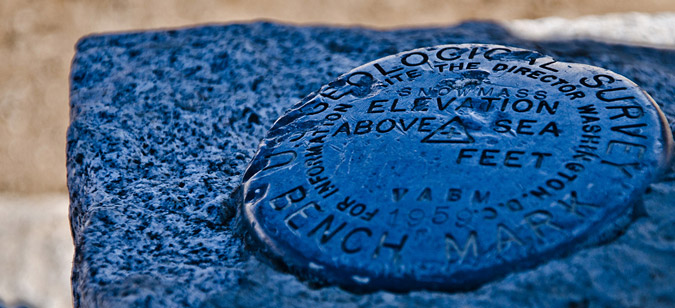
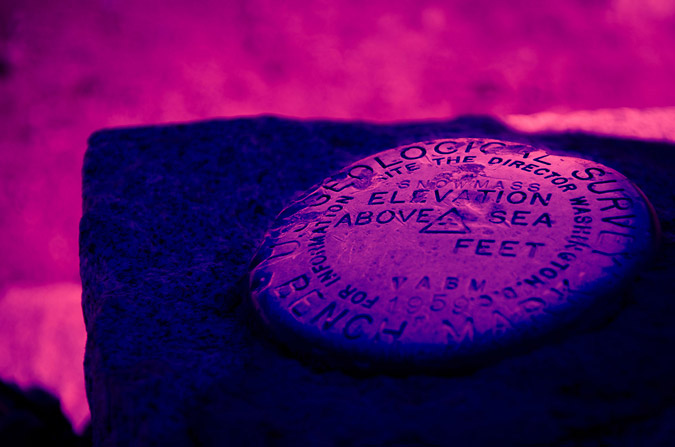
Before we left, I wanted one more parting shot from Pyramid with the USGS marker.
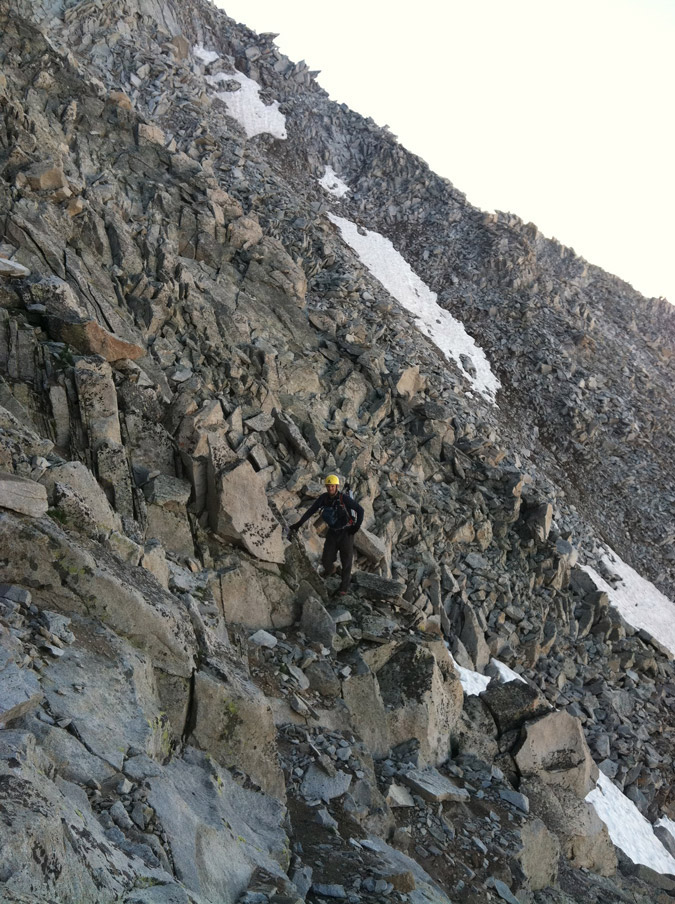
Downclimbing Pyramid Peak was slow going. It always feels much more awkward to downclimb the steeper terrain and Pyramid was no exception. Our group took special care not to dislodge any rocks onto each other and we staggered our decents and ensured we were each clear of a run-out section before the next person started. It was pretty fun climbing though.
Pyramid was one steep mountain, with lots of loose rock to beware of.
I was still amazed at how rugged the terrain was on Pyramid - it looks so unclimbable from all directions, and even when you're up there it feels quite surreal.
The slowest and most challenging part of the downclimb was the green gully. We took turns decending into sections and just as we reached the bottom of it, small rain drops started to slowly fall. We had made it through the hard sections just in time.
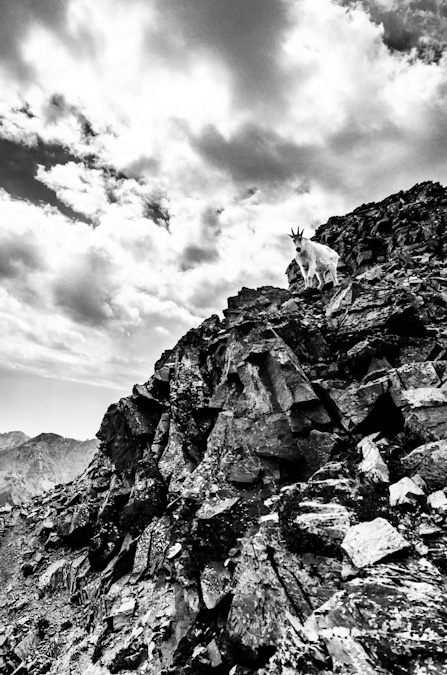
Luckily for us, the rain lasted only a short time and we were able to reach the saddle quickly and safely. Upon arrival, we were greeted by a lone mountain goat, who was probably licking up the urine others had deposited there earlier in the day...
This mountain goat was quite photogenic and decided to pose just for me on the rocks above.
After enjoying the company of the goat, we decided to head on down the most wonderfully exciting and enjoyable dirt and scree fest that was the descent off of the ridge back into the Ampitheater. We both ran out of water at this point and decided to hoof it down as fast as we could, with plans of heading on out of the valley that evening. The thought of a celebratory meal in Aspen was too much to pass up. Once out of the ampitheater, the CFI trail down was quite solid. I could not really imagine how awful this trail would be before this work was done. I took one final parting shot of the Maroon Bells on the way down Pyramid.
Sarah snapped off one last shot of me hiking back to camp. This is one happy dude.
We got back to our campsite and packed up after refilling our water. Our legs were tired. Our souls were refreshed. It was time for beer and pizza. We headed out and I took one final "classic" shot of the Maroon Bells from Maroon Lake with the "Deadly Bells" sign. "DO NOT ATTEMPT IF NOT QUALIFIED."
I'm not sure if I was qualified or not, but I felt greatly accomplished and quite humbled to have experienced them either way.

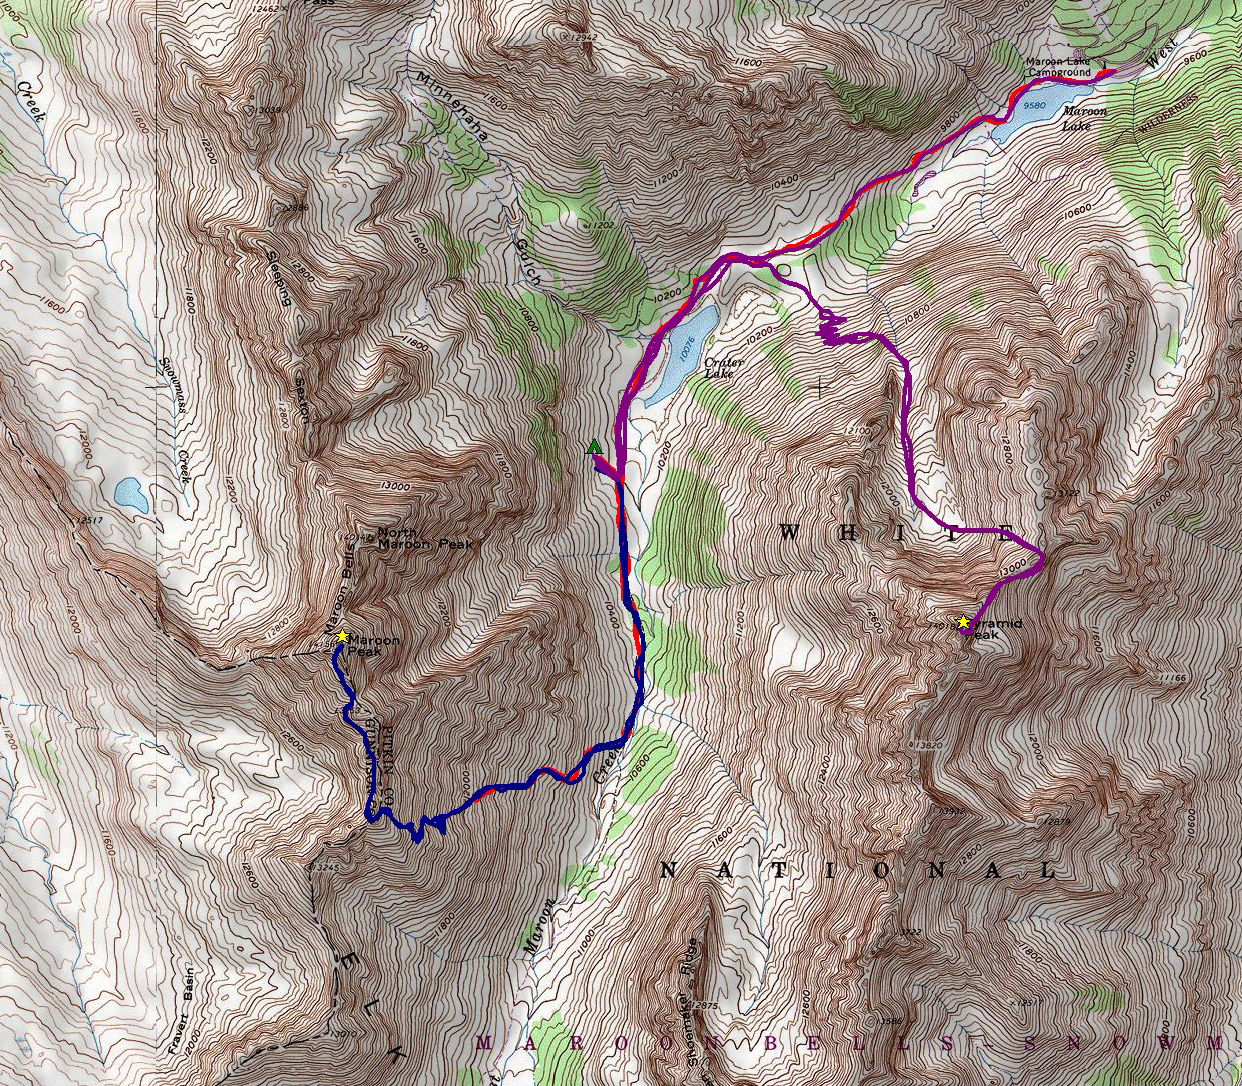
A final look at the route map. Click on it for a larger version.
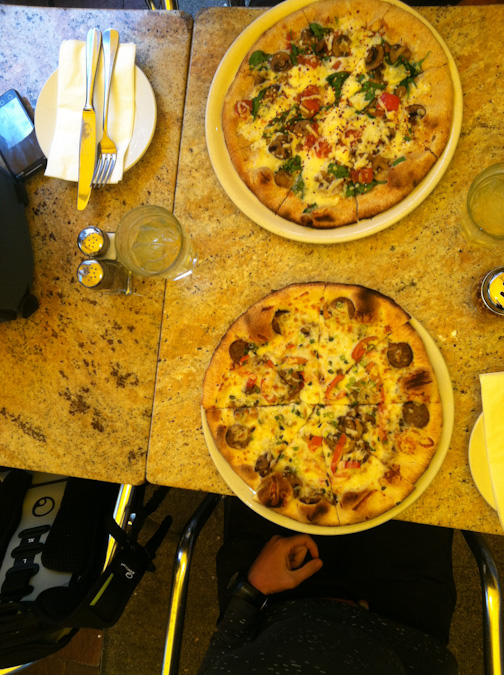
We decided on a restaraunt called Mezzaluna in Aspen for our celebration dinner. I had a vegetarian pizza (did I mention I'm a vegetarian) with truffle oil and Sarah had a sausage pizza. Two margaritas were served and congratulations were in order.
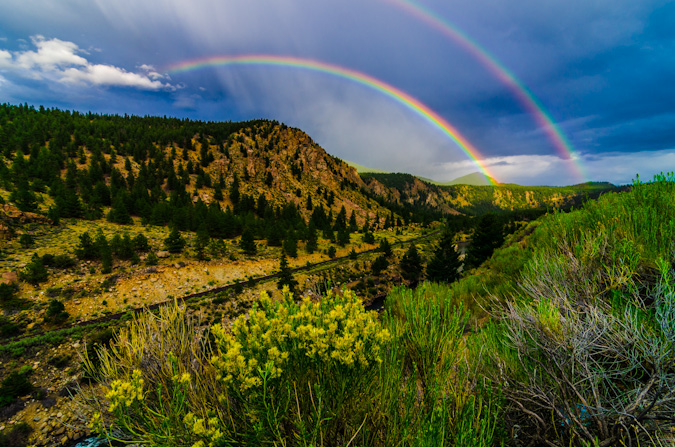
After leaving Aspen and dropping off of Independence Pass towards Buena Vista, we were greeted with a rare double rainbow, which capped off our most excellent trip in fine order. I could not have asked for a better trip, partner, or experience to finish the 14ers.
Conclusion and acknowledgements
A goal that takes 27 years to complete is one worthy of relishing, reflection and sincere acknowledgements to those that helped make it possible.
After fracturing my L5 vertabrae in 1995, I was not sure if I would ever be able to realize some of my goals. Fortunately, through hard work and incredible support from my family, I fully recovered from that and learned a great deal about work ethic. This quest for the mountains has tought me so many valuable lessons about life, about people, about myself...
Most importantly, it has taught me that despite people having severe differences of opinion on matters such as religion, politics or otherwise, something like the great mountains of Colorado can bring those people together to share in life-changing experiences that bind people unlike any other force. I hope to build on those lessons and continue to better myself as a person - my friends and family know there is plenty of room for growth.
To Sarah Musick: Thank you so much Sarah! It was such an honor to share those last two summits with you - you have been a true inspiration to me and my quest to finish. Your support over this past year has been fantastic. You are truly an amazing human being.
Of course, an achievment like this is never possible without the support of others, who are for sure some of the finest people I've had the pleasure to meet.
1. 1st - to my wife, Angela Payne (one fine Vegan chef with a killer sense of humor) - who has given me more support than I ever could have asked for - allowing me to chase my dreams is the best gift a person can give!
2. To my parents, they have been an inspiration for this life-long goal and I would have never have started without them introducing me to the mountains of Colorado at such a young age. My dad's goal to complete the highest 100 began in the 1970's and it quickly became my own goal as well.
3. To my family’s close friend – Dave LeShane – who also was on the quest for the highest 100 when I was a child – and inspired me to dream for the stars while climbing various 13ers with me as a child. Your wisdom, guidance and support over the years was like having a super-awesome uncle with bad-ass climbing stories.
4. To my regular climbing partners - Sarah Musick, Ethan Beute, Jeremy Park, and Regina Primavera (Yalegirl09) - you guys have been absolutely awesome to climb with! Your support, humor, talks, patience, insight and overall awesomeness has grounded me and reaffirmed my faith in mankind's future.
Sarah - you are one of the most amazing people I've ever met - our short but fantastic friendship has been such a blessing for me.
Ethan - our talks and hikes are always some of my most enjoyable days and most memorable experiences - I hope we can continue what I believe to be an incredible friendship!
Jeremy – while we have not done any 14ers together, we’ve known each other since high school and have been amazing friends ever since. Our epic adventure on Vestal’s Wham ridge will always be one of my fondest moments in my life!
Regina - you are one crazy, amazing and true friend! Our hikes are always a great time and I have enjoyed our talks!
5. To my other climbing partners, mostly from 14ers.com –
Terry Mathews (tmathews) - it was so great getting back into climbing with you back in 2009. Our adventures and introductions to class 3 on Crestone Needle, Crestone Peak, Blanca, Ellingwood, Kit Carson and Challenger were fantastic.
Micah (mountainmicah83)- dude – our epic day on Harvard and Columbia will never be forgotten - while I had hoped we could get out more – it was still awesome to learn rope/climbing skills from you and Matt!
Mike Vetter and Travis Arment - what can I say Mike - anyone who would drive all the way from South Dakota to climb Huron Peak with me is one awesome dude. Our adventure up Capitol Peak with the accomplished Travis Arment was unforgettable. You guys are fantastic people.
Barry Johnson (Johnson) – our climb of Shavano in 2009 was my re-introduction to the 14ers after a long hiatus – thank you for joining me on that fantastic day!
Mike (fiemus) and Bob Hay – our hike up Yale was great – learning about all of Mike's SAR stories was one of my favorite days in the hills.
Kara Bauman, Will (WillV), Alli Kolega and Tom Shaar – our climb of Mt. Wilson was absolutely wonderful! Thank you for allowing me to join you guys on such a fabulous adventure!
6. To Bill Middlebrook for creating and maintaining 14ers.com – it has been very helpful for me in this crazy pursuit.
7. All the other awesome mountaineers, climbers and hikers in this community - we need to continue to focus on our common goals and dreams.
Thank you for all for the inspiration to write these, and thank you for reading...
{fcomment}
Creating Planets out of 360 Degree Panoramic Photos

This tutorial will teach you how to create "planets" out of your 360 degree panoramic photos and requires Photoshop.
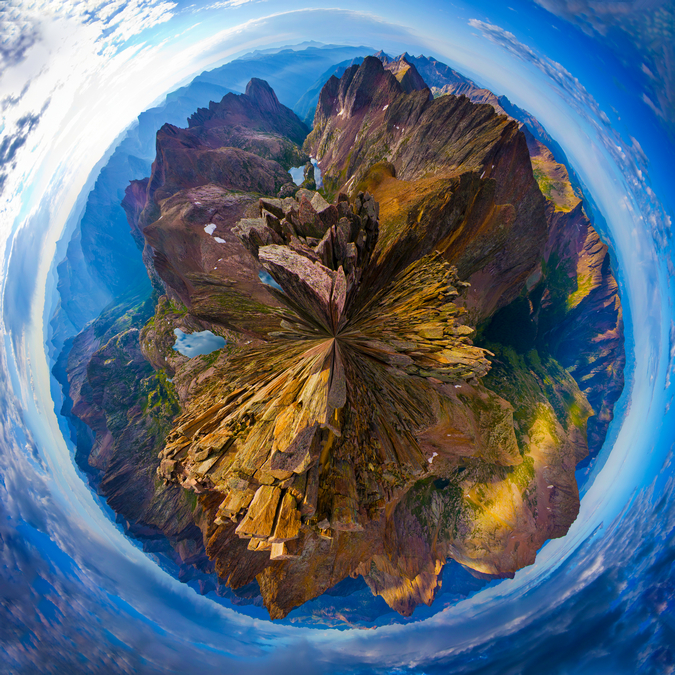
It is no secret that one of my favorite things to do is to create panoramic photos from very high and unique vantage points in crazy situations like sunrise, sunset, etc. One way that I have made this practice even more artistic is to create "planets" out of those panoramics. This process is actually easier than it sounds, as long as your panoramics are done well. The first step, of course, is to create a 360 panoramic out of your images. I have written a tutorial on how to do that HERE. Once you have your panoramic created, open it in Photoshop. For this tutorial, I have chosen a 360 degree panoramic that I took 2 months ago from the summit of Windom Peak, one of Colorado's more remote and rugged 14,000 ft. mountains. You don't have to use 360 degree panoramics for these planets, but it makes the editing process much easier.
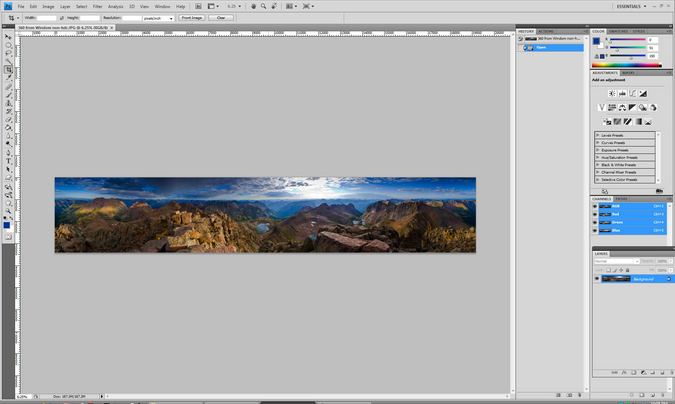
Now that you have your panoramic loaded up into Photoshop, you will need to change the size of the photo itself so that the length and width are equal. To do this, you need to click on the "Image" menu and select "Image Size." Uncheck "Constrain Proportions" and "Scale Sizes." Lastly, make the width and height the same value. I like to just use an approximation roughly equal to half the value of the width for this.

Hit "OK" and you will see the image warp into a squished looking image. Click again on the "Image" menu and rotate the image 180 degrees. It will turn the image up-side-down.
The next step is to turn it into a sphere around a polar coordinate. To do this, click on "Filter" and then on "Distort" and then "Polar Coordinates."
The result is a square image with your scene distorted to look like a planet. Crop it to your desired size. The last step is sometimes not necessary, depending on how clean your panoramic photo is and which software you used to create it. You may need to go into the seam where Photoshop joined the two ends and do some clone stamping and/or healing brush work to get it to look good. In this case, the pano fits together perfectly and is ready to publish! Here are the final results:
The very last thing that I sometimes will do with these is to clean up the corners, as you may notice some interesting lines shooting out from them. I usually just use the healing brush and paint in the corners. I hope that this tutorial was helpful! Please feel free to share your results with me in the comments below.
{fcomment}
Snowmass Mountain and Hagerman Peak - Magic in the Elk Mountains

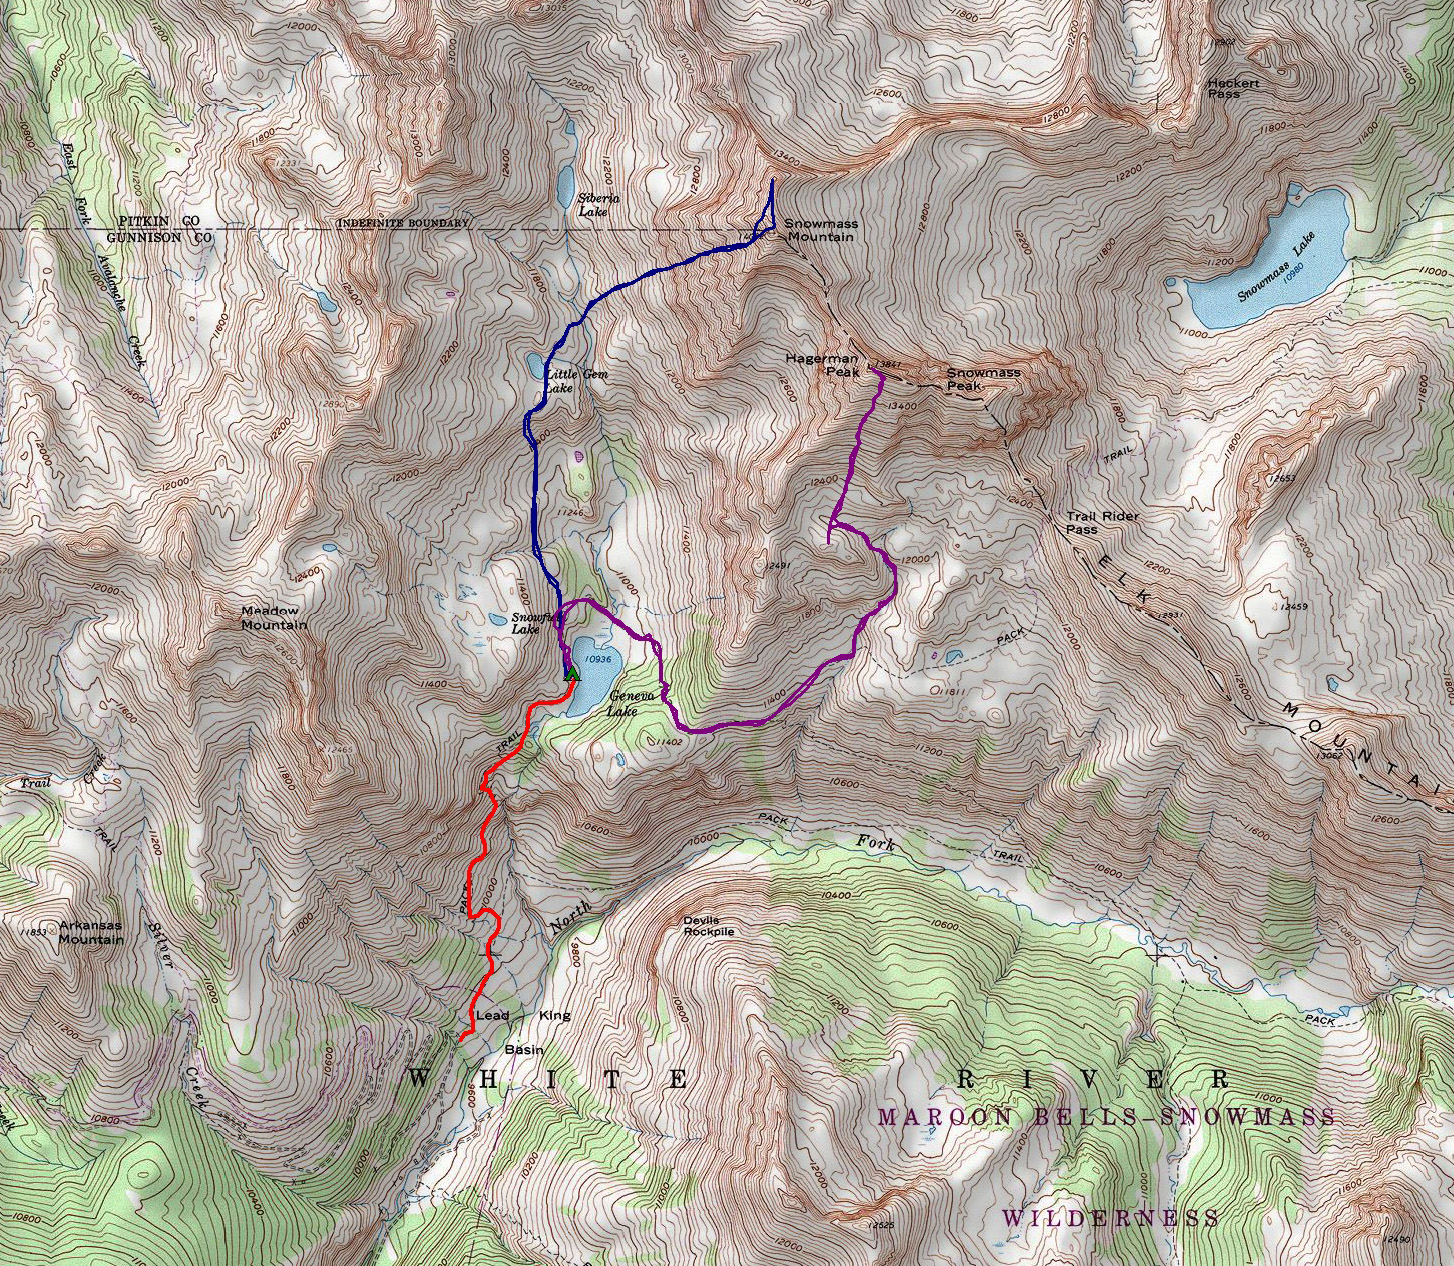
Day 1: Drive to Lead King Basin and Backpack to Geneva Lake ~ 1,400 ft. elevation gain ~ 3 miles
Day 2: Snowmass Mountain via the West Ridge Route ~3,000 ft. elevation gain ~ 6 miles
Day 3: Hagerman Peak via the standard route (south ridge) ~3,000 ft. elevation gain ~ 6 miles
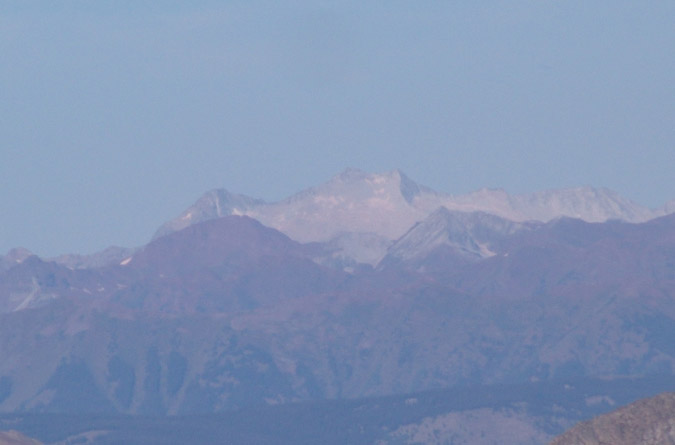
Snowmass Mountain and Hagerman Peak have sustained my attention for quite a few years. Ever since I first recall setting eyes on Snowmass Mountain from the summit of La Plata in 2005, I was in awe. The massive snow field that sits in the bowl that is Snowmass Mountain is simply breathtaking and totally recognizable from the summit of many mountains in Colorado. Here are a few examples of how easy Snowmass Mountain is to recognize, from various shots I’ve taken over the past few years of Snowmass Mountain from various summits:
From Huron Peak - June 2010:
From La Plata Peak - July 2005:
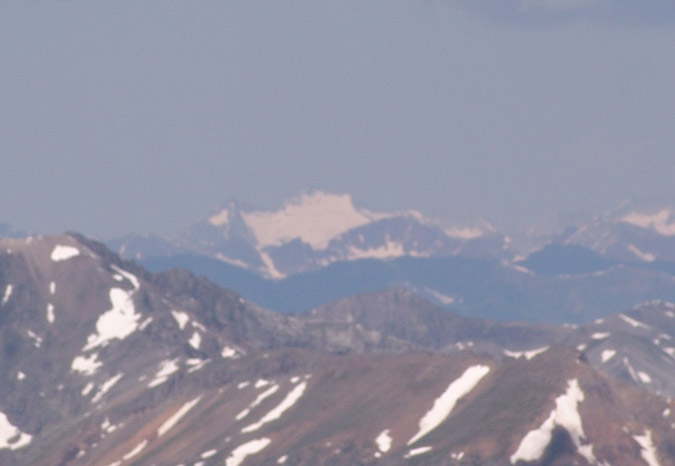
From Mount Massive - October 2009:
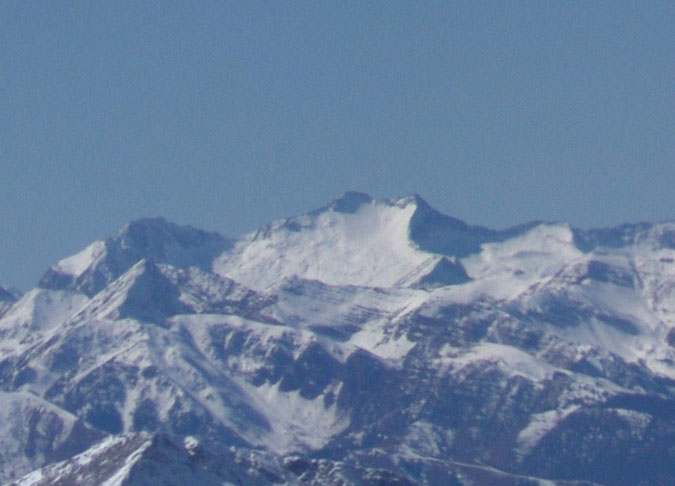
From Mount Elbert - August 2009:
Snowmass Mountain and Hagerman Peak have a very storied history and are deserving of a few paragraphs to paint those details:
Snowmass is the 31st highest mountain in Colorado and rises to 14,092 ft. and is the 4th highest in the Elk Mountains. Snowmass was named originally by the Hayden Survey of 1873 and was simply called “Snow Mass” because of the huge snow field beneath the summit. The Ute Indians called it “Cold Woman” because it was often believed to be the source of bad weather. Some pioneers called it White House Peak, but that name did not stick. 1 Interestingly enough, there is a restaurant in Carbondale that we ate at on the way home called White House Pizza – which was delicious by the way - I wonder if it is named after this historical fact.
Hagerman Peak is the 88th highest mountain in Colorado and rises to 13,841 ft. and is the 8th highest in the Elk Mountains. Hagerman Peak is named after the legendary Aspen, Colorado businessman and mountaineer Percy Hagerman, who was the first person to climb Maroon Peak in 1908 and the first person to climb Hagerman Peak as well. From Hagerman’s Book, “Notes on Mountaineering in the Elk Mountains of Colorado, 1908-1910,” Hagerman describes the area around Snowmass Mountain and Hagerman Peak: “These peaks are among the finest in the Rockies for a number of reasons. They have big streams and fine large lakes; they are rugged, steep and forbidding in appearance; some of them are richly colored; and finally, the upper stretches have not been scarred with mining claims.”2
Hagerman Peak is rarely climbed due to its remote location and difficulty (and because it is not a 14er). In fact, we saw only a handful of names on the summit register dating back to 2009 – many of which I did recognize (props to Ryan Kowalski for picking Hagerman as his 99th Centennial to climb – he eventually finished on Pikes Peak of all mountains).
Enough with the history – let’s get on with the trip report, starting with a TOPO map of our journey (click for a larger version):
Day 1: Drive to Lead King Basin and Backpack up to Geneva Lake
I was desperate. Desperate for the mountains, desperate for a climb, desperate for a climbing partner. After my miserable failure on Snowmass in June, I really wanted to get vengeance. If I were to finish the 14ers this year, that meant knocking out either Snowmass Mountain or Wilson and El Diente. Due to the insane rain that the Telluride area has received as of late, and thanks to a stern warning from a friend from 14ers.com, Jim (dancesatmoonrise) about the nasty conditions of the Wilsons after a lot of rain, I opted not to head down to the Wilsons. Instead, I contacted another friend, Ryan (monster5) to see how the conditions on Snowmass’ west ridge route were. Ryan was involved in a rescue attempt the prior weekend on Snowmass for 25-year-old Sean Wylam, another 14ers.com member. Sean eventually succumbed to his injuries and died, which was a real blow to the 14er climbing community. The thought of Sean’s death on Snowmass did damper my enthusiasm to climb it; however, I was determined not to let that stop me. Additionally, I chose another, more technically challenging route, but one that did not involve the use of crampons or snow. Lastly, I knew that this route would also give me good access to Hagerman Peak, which is another mountain in the highest 100. Bonus! I searched all week long for a partner. I knew that one of my regular partners, Regina, would not be up for the challenge (too technical), and I knew my other go-to partner, Ethan, would not be able to do a multi-day trip. Another friend, Micah (mountainmicah83) was already occupied for the weekend as well.
Enter Sarah Musick, friend, musician (no joke - that is really her last name – check her out on YouTube), ball-smasher (ask me later about that one) and last-minute climbing partner hero of the year! Here's Sarah on YouTube:
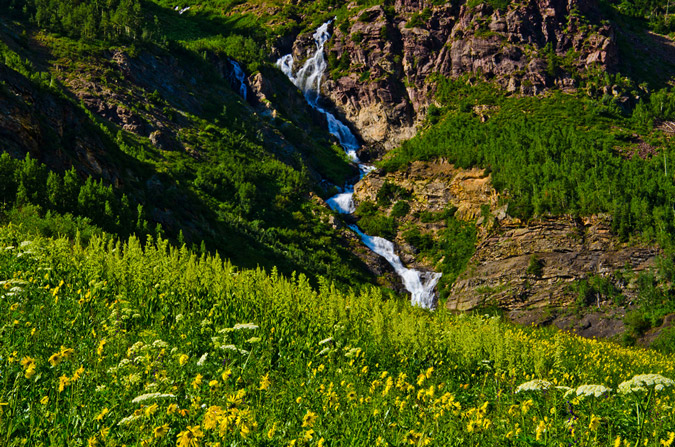
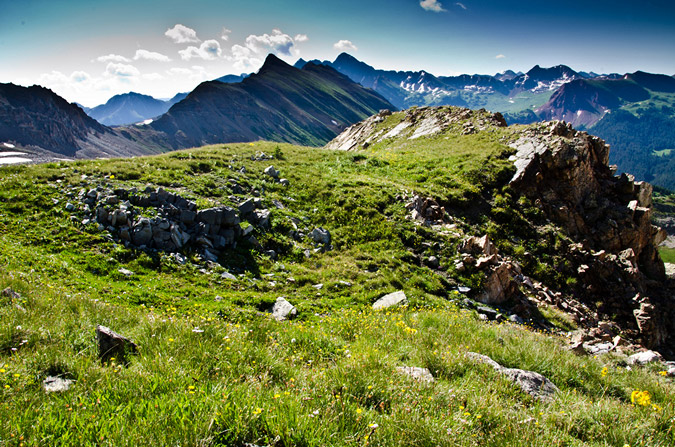
Sarah was able to get the green light at the final hour to join me on my trip to Snowmass – and I was totally excited! I really was not sure if I would be able to go without a partner because my wife might have just taken my car keys away if I didn’t have a partner lined up. After watching Sarah perform at Stargazers Theatre on Thursday night, I was able to pack for the trip. I had Friday off of work and was ready to rock. I picked Sarah up at her house at 10 AM and we departed for Carbondale. We stopped in at a burger joint in Carbondale and headed for Marble. The drive up from Marble was interesting. I was definitely glad that I had my lifted Jeep Grand Cherokee. I would rate the road a 6/10 on the difficulty scale for off-roading, as it did provide some rocky sections and a pretty formidable creek crossing. I think most stock SUVs could handle the road with caution. We found what we thought was the trailhead, but were not sure since it said “Silver Creek Trail.” We confirmed that it was not the right trail and kept going up the road another 2 miles up. All-in-all, the road into Lead King Basin is a good 15 miles of off-road adventure. I have never seen an area so full of wildflowers in my entire life! Wildflowers were everywhere, and the Lead King Basin offered spectacular views in almost every direction, all filled with flowers. Especially amazing were the views of Snowmass Mountain and Hagerman Peak. A huge waterfall crashes down from the Geneva Lake Basin into the Lead King Basin beneath the mountains.
Wildflowers galore in Lead King Basin with Snowmass Mountain (left) and Hagerman Peak (right) in the background. Our route for Snowmass Mountain would take us right up that steep left side.
My Jeep’s temp gauges were all going into the red and I was perplexed. Well, it turned out that I had burned / leaked all of my coolant. No big deal, I had extra in the back. We parked at the real trailhead, which was totally obvious and labeled as the Geneva Lake trail. We headed up the trail at about 5 PM.
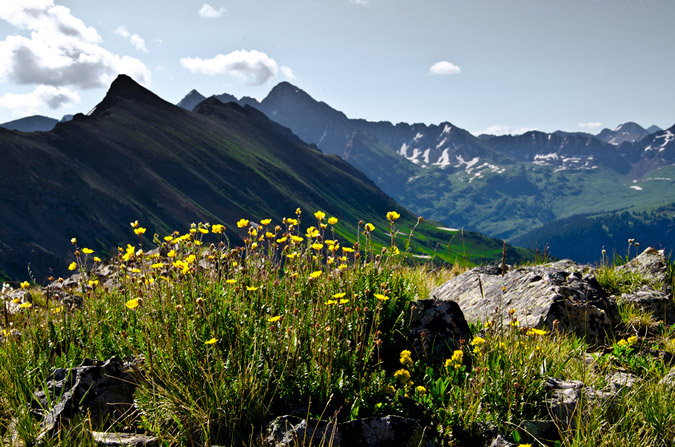
Some of the wildflowers that we saw on the trail were actually taller than me! The Wilderness Designation for this area is completely appropriate, that was obvious.
Along the way, there was an incredible opportunity to take photos of the wildflowers. We found ourselves standing smack dab in the middle of a field the size of three football fields, all filled with huge wildflowers. It was incredible. I was thankful that I had packed in my tripod (thanks for the advice Kane Englebert).
I brought the tripod for a couple of reasons. The first reason was that HDR photos are much better with a tripod since the tripod reduces and prevents movement of the camera, making the HDR photos easier to combine. The second reason is to do better panoramic photos.
The use of the tripod for this field of wildflowers proved great and I put together an HDR version and a non-HDR version for you to see the difference. By mousing over the photo, you can see the HDR version. You can really see how the HDR processing allows for a richer texture and you can see how the dynamic range of the darks and shadows are brought forward.
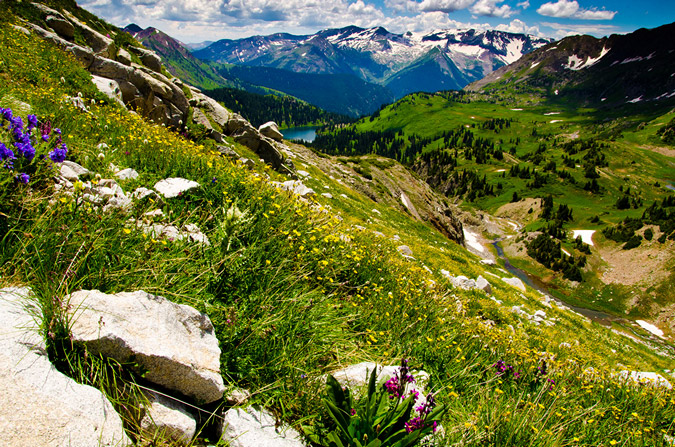
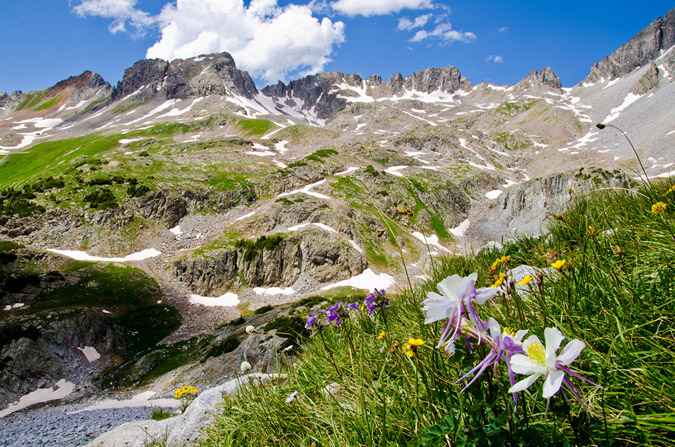
What was even more exciting was that the Maroon Bells peak through on the way up the trail to Geneva Lake as well. Thanks to the rift caused by the Fravert Basin, views of Maroon Peak were spectacular from the trail.
The wildflowers continued as we climbed up towards Geneva Lake. It was madness, truly.
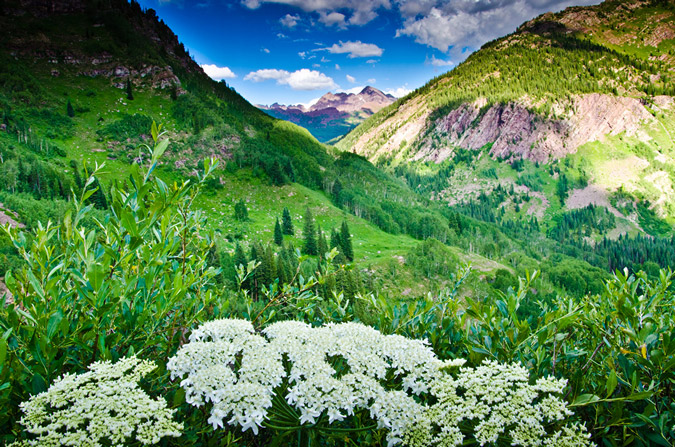
This was the first time I had seen the Maroon Bells this close up with a decent camera and I was not going to let the opportunity go to waste!
We reached Geneva Lake in quick order (about 2 hours) and found one of the six designated campsites near the lake. We opted to camp in site #2 even though we later found site #4 and #5 to be the superior sites. Site #2 sat on a large hill above the lake’s western shores and was right off of the trail. It was highly impacted, and offered several trails down to the lake for water fetching purposes. We found it to be quite a nice site. Camping at sites that are not designated for camping is prohibited at the lake; however, we noticed that it really did not deter others throughout the weekend from making sites of their own. Tisk Tisk!
After we got all set-up, I decided to go check out the lake and stumbled upon a huge waterfall near the mouth of the lake’s south shores. The waterfall was really rushing quickly and difficult to get down to, but I managed to get my tripod and camera into place for some fun shots of the water.
Next, my attention was on getting set-up for the sunset and for star trails photography, which I was pretty excited for. I set-up my tripod on the shores of the Geneva Lake and went to work.
I was so busy checking out the lake that I almost missed an opportunity to catch the last of the sun's light on some clouds over the lake. I think if I were to take this shot 3 minutes earlier, the clouds would have been even more vibrant. Oh well!
For this trip's star trails photo, I decided to do something a little different based on some techniques I've been reading about. Instead of just doing the night sky, I wanted the scene to be a bit more interesting this time. I decided to start the process earlier and take it deeper into the night, so I set-up before the sunlight had totally faded and started - ending after an hour and a half of photos. I opted for an f-stop of 5.6 instead of 3.5 (to allow for a slightly better depth of field) and I stuck with 30 second exposures. All-in-all, this photo is a compilation of 115 photos. The North Star is just out of frame on the top-left.
I really loved how the stars reflected in the lake too!
After nearly falling asleep while sitting next to my tripod in the dark, I decided it was time to hit the sack. Knowing that we were entering dangerous and unknown territory to ascend Snowmass Mountain's west ridge, we opted for a slightly later start, but not too late so we could be down before storms. Before our 3:30 AM and 4:00 start came, we were both awakened by a really pissed off coyote across the lake from us. That guy was howling and barking for a good 30 minutes and would have startled anyone, I don't care what you say!
Day 2: Snowmass Mountain via the West Ridge Route
Hiking in the dark is always interesting, especially when you don't know where you're going. We had the description from 14ers.com in print and on my Android phone 14ers.com app (thanks Bill), and headlamps with fresh batteries. We were able to find our way pretty easily though, and before we knew it we were heading up the insanely steep slopes of Snowmass' west ridge. The trail to this point had been very easy to follow except for a few spots and the route finding had begun since there was no trail after we crossed over creek that feeds Geneva Lake coming down from Siberia Lake. It was all scree, boulders and dirt from here on out. I made a quip to Sarah: "Welcome to the next three hours of your life!" We both laughed and continued up to a flatter section that was clearly perfect for a tripod. Since the sunlight was getting a bit better, I decided it was prime time to set-up for some HDR panoramic photography. The clouds and sky were an orange-pink-purple color to the south and west over the Raggeds Wilderness Area and Treasure Mountain. Additionally, Little Gem Lake was barely in view, which we had passed on the way up. Lastly, "Siberia Peak," a quite prominent and impressive mountain connected via a ridge with Capitol Peak was in the right 1/3 of the frame. Hauling a tripod up the side of a mountain is a pain in the butt, no question about it; however, the rewards are well worth it. Click on the photo for a much larger version.
We hung out in the cold for a bit longer, allowing the sun to just paint the tops of "Siberia Peak." You can really see the difference between HDR and non-HDR in the below photo (non-HDR) and the above photo (HDR).

I packed away my tripod and woke Sarah up and defrosted her (just kidding on both accounts). We headed up the side of Snowmass and located the obviously correct gully that was full of vegetation at its base. The climbing from here on out was quite enjoyable, despite what I had read about the route. You could choose between loose dirt and scree (great for coming down, not so much going up) or huge boulders and class 3/4 scrambling. We opted for the fun scrambling and it was one of the most fun routes I've been on. Sarah was loving the terrain too, which was a relief since you never know if a new climbing partner will like this sort of climbing or not. It takes a different breed to enjoy scrambling on steep boulders.
Sarah and I also have another thing in common - we both love taking pictures of wildflowers. She recently just gave her partner one of the coolest birthday presents there is - a bunch of framed photos of wildflowers that her partner had taken on 14er hikes.
As we climbed, the views became progressively better. Finally, Geneva Lake came into view for the first time and Sarah and I stopped to admire it, as seen in the below panoramic which includes Geneva Lake, Little Gem Lake and Sarah. Sarah (and anyone else) - click to see a much bigger version!
We were both just loving the scrambling!
We kept climbing up, opting to stay close to the tops of the higher ridge that was on the left side of the gully. Sarah was able to document my climb up.
 |
 |
And of course, I was able to photograph her photographing me - man we are nerds!
The rock was more solid than advertised, but we were very careful to test every hold and every step. Every once in awhile we were surprised by a loose rock or two, but so far, nothing had really warranted the dangerous warnings that I had read about on numerous sites and trip reports.
Staying near the ridge's top proved to be a great strategy because it offered us some really early views of the magnificent Capitol Peak, which I climbed last year and subsequently won a copy of Gerry Roach's 14ers guidebook through contest put on by his publisher for the efforts I put into my trip report. Not to digress, but I am really glad that people read, enjoy and use these reports, considering the fact that a report such as this one takes me roughly 16 hours of work between photo editing and writing.
Both Sarah and I were excited to see Capitol Peak... maybe me more than her - what do you think?
Pierre Lakes came into view as well, sitting below Capitol Peak.
Sarah caught me gazing at Capitol:
I felt this was also a great time to stop for a minute to get a really awesome panoramic. The basin below had really opened up quite a bit and the contrast from the low sun had made for some nice photo conditions. Click on the photo for a much larger version!
Continuing up the ridge line felt like the best way to go, despite the fact that we often ran into some obstacles that were challenging. Someone else must have agreed since we found a really groovy cairn up there too.
We finally crested the ridge and the first views of North Snowmass came into view. North Snowmass is one of two points that makes up Snowmass Mountain and is not ranked, but is 20 ft. above 14,000 ft. and has a whopping 40 ft. of prominence.
Sarah and I decided that on our way back we would for sure venture over to it, but for now we would concentrate on getting to the real summit of Snowmass Mountain. Here's a view of North Snowmass from the top of the ridge with Capitol Peak rising in a quite intimidating fashion to the north of the connecting ridge between North Snowmass and Capitol Peak.
From here, we opted to stay high on the ridge, which I affectionately nicknamed "Exposure-Palooza" after the famous rock band tour of the same namesake. The exposure from this ridge was fabulous. I was totally loving it despite Sarah telling me I was out of my mind. It was perfect exposure - totally manageable on one side (west) and totally freakishly nuts on the other (east). Sarah was a trooper though and kept up with me through the exposure-filled ridge scramble.
I think the exposure had grown on Sarah too, and before long I caught her flirting with it.
We reached the summit just shy of 9 AM, which meant we had made excellent time. There was still no sign of storms and we had the summit to ourselves. We could see some people below starting to make their way up, so I knew my time was limited to get a panoramic photo with my tripod. I set the tripod up right on the summit block, with one of the legs about 6 inches away from the greatly exposed face. This made for some adventurous maneuvering around the tripod as I shot. Sarah thought for sure I would step off the side and die. I'll admit, it was a bit surreal operating a tripod on the summit of Snowmass!
I tried to do some HDR work, but I don't think the lighting was best for it, so I opted to post-process a non-HDR version and an HDR version.

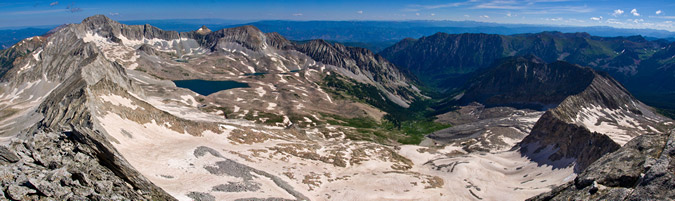
260 Degree Panoramic from Snowmass Mountain - at left - Capitol Peak - center - Snowmass Lake - right - Hagerman Peak
 360 Degree HDR Panoramic from Snowmass Mountain
This was Sarah's 15th 14er and she was pretty excited. As for me - it was #48. Another advantage of having a tripod on the summit - it makes for great summit portrait shots! Hooray for self-timers and tripods!
Eventually another climber (a 14ers.com member but I can't recall his user name) joined us on the summit from the standard route and took notice of the crazy guy behind the camera on a tripod. It was a pretty funny conversation:
Me: "How's it going!?"
Him: "Great man, you?"
Me: "Could not be better!"
Him: "What's your name?"
Me: "Matt."
Him: "Matt Payne?"
Me: "Yep!"
Him: "Oh cool - I love your pictures!"
Me: "Awesome - thanks man!"
He must have figured that I was the only person crazy enough to take a tripod up Snowmass Mountain. Haha. Either way, it was quite flattering and I really thought it was awesome that he knew who I was.
He reported to us that he wore only microspikes up the huge snowfield and that it was a challenge but doable. He had wished he had crampons but it seems they are not necessary at this time. Good to know for other climbers doing the standard route. He departed after only a few minutes and Sarah and I watched as another climber came up the snowfield, except this time, this climber went all the way up the basin and ascended North Snowmass via a very steep and sketchy rock face.
My attention was kept by the powerful Maroon Bells to the east of us, and so I decided to try my hand at a zoomed-in panoramic at 105mm. You can also click on the photo to view a larger version of it on Flickr in a new window - feel free to comment!
Sarah and I figured we had spent enough time on top - so I took some shots of the USGS marker. The second one has some split toning applied to it in Adobe Lightroom.
Sarah packed up and re-attached her helmet to her dome. She asked me one last time if we should do the traverse to Hagerman Peak from here. I explained that I had read several reports of that traverse and that it did not sound like something we would want to do. Take a look for yourself, or read lordhelmut's trip report.
I thought that the exposure was just as fun on the way down as it was on the way up. Sarah agreed.
Sarah and I reached the joining saddle between the down-climb back to camp and the traverse over to North Snowmass. The terrain below looked loose and nasty. We took our time and staggered it so that I would go down 20 feet and then step to a side, let her know she could come down while I stayed put, and then repeat until down to the saddle. The reason for this strategy is to prevent rockfall injury. It worked wonderfully.
On the way over to North Snowmass I had to perform some last minute heroics to prevent the mountain from falling down. Good thing I drank some gatorade!
We were able to join the solo hiker that had gone up to North Snowmass via the standard route just as another climber hit the summit of Snowmass Mountain.
Let me know if that is you on top of Snowmass and I can show you a larger version!
The reason I wanted to head over to North Snowmass was because I knew the views of Capitol Peak and the Pierre Lakes basin would be great - and I was totally right about that concept, no question!
Sarah was really in love with this place and commented that it was easily the most gorgeous 14er she'd been on to date. The connecting ridge between Snowmass and Capitol was quite intimidating. I know of only a handful of people that have successfully completed that traverse, and I am certain that each of them is either certifiably insane or... as Samuel Jackson would say, "One Bad Mutha $%^&*#."

Even without the tripod set-up, I was able to get a decent panoramic from North Snowmass, which included both Snowmass Mountain and Capitol Peak.

The last order of affairs was to get a really good glimpse of the valleys below, which Sarah caught me in the act of doing.
We decided to head back to the ridge for our downclimb. Now - this is where I made a critical error in judgement and should be critisized repeatedly, especially given my propensity to evaluate mountaineering accidents. Let me be clear - I was an idiot. A moron. A completely foolish jack-ass. There, I said it. Now you don't need to. If I had not made it out alive, I would fully expect someone to write an entire article about how stupid I was and how ironic the death was given my mountaineering safety articles. It really goes to show that even the most experienced people can make errors and find themselves in a bad place. There's no question in my mind that no one is immune to it. When Sarah and I head back towards the saddle between North Snowmass and Snowmass, I decided it would be a fine and dandy idea to take a short-cut to re-join the ridge for our descent. Instead of going back up the ridge we came down, I thought we could get away with going around the side and to the ridge. I figured that if we encountered anything too crazy that we could turn around and go back the way we came. From my vantage point, it looked totally doable to just skirt around the side. If you look at the photo below you can see what I saw - the ridge where we needed to head down from and the ledgy system that connected us to it.
What we found was something totally inviting yet progressively challenging. It was kind of like each time you passed an obstacle it got easier for a moment and then you found another slightly harder obstacle until you were up against an almost impossible one that was slightly more psychologically reasonable than turning around. I am not sure if that makes sense or not, but it did to me at the time. What we found ourselves in was a mess - a real pickle. The rock was loose. Insanely loose. Dangerously loose. And it was exposed with class 5 sections. Each foothold and handhold was tested by both of us with great diligence - which is probably what saved our lives. Eventually, I found myself perched on a ledge with nothing but veritcal rock above and below me, with a huge boulder between me and the next part of the ledge. The only reasonable foothold was a large protruding boulder below me that looked to be held in place by air and spiderwebs. I knew it would not hold, but I also knew I had no where else to go. So I asked Sarah what it looked like from her point of view. "It looks like it is going to go at any second." Crap. I triple tested all of my holds again and put a small amount of weight on it with my right foot. Sure enough - the huge rock went crashing down the mountain. I still get chills even thinking about it. I could feel the mountain shake each time it bounced below me. Not a good feeling. Too late to turn back. In what felt like a move out of a Spiderman movie, I crouched backwards while holding solid holds with my hands and found myself on the other side of the boulder obstacle in a move that must have looked like a circus act to Sarah. My heart racing, I stopped to take it all in and relax for a bit. What the hell were we doing? Why was I risking my life for a short-cut? So stupid. I kept saying it out loud too. "Sorry Sarah. I'm stupid. Sorry. Ahhhhh why am I so dumb!?" I think Sarah was regretting this climb now. I didn't blame her. The terrain we found ourselves in was rugged and surreal, sure - but wow - death defiance was not what I signed up for this week. Sarah smartly resigned to down-climbing below my spot and up a gully nearby, where she rejoined me at another crux. A small triangular rock was wedged vertically into the ledge, held in by only a half inch of rock. It was the only handhold between me and death. Footholds were scarce too - a small patch of dirt and rock about half a foot in diameter terminating in air. After this move, the route was clear to the ridge. I tested everything over and over again like Howard Hughes washing his hands. When your life is at risk a little OCD goes a long way. I nailed the move and breathed deep sigh of relief. Sarah watched me and gave it a go. Before she could even get to the crux, she stepped on some rocks and sent about 20 large rocks crashing down - with quite real psychological demoralizing impact. Sarah was freaked out. I talked her through getting to a safe place. Fortunately, her OCD rock-testing was on par with mine. She decided (smartly) again to down-climb for a safer area and eventually we were able to re-join each other on the ridge. Some short-cut. Lesson learned. Short-cuts are stupid, especially in the Elk Mountains! Here's some views of what we found ourselves in.
It was really irresponsible of me to put Sarah's life into this sort of danger and for that I will always feel bad.
After we rejoined on the ridge, we talked about the adventure we just had and how stupid it was. We were both pretty shaken. We were overly careful after this point and it slowed our descent a bit, but that was OK by both of us. Finally, we were able to reach the vegetation at the bottom of the 2000 ft. gully and enjoy more solid ground.
The wonderfully gorgeous flowers almost calmed my nerves, almost.

It was an impressive mountain to downclimb. Looking back, you really gained a sense of accomplishment at how far we had gone and how steep the mountain really was.
We ran into one other guy heading up as we were coming down. I was not quite sure what he was going to accomplish since storm clouds had already began to form in the area, but he seemed quite determined and I felt I had no place preaching to him about safety after the complete debacle I had just escaped (turns out he came walking by our campsite a few hours later stating he was turned around by weather - I was glad he made it down safely).
At this point I was just happy to be alive and enjoying the multitude of incredible wildflowers.

Speaking of wildflowers - I had never seen so many Columbine flowers. They were everywhere!
I stopped for one last look back up Snowmass Mountain. The gully with all of the green at the base was the one we went up.
We reached Little Gem Lake in no time at all and enjoyed the views from there.

Below Little Gem Lake was a really nice mountain creek draining out - it was surrounded by flowers, making for a really nice scene!
I could not help myself from stopping several times on the way back to Geneva Lake to take photos of the wildflowers and waterfalls that were everywhere. What a magical place!
The ubiquitous columbine flowers made for great backgrounds and bokeh subjects for other flowers in the area, which I accentuated in this desaturated photo. A lot of people ask me what bokeh is. According to Wikipedia, bokeh is is the blur, or the aesthetic quality of the blur, in out-of-focus areas of an image, or "the way the lens renders out-of-focus points of light." Differences in lens aberrations and aperture shape cause some lens designs to blur the image in a way that is pleasing to the eye (or not pleasing to the eye). Further research on the origin of this word took me to this article, where the author goes on to explain that, "it is a Japanese word meaning, roughly, "fuzzy," and it is used to describe old people with cobwebs in their heads among several other things — including the out-of-focus areas of photographs, which, I'm told, might more specifically be referred to as "boke-aji." So, long story short, the correct pronounciation is: BOW (as in bows and arrows) KUH (like Cuss). They even did a YouTube Video on it...

We finally reached our campsite at about 2:30 PM and cooked some delicious food. By now, other groups had made their way into the basin and a family of four had made camp just above us in a site out of view from our campsite. Sarah and I were pretty tired, so we took a nap while a thunderstorm rolled through the area. I've always loved sleeping in a tent during the rain.
Here's an elevation profile of our long day up Snowmass Mountain. Feel free to click on it for a larger version.

For day three, we decided it would be best for a 2:30 wake-up and a 3:00 start in hopes of catching the sunrise at some point for photography purposes.
Day 3: Hagerman Peak via the standard route (south ridge)
2:30 AM came pretty quickly and when it did, I asked Sarah if she wanted me to hit snooze. Hilarious half-awake banter ensued:
Me: "Want me to hit snooze?"
Sarah: "I don't want to ruin your sunrise."
Me: "That sounds like a tragic country song."
Sarah: (laughter)
Me: (singing voice and fluctuating notes) "Don't wanna ruin your sunrise."
Sarah: "It could be a song about a one-night-stand - leaving before the other person wakes up."
Both: (heavy laughter)
We opted not to hit snooze and embarked on another darkness-filled adventure. I had copied the notes from Gerry Roach's Colorado Thirteeeners guidebook as a reference, which proved quite handy despite the fact that we were in complete darkness all the way to the base of Hagerman. Despite our success in reaching the base of Hagerman, it did not come without some really tough route finding. For starters, the route was quite confusing and after the turn-off from the Trail Rider Pass trail, there was no trail. We found the creek drainage Roach describes in the route easily but were somewhat astounded and questioned the route when we found ourselves walking IN the creek since it was quite a narrow drainage (photos of the route during the daytime can be found later in this report). Additionally, the route went straight up the side of a hill through steep willow trees. Trails are for the weak, I suppose. Fortunately the willow trees were sturdy and we could use them to aid our climbing. Next, we found ourselves on top of a small 12,000 ft. mountain thinking it was the ridge after following the directions in the route description, only to realize it was opposite our current location. All was well though. We found what we thought was a gully Roach describes in the route, which turned out to be a much harder gully to the west of the actual gully. According to Roach, the gully was supposed to lead us to a "commodious grassy bench" but we had no idea what the hell a commodious grassy bench looked like, so that was not much help. Turns out, by the way - that commodious means spacious. Who knew!? We found ourselves on the south ridge pretty quickly. Unfortunately, because of the poor quality of the route and our misdirection, we did not reach the top in time for sunrise; however, we were able to make it to about 12,500 ft. and in view of the Maroon Bells and Pyramid Peak. There were some clouds hovering around Maroon Peak and it made for a very dramatic morning at first.
We were in pretty good position for sunrise and it was decent lighting for an HDR panoramic attempt. I feel like it turned out pretty well. The HDR process brings out all of the dynamic range of each bracketed photo, and in this case, it made for a graduated sunrise effect, ranging from pink to orange to purple. Quite stunning. Click on the photo to see a larger version.

Once the photo session was over, Sarah and I packed up and headed up Hagerman's south ridge, which we found to be pretty straight-forward and enjoyable. It was quite similar to Snowmass the day before - offering a choice between dirt and scree or boulders. We once again opted to up-climb the boulders and later down-climb the dirt and scree.
We reached the saddle between Hagerman Peak and Snowmass Peak (not to be confused with Snowmass Mountain - Snowmass Peak is an un-ranked 13er to the southwest of Hagerman, named only due to its dramatic view from Snowmass Lake) and enjoyed the amazing views below, as seen in the below panoramic from the saddle (click on the photo to see a larger version).

We stopped short of the summit for a bit to take it all in. What an amazing weekend we had had.
We reached the summit of Hagerman in no time at all from here after scrambling over a very small false summit. We could see a group of climbers below, heading up Snowmass Mountain from Snowmass Lake. I was pretty sure that this was the group that had talked to me earlier in the week about joining them, including Kara Bauman.
Sarah was pretty excited to reach the summit of her first 13er!
Once again, I was blessed with the powers of the tripod to ease my summit panoramic photography. Click on the photo to see a larger version.

If you'd like to see a very large version of this photo in flash with the ability to zoom in and out and move around, check out this page, but be warned - it is 22 megs!
We set-up for a summit portrait with Snowmass Mountain behind us.

After a few more minutes on the summit, we decided to head down the same way we came up.
The downclimb was quite a bit easier due to the slightly wet dirt and scree, which made for quite an enjoyable boot ski down.
During the downclimb we finally properly identified the commodious bench, which quickly became the subject of many jokes. The "commode" as it was referred as from now on served its purpose well.
The commodious grassy bench offered one other benefit as being a great place for photography of the Maroon Bells.
Directly next to the grassy bench was the gully we were supposed to take up earlier in the dark. Here's what the gully looks like if you are wanting to know.
We followed some rocky ledges (as described in Roach's book down and the rest of the route was fairly easy to follow back down the drainage.
Here are some photos showing the route down, obviously in reverse order if you were coming up. Hopefully these can serve as a better guide to you than Roach's book did for us.
The "trail" for Hagerman going up a "narrow drainage."
The willows you must upclimb for the standard route of Hagerman Peak.
The "excellent campsite" on Hagerman's standard route
This is where you turn off to go up the creek and faint trail for Hagerman's standard route.
The hike back to Geneva Lake was pleasant and the views along the way were great. Here's another vantage of the Fravert Basin.
And a sweet view of Siberia Peak from a clearing on the trail.
And back at Geneva Lake!
After reaching our campsite, we quickly tore down camp and packed out, making it back to the car just shy of noon - making for a great weekend of climbing!
These two mountains will forever hold a special place in my memory and my heart - if you've never been to Geneva Lake and the Lead King Basin - you really should! It is a magical place.
Here is an elevation profile of Hagerman Peak and then one of the entire trip - feel free to click on each to see a larger version.


Thanks for reading! Just a reminder - this site costs me time and money to maintain - if you find it useful, please consider supporting the site by remembering to use the affiliate links, especially if you purchase photography related gear from Adorama. Thanks!
References:
- http://www.tosv.com/uploads/FileUpload/mtnnames.pdf - Snowmass and its peaks: the name game. Catherine Lutz.
- Notes on Mountaineering in the Elk Mountains of Colorado, 1908-1910. Percy Hagerman.
{fcomment}
Panoramic Landscape Tutorial
A lot of people have been asking me how I do my panoramic landscapes, so I thought I would write up a guide on how to do them. Since I would love to see your results, feel free to share them with me and I will let you know what I think. Anyone can publish content on 100summits.com, so feel free to have at it! Without further ado, here's the tutorial:
The first thing you'll need to do is find a good subject to photograph. My personal favorite scenes are landscapes in the mountains; however, you could use this technique for all kinds of applications like in your house, architecture, real estate, city-scapes, etc. There are very few "rules of thumb" for shooting panoramics; however, the best thing to do is to develop a work-flow and be consistent with it. Ideally, you'll want a tripod and a good camera that allows you to change a ton of settings. My current camera is a Nikon D7000; however, most of my current (as of March 2011) panoramics were done using an older Sony DSC-828. Let's talk about the camera settings you'll want to change.
- Set focus to manual and infinity. You'll want as much depth of field as possible, with the lens focused on everything in the scene.
- Set mode to either aperture (A) or manual (M) mode. Aperture mode allows you to control the aperture of the lens (how much light is let in) and the camera automatically adjusts the shutter speed. Manual mode allows you to control both shutter speed and aperture. I prefer to shoot in manual mode. If you use aperture mode, it is generally best to use a lower f-stop (higher number) in order to make sure your depth of field correctly focuses on the whole scene. This will force you to have a longer shutter speed, and necessitate a tripod or a very steady hand. Note, almost all of my summit panoramic photos are taken without a tripod! Practice makes perfect.
- Set ISO to 100 if possible. The lower the ISO, the less noise will be present in your images. Lower light will force you to use a higher ISO unless you can shoot long-exposures on a tripod. Take a few practice shots and preview them to see how the image is exposed. This will indicate your need to adjust ISO and / or shutter speed / aperture. Play with the settings until you have a desireable photo.
- Set your exposure readings on the brightest subject in the scene so that you don't blow out highlights.
- Set metering to matrix / pattern.
- DO NOT set white balance to "auto." The same goes for ISO. If you use auto white balance or ISO, each frame you take of your scene will look different, making it impossible to align the images for stitching in post-processing. I like to use cloudy white balance for landscapes. It tends to bring out more color in the photo.
- Do not use a filter. Filters will also alter the way you will be able to stitch photos in post-processing.
OK so you have your camera dialed-in and ready to rock. You have your pristine scene and you are itching to get a panoramic. In order to get enough image data for the post-processing steps, you'll want to try to get at least 1/3 overlap on each photo. For example, if you shoot a photo and then move to the next photo slightly to the right, you'll want that second photo to overlap with the first by at least 33%. Also remember that there will be distortion from shooting this many photos, so you will want to compensate by taking extra photos of the top and bottom parts of the scene. You'll see what I mean later on.
Q: Should I shoot left-to-right or right-to-left?
A: It does not matter! Just be consistent. A good tip is to take all of your photos and then shoot one with your hand over the lens or with the lens cap on so that you know where the pano series ends on the memory card.
For some advanced shooting techniques, you can zoom into a scene and do panoramics that way. Just know that you'll need to be extra careful to get sufficient overlap and that the work in post-processing will take much longer. The reward is that you get a lot more detail in the photo. An even more advanced technique that involves this is called "gigapan."
OK so you have your photos and they are on your computer ready for processing, now what!?
Step 1: load the photos into your favorite panoramic software. Fortunately for you, there are some free versions out there. This tutorial will show you how use both Autopano Pro by Kolor, and Windows Photo Gallery Live by Microsoft.
I will start with Autopano Pro:
Open Autopano Pro and you'll see this screen:

For this tutorial, I am going to use a pano I made last year from Vestal Peak, taken from Vestal Lake. It is one of my favorite photos from last year. Using My Computer, find the folder where your photos are located. Holding down the control key, select each photo from the pano and drag-and-drop them all into Autopano Pro. Alternatively, you can drop a whole folder into Autopano Pro and it will try to figure out which panos can be made from those files, which is a pretty cool feature; however, sometimes it does not do this correctly, so your mileage may vary.

Once you drop your photos into Autopano Pro, you will see them in the left hand side. The next step is to hit the green play button which forces the program to detect possible panos from the photos you selected.
Once you click the button, it will begin the recognition process, seen below:

It will then paint a preview of the pano that will result in the stitching of the photos you selected, seen on the right hand side of the screen.
If everything looks good, hit the render button, which is the blue gear button. Hitting that button brings up a dialog box asking you how you want the file processed, where to save it, what to name it, etc. I prefer to stitch my panos into .TIFF files with no compression, especially if I am going to be post-processing HDR's etc. However, .jpgs are usually just fine. The settings I like to use are seen below:
The next step is to hit render and the software does its thing. It begins by blending all of the images together into one giant photo. This process takes longer if you have a ton of photos to combine.
The process completes and you can open the file up in your favorite image editing program or the default program (Windows Photo Gallery Live seen below). You can see how there is some blank areas as well as a little bit of distortion, both of which can be fixed in post-processing. You can see the gaps in the middle bottom, where I could have benefited from taking one more photo to cover that area. Oh well! My mistake is now for your benefit!
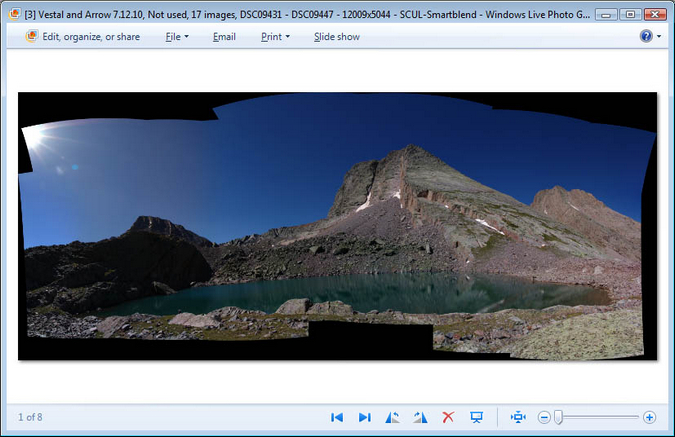
Go ahead and crop the image to your liking. I like to use Capture NX2 or Windows Photo Gallery Live to crop because they have the ability to show you an overlay of a rule of thirds grid. If you don't know what the rule of thirds is, read this article.
Most of the time, I like to crop as little as possible to retail all of the images. You can see the final result below. After cropping, feel free to do other post-processing work on the image before publishing it for others to view.
Now, let's see how to repeat this process in the free software, Windows Photo Gallery Live. Below you will see the images from the Vestal folder in Windows Photo Gallery Live. Holding down the Control key, select all of the photos needed for the pano. They will be highlighted.
Next, go to the menu and click on create. You will see the panorama option. Select it. You will see a "stitching panoramic photo" dialog box pop-up. Once it is finished, your stitched photo will be ready for further editing such as cropping.

After it completes the stitching, it asks you to rename the file.

The rest of the steps are identical to the final steps in Autopano Pro. Simply crop and edit as needed.
That concludes this tutorial on how to create panoramic photos. I'd love for you to share your results. Feel free to quickly register on the site and begin uploading your own photos today! If you'd like to be featured as an artist on 100summits.com, feel free to contact me!
I would love you to stay up-to-date on the latest trip reports, photography tutorials and other new material. Follow me on Facebook and Twitter!