One of the things I have become really excited about is taking High Dynamic Range (HDR) photos with my new Nikon D7000. Since I knew almost nothing about how to do this, other than the fact that I needed to take some bracketed photos at various exposure levels, I decided to check out a book from the Pikes Peak Library District, entitled, High Dynamic Range Photography for Dummies. This is a really great book for beginners, and I strongly recommend it if you are new to this method of photography.
I wanted to keep my first HDR project as simple as possible, so I set my camera on my dining room table, which has a very colorful tablecloth on it. I also set out the lid to a tupperware container that had just been covering my lunch. The sun was bright outside, but the light in that part of the house was mixed - some bright light was let in through the curtains, but there were tons of shadows as well - a seemingly perfect scenario for HDR work.
In the book, it explained that I needed to use my camera's built in auto exposure bracketing for the best results. Fortuntely, my new camera has this setting, which makes HDR work a lot faster. I set my exposure levels to -2, 0 and +2 exposure values (EV) for the auto-bracketing. If you're not familiar with bracketing, it is the practice by which you take three or more photos of the same subject (preferably with a tripod for best results), at a different exposure value for each photo taken. In this case, I did 3 photos to simplify the process, but one could use up to 9 or more photos if there is a large amount of dynamic range in the scene you are photographing. Dynamic range is basically the range of light the camera is seeing with its sensor. Most digital camera sensors can only fit so much light data onto their sensors, so if you are shooting a scene with lots of bright lights and shadows, high dynamic range is your solution to capture the full range of light. Once the photos with varying exposure values are taken, they are then combined using a process called tone-mapping, which maps all that light information onto a smaller amount of data. That is why it is called tone-mapping. I won't go into all of the specifics, but I hope that is enough for you to get a grasp of the concept.
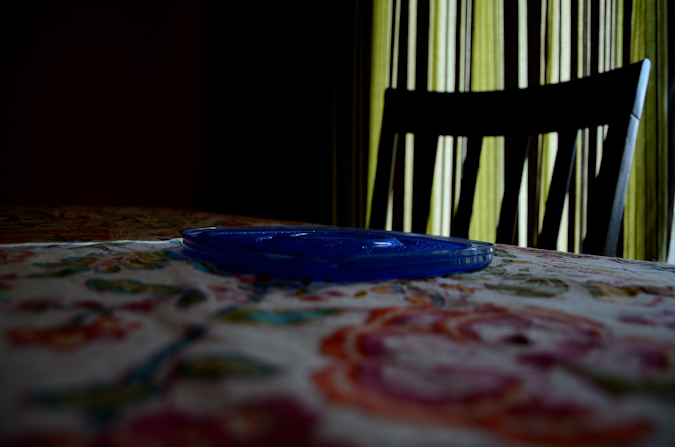
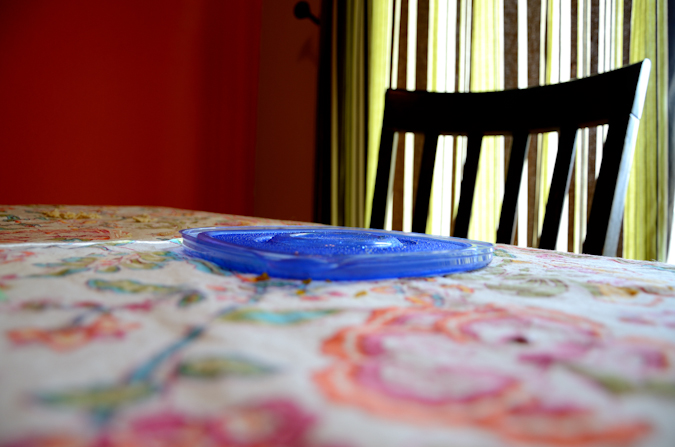
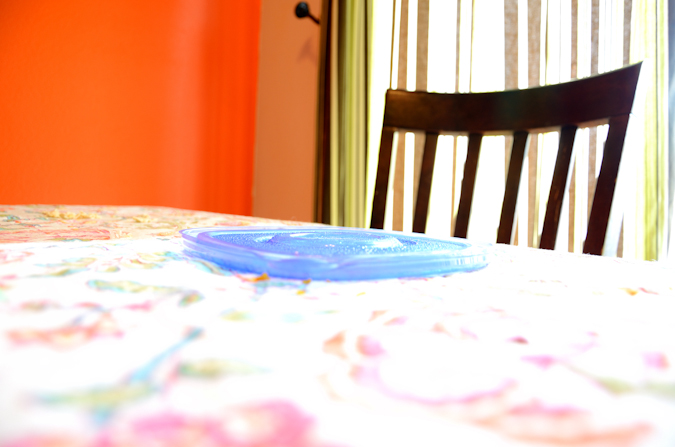
So, here are the three photos I took, one under-exposed (-2 EV), one properly exposed (0 EV), and one over-exposed (+2 EV), labled 1, 2 and 3 respectively.
Example 1: -2 EV
Example 2: 0 EV
Example 3: +2 EV
I shot all three photos in "RAW" mode. If you're not familiar with the difference between RAW and JPG, read this awesome article by the Digital Photography School. Using a program called Capture NX2, which is designed to handle the RAW .NEF files from my Nikon D7000, I applied some extra sharpness and color saturation to each photo (+20 sharpness and +40 saturation). I then converted each photo to a 16 bit .TIFF file. .TIFF files are great for working in HDR because they retain the full quality of the image, whereas .JPG files are compressed and lose some of the image quality.
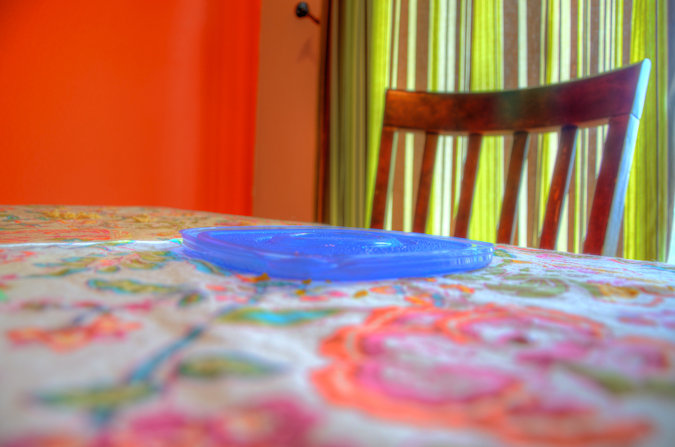
Once converted into TIFF files, I open up Photomatix Pro, software designed specifically for working with HDR images. In this great program, you can do amazing things with bracketed images, and there are literally thousands of different combinations of settings that can be used to tweak the image into something you like. The main settings that you will work with are Strength and Smoothness. These two settings control a great deal of how the final image turns out. I won't go into depth here on the various settings in Photomatix since I am still learning, but I wanted to highlight those two settings as being very important. The best way to use this program is to play with each setting and see what kind of effect it has on your photos.
With the three images loaded, I set the Strength to 100 and the Smoothness very high (I don't recall the exact number). I reduced Chromatic Abberations and hit process - away to the races!
The final product is something that I feel looks great. You can mouse over the image to see what the original image at 0 EV looked like vs. the HDR version.
I really like the look of HDR photos, and I am excited to play more with this on my hikes this summer to produce some great images. If you have expertise in working with HDR, I'd love for you to comment or Register on the site and add your own article on how your HDR workflow differs from mine.
If you enjoyed this article, remember, you can always stay up-to-date on new articles and trip reports by following 100summits on Facebook and Twitter.